background image

01/18

24

9.

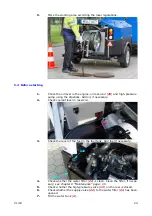
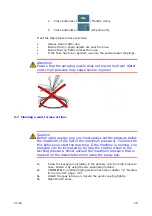
Mark the working area according the local regulations.

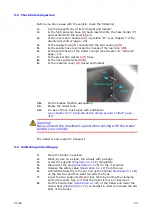
5.4  Before starting

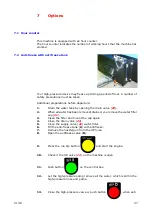
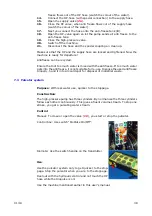
1.

Check the oil level in the engine, oil reservoir (

29

) and high-pressure 

pump using the dipsticks. Add oil, if necessary.

2.

Check coolant level in reservoir.

3.

Check the level of the fuel in the fuel tank. Add fuel if necessary.

4.

Check whether the water filter (

21

) is clean. Clean the filter, if neces-

sary; 

see chapter 8 "Maintenance" page.: 45

.

5.

Check whether the high-pressure valve (

13

on the reel is closed.

6.

Check whether the supply valve (

22

) to the water filter (

21

) has been 

opened.

7.

Fill the water tank (

4

).

Check

Add

Summary of Contents for MULTI JET

Page 1: ...USER S MANUAL MULTI JET Edition 04 Date Wednesday 24 January RIONED P O Box 5070 5004 EB Tilburg The Netherlands Telephone 31 13 5479100 E mail info rioned com Internet www rioned com...

Page 2: ...nsent of RIONED This restriction also holds for the corresponding drawings and diagrams RIONED has the right to change parts at any time without any prior or direct warning to the client Also the cont...

Page 3: ...machine Chapter Technical specifications gives information about the working characteris tics performance under normal use and construction specifications Control is the next chapter This chapter exp...

Page 4: ...01 18 4...

Page 5: ...e 11 3 Technical Specifications 13 3 1 General 13 3 2 Motor 14 3 3 Pump 15 4 Construction 17 5 Control 21 5 1 Hitching up the trailer 21 5 2 Check before departure 23 5 3 Unhitching and setting up 23...

Page 6: ...3 Minor servicing 45 8 4 Hydraulic system 46 8 5 Maintenance wheel bearings and wheel nuts 47 8 6 Check the brake drums and the brakes 47 8 7 Extensive periodical maintenance 48 8 8 Maintenance scheme...

Page 7: ...is also included can be used This manual contains all the necessary information concerning control and maintenance If the device is positioned correctly properly controlled and reg ularly maintained...

Page 8: ...01 18 8...

Page 9: ...top This machine is equipped with an emergency stop By operating the emergency stop the machine will stop immediately Do not use this button for normal stopping Only use it when dangerous situations o...

Page 10: ...to dangers of electrical or mechanical failures 2 7 Working safely The in this manual named security prescriptions the national prescriptions to prevent accidents and the internal labour company and...

Page 11: ...e machine is conform the user s manual The limits that are written in chapter Technical Specifications and Appendix may never be overstepped If the machine does not work or give troubles it is forbidd...

Page 12: ...01 18 12...

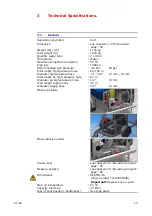
Page 13: ...e 80 150 m Diameter high pressure hose 5 8 13 mm 16 mm Total length 2e high pressure hose 60 m Diameter 2e high pressure hose 1 2 13 mm Total length supply hose 35 m Diameter supply hose 3 4 19 mm Pla...

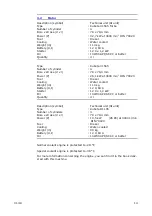
Page 14: ...3000 min 1 DIN 70020 Fuel Diesel Cooling Water cooled Weight m 110 kg Battery U I 12 V 63 A Starter 12 V x 1 2 kW Oil 10W30 API SF CC or better Quantity 4 l Description symbol Technical unit SI unit...

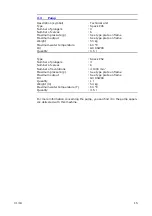
Page 15: ...er temperature 60 C Oil GX 80W90 Quantity 3 5 l Type Speck P52 Number of plungers 3 Number of valves 6 Number of revolutions 1000 min 1 Maximum pressure p See type plate on frame Maximum output See ty...

Page 16: ...01 18 16...

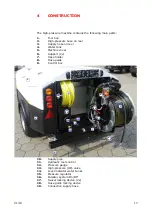
Page 17: ...5 Machine cover 6 Support 2x 7 Hose holder 8 Hose guide 9 Control box 10 Supply pipe 11 Hydraulic reel control 12 Pressure gauge 13 High pressure HP valve 14 Level indicator water tanks 15 Pressure r...

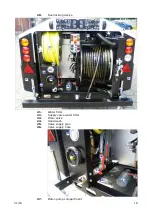
Page 18: ...ing device 21 Water filter 22 Supply valve water filter 23 Drain valve 24 Hand wash 25 Valve supply pipe 26 Valve supply hose 27 Motor pump compartment 1 12 14 15 17 18 19 9 2 8 4 4 6 6 3 16 17 21 10...

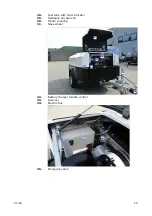
Page 19: ...18 19 28 Fuel tank with level indicator 29 Hydraulic oil reservoir 30 Trailer coupling 31 Nose wheel 32 Battery charger remote control 33 Receiver 34 Electric box 35 Emergency stop 27 28 30 31 29 5 34...

Page 20: ...01 18 20 36 Connection remote control 13 3 35 2 11 9 22 23...

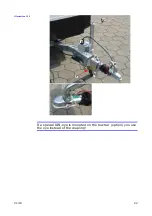
Page 21: ...uired height heart cone between 38 and 42 cm from the ground and your car will not be able to tow the trailer 3 If the hitch on the car is at the required height push the safety lock Illustration 5 1...

Page 22: ...01 18 22 Illustration 5 1 1 If a special DIN eye is mounted on the tow bar option you use the eye instead of the coupling C B F E D A...

Page 23: ...antifreeze see chapter 5 10 Using the device during periods of frost page 31 Warning Never exceed the maximum speed when driving with the trailer behind your vehicle The trailer is now ready for tran...

Page 24: ...essary 2 Check coolant level in reservoir 3 Check the level of the fuel in the fuel tank Add fuel if necessary 4 Check whether the water filter 21 is clean Clean the filter if neces sary see chapter 8...

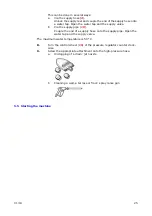
Page 25: ...supply pipe 10 Couple the end of a supply hose onto the supply pipe Open the water tap and the supply valve The maximum water temperature is 50 C 8 Turn the control wheel 15 of the pressure regulator...

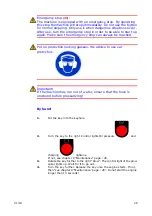
Page 26: ...g glasses We advise to use ear protectors Important If the machine has run out of water ensure that the hose is unwound before pressurizing By hand 1 Put the key into the keyhole 2 Turn the key to the...

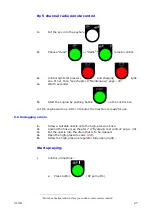
Page 27: ...x Let the engine warm up After 3 minutes the machine is ready for use 5 6 Unclogging a drain 1 Screw a suitable nozzle onto the high pressure hose 2 Unwind the hose see chapter 7 4 Hydraulic reel cont...

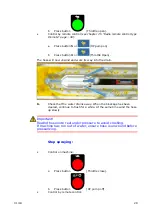
Page 28: ...its way into the drain 6 Check that the water drains away When the blockage has been cleared continue to flush for a while At the same time wind the hose up slowly Important Rewind hose onto reel und...

Page 29: ...ution Before using a spray gun you must always set the pressure below the maximum the half of the maximum pressure You must do this before you start the machine If the machine is running the pressure...

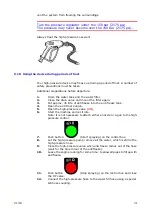
Page 30: ...om the pressure gauge 12 on the machine when the spray gun is open 5 Pull the trigger of the spray gun Stop spraying Release the trigger of the spray gun 5 8 Stop working 1 Press button Throttle close...

Page 31: ...ntifreeze into the anti freeze tank 4 Open the anti freeze valve 5 Open the high pressure valve 13 6 Start the machine and let it idle Note it is not necessary to attach either a nozzle or a gun to th...

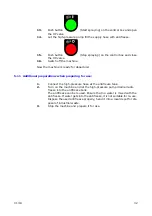
Page 32: ...Additional preparations when preparing for use 1 Connect the high pressure hose at the antifreeze tank 2 Turn on the machine and let the high pressure pump drain all anti freeze into the antifreeze t...

Page 33: ...tle open more water and more pressure Throttle close less water and less pressure Signal lamp Charging Burns if there is no charge to the bat tery Signal lamp Oil pressure Burns if there is not enough...

Page 34: ...01 18 34 Run dry protection option 12 volt accessories Back plate Emergency stop 6 2 Pressure gauge 6 3 Pressure regulator Working area Danger zone Maximum allowed pressure Less pressure More pressure...

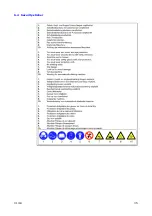
Page 35: ...01 18 35 6 4 Security sticker...

Page 36: ...01 18 36...

Page 37: ...3 2 When all water has been removed drained you remove the water filter cap 21 3 Clean the filter and mount the cap again 4 Close the drain valve 23 5 Close the supply valve 22 water filter 6 Fill the...

Page 38: ...mixed with the antifreeze If too much water gets into the antifreeze it is not suitable for re use Dispose the used antifreeze properly hand it into a local depot for disposal of industrial waste 7 3...

Page 39: ...by means of the hose guide with the other hand to the required place 7 5 Radio remote control type Riomote Purpose To operate the high pressure machine from a distance To operate the transmitter Chec...

Page 40: ...n high quality before leaving the factory If any disturbances would appear check the part trouble shooting 7 6 Hose guide Purpose To guide the HP hose into the sewer To wind the HP hose on the reel dr...

Page 41: ...tury Place the suction ventury in a reservoir Place the transparent hose there where the dirt must come Check if the HP valve to the HP hose is closed Start the machine Switch on the high pressure pum...

Page 42: ...an turn freely without resistance To get the HP reel in hydraulics you put the device in position B The pin gets back in locking position and you can use the hydraulics again 7 10 Working lamp By mean...

Page 43: ...by pass pipe Open the HP valve 13 Push button or by use of a remote control Use the throttle control to regulate the water temperature Push button or Engine speed up water warmer Engine speed down wa...

Page 44: ...rds to acti vate the hot water system Remark When using the warm water sys tem the pressure will go back and less water will come out of the HP hose Attention The water is coming with 55 de grees B ou...

Page 45: ...consumption of the engine can be more than usually 2 Cleaning water filter 21 a Close the supply valve 22 in the suction pipe b Unscrew cap from the filter piece c Clean the filter and concerning par...

Page 46: ...nd gasket Regularly clean the high pressure control Carefully remove all dirt Proper maintenance will increase the service life of this part Changing the pump oil Change the pump oil in the high press...

Page 47: ...the brake cables and hose and check that the brakes oper ate smoothly 2 Rotate the brake drum in the normal direction and fasten the adjusting nut until the brake drum starts rubbing Then rewind the n...

Page 48: ...engine Every 250 working hours or at least once every six month Lubricate moving parts Every 250 working hours or at least once every six month Cleaning pressure regulator Every 250 working hours or a...

Page 49: ...es blocked Carefully loosen the valves and des cale them if necessary V belt not sufficiently tightened Tighten the V belt replace if neces sary Suction valves worn out Contact the service department...

Page 50: ...eck fuses Contact your supplier by repeating dis turbances Transmitter is not on Put button 0 1 to position I Transmitter out of reach from receiver Put the machines closer on Put trans mitter closer...

Page 51: ...01 18 51 10 Exploded Views and part lists...

Page 52: ...se P52 120 120 Seal Sleeve P52 120 120 36 3 66 052 120 036 Leckagedichtung P52 72 200 Leakage Seal P52 72 200 36 3 66 052 120 036 Leckagedichtung P52 100 150 Leakege Seal P52 100 150 36 3 66 052 120 0...

Page 53: ...01 18 53 10 2 Exploded view Pump P45...

Page 54: ...101 013 07 3006 Valve Plug 14 1 67 262 101 014 07 3005 Valve Plate 14C 2 67 262 101 314 06 0496 O Ring 14D 1 67 262 101 414 07 1941 Spring for Kick Back Valve 15 21 67 262 101 015 07 1662 Spring Plate...

Page 55: ...RIONED MULTI JET Machine number is in compliance with the Machinery Directive 2006 42 EC and 2007 46 EC is in conformity with the provisions of the following other EEC direc tives 2014 30 EC the foll...

Page 56: ...s Managers EXPORT D Maas Area Sales Manager Centaurusweg 45 5015 TC Tilburg Tel 31 13 547 91 00 Fax 31 13 547 91 04 REPAIR THE NETHERLANDS Rioned Centaurusweg 45 5015 TC Tilburg Tel 31 13 547 91 50 Fa...

Page 57: ...01 18 57...

Page 58: ...5 955 1360 180 Reflector 4x Merk Proplast Goedkeuring 021A E13 0491 Kentekenverlichting 12 Volt 5 Watt 2x GEKA E1 22822R4 ZESKANTBOUT DIN 933 M12x80 VLAKKE SLUITRING GROOT DIN 9021 13 VLAKKE SLUITRING...

Page 59: ...er 1 3 octave 1 1 octave Frequency weighting A C Z flat Time weighting Fast slow and optional impulse Logging to SD Card All levels simultaneously Short time levels including spectrum for 1 second or...

Page 60: ...01 18 60...
Page 61: ...mum water temperature 25 mechanical failures 10 O Oil 15 original spare parts 11 P protection facilities 10 Protection looking glasses 9 protection looking glasses 26 Puncture nozzle holes 48 Q qualif...

Reviews: