background image

COMPANY CONFIDENTIAL 

Freephone: 0800 214503  |  Tel: +44 (0) 1444 871349  | Fax: +44 (0) 1444 870228   

E-Mail: [email protected]  |  Web: www.ringdale.co.uk 

Ringdale UK Ltd, 26 Victoria Way, Burgess Hill, West Sussex, RH15 9NF United Kingdom 

2)  The screen recalibration will appear next, and can be skipped if screen alignment is normally 

satisfactory. 


The settings which can be changed in this interface are shown below: 

Setting 

Purpose 

Value (Defaults) 

Recalibrate 

Allows for the screen 
to be recalibrated in 
the event the screen 
button press 
alignment is not as 
expected 

[N/A] 


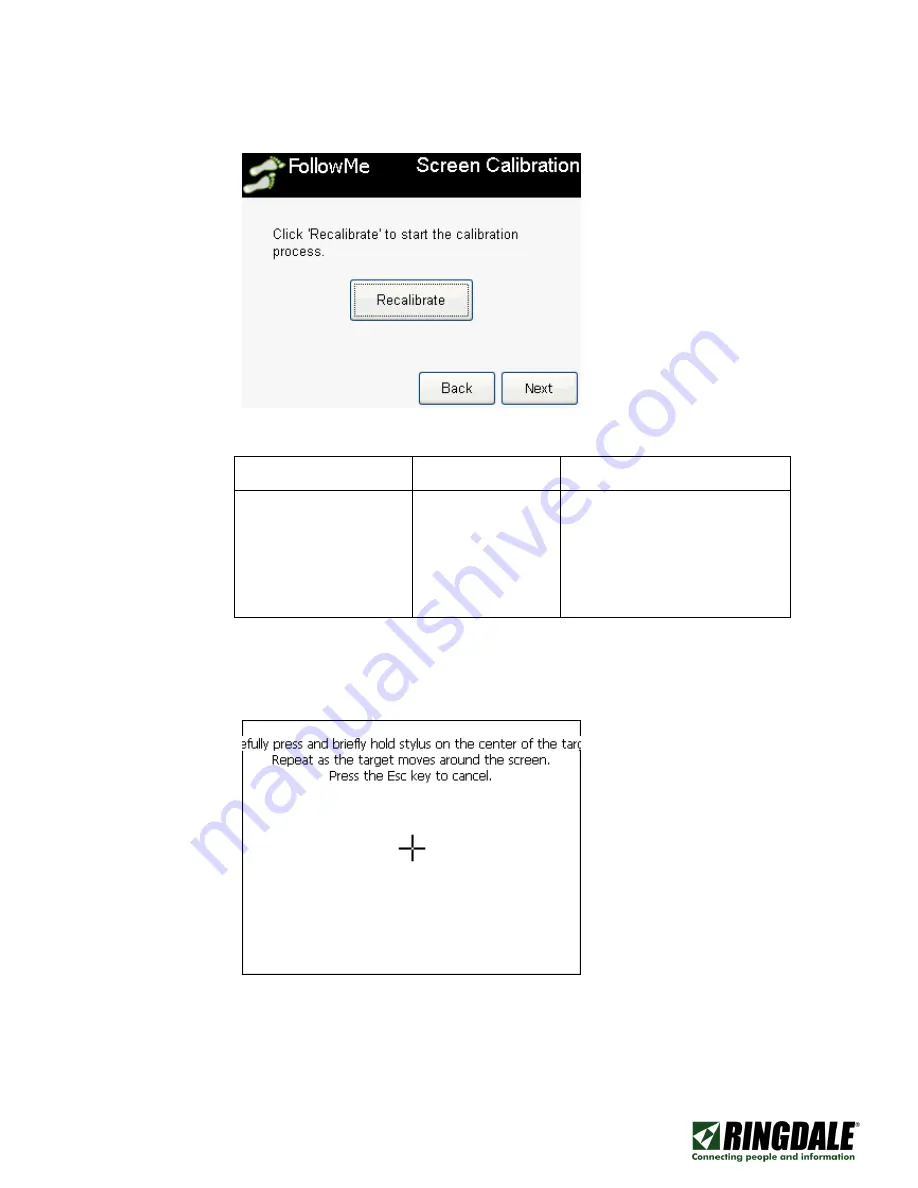
In the event the “Recalibrate” button is pressed, the following screen will appear, and the on 
screen instructions should be followed, pressing on the “+” carefully ensuring the screen is 
correctly calibrated. 


The on screen instruction states the following: 

Carefully press and briefly hold stylus on the center of the target.  Repeat as 

the target moves around the screen.  Press the Esc key to cancel.

” 

Summary of Contents for FollowMe

Page 1: ...information in this publication is correct but will not accept liability for any error or omission Trademarks All trademarks are hereby acknowledged Quick Installation Guide FollowMe Terminal Document Control Purpose This quick installation guide provides an overview of how to install and configure the FollowMe Terminal hardware device Date 4th April 2013 Revision 1 2 Overview The FollowMe Termina...

Page 2: ...ted Kingdom Pre Requisites To successfully install the FollowMe Terminal the following pre requisites need to be met Network Network connection 10 100 BASE TX RJ45 Network cables Two network cables are required one from the FollowMe Terminal to the copier printer or MFP and one from the FollowMe Terminal to the main network outlet FollowMe Q Server Version 6 x or later FollowMe Embedded Terminal L...

Page 3: ...owMe Terminal embedded software client to the server The ports and encryption used for communications are detailed below Product Target Port Protocol Target Purpose FollowMe Terminal 9100 TCP FollowMe Q Server Communications between the FollowMe Terminal embedded software client and the Q Server software on the server FollowMe Q Server 8450 TCP FollowMe Terminal Communications between the Q Server...

Page 4: ...gure and connect device and for the terminal then to be attached to an output device Front The FollowMe Terminal front view consists of a 7 LCD screen There are also optional reader attachments which allows for a compatible reader to be mounted to the left or right of the screen Rear The rear of the FollowMe Terminal allows for the FollowMe Terminal to be mounted using VESA 75 or VESA 100 standard...

Page 5: ... Connections Description LAN 2 The LAN provides the network connectivity to the FollowMe Terminal Unlike other FollowMe network products the FollowMe Terminal features a built in HUB rather than a pass through network interface meaning both LAN ports act the same allowing either the LAN or Device to be attached in any which way USB 2 The USB provides connections for the various FollowMe card reade...

Page 6: ...om Typical Configuration A typical configuration where the FollowMe Terminal is used is shown by the following diagram In this configuration the FollowMe Terminal has both its LAN ports attached one to the main network and the other to the Copier Printer or MFP The card reader is attached via USB to the FollowMe Terminal and this could also be a USB fingerprint reader or other supported USB authen...

Page 7: ... Setup wizard will appear this wizard will allow basic settings to be configured to allow the FollowMe Terminal to be discovered and configured in the network The initial setup workflow is as follows Initial Setup 1 On first use the first screen which will be seen is the below The settings which can be changed in this interface are shown below Setting Purpose Value Defaults Device Name The devices...

Page 8: ... interface are shown below Setting Purpose Value Defaults Recalibrate Allows for the screen to be recalibrated in the event the screen button press alignment is not as expected N A In the event the Recalibrate button is pressed the following screen will appear and the on screen instructions should be followed pressing on the carefully ensuring the screen is correctly calibrated The on screen instr...

Page 9: ...sed to achieve better calibration of the screen When the calibration completes the following screen will appear to exist simply press on the screen again 3 The network configuration will appear next The settings which can be changed in this interface are shown below Setting Purpose Value Defaults Obtain via DHCP The default setting is to obtain the IP address via DHCP Default Specify an IP Address...

Page 10: ...nd how to access the devices embedded web server to configure the device Forcing the Initial Setup Mode In the event it is required to enter the Initial Setup mode at any point after it has completed for the first time this can be done by following the steps below 1 Press on any area highlighted in red on the screen The press should be held for a period of 10 seconds and then released 2 Once relea...

Page 11: ...ce authenticated the Service Mode screen will appear in this screen only the Initial Setup Mode should be selected IMPORTANT It is strongly recommend that one does not select other settings such as Firmware Update unless one has a firmware file ready upload as this will render the unit unusable until a firmware file is loaded 4 The device will now enter the Initial Setup mode please follow the Ini...

Page 12: ...ded Web Server The built in embedded web server allows for the FollowMe Terminal to be configured over a web browser 1 Connect to the FollowMe Terminal via the following URL http DEVICE_NAME_OR_IP_ADDRESS FollowMeEmbedded The DEVICE_NAME_OR_IP_ADDRESS would be replaced with the FollowMe Terminal s network address 2 Once connected the device will prompt for credentials The default credentials are l...

Page 13: ... Defines which language the Embedded front panel Graphical User Interface GUI is displayed in Switch to user profile language when available Defines if the Embedded front panel Graphical User Interface GUI language will be changed to match the users profile language at time of login Prompt Type The authentication method which will be displayed on the front panel is chosen here for example it defin...

Page 14: ... successful authentication or feedback beeps d Optionally change the logging setting Setting Purpose Logging level The embedded software client is capable of logging additional information or diagnosing an issue The default logging option is Normal and should not be changed unless specifically requested by a FollowMe support representative 4 The Device Settings can also be configured a Optionally ...

Page 15: ...o authenticate the user Admin Password The administrative password which is used on the embedded web server to authenticate the user c Optionally the Networking settings can be changed Setting Purpose Value Defaults Obtain via DHCP The default setting is to obtain the IP address via DHCP Default IP Address Subnet Default Gateway One can optionally specify the devices IP address subnet and gateway ...

Page 16: ...e unit resides so it can provide local time Use Daylight Savings The daylight savings option allows for the time to be adjusted according to the time zone daylight savings setting e Optionally the Network Time Server NTP Settings can be changed Setting Purpose Enabled Enables the Network Time Server NTS NTS Address Specifies the Network Time Server NTS IP address Refresh Interval Specifies the tim...

Page 17: ...ings section g Optionally the Sound settings can be changed Setting Purpose Clicks Enables or disables the button clicks when pressing on the front panel Volume Specifies the click volume when enabled h Optionally add a Logo Image can be displayed in the top left of the screen When clicking on the Edit button the following will appear here the logo image should be chosen and the size should be 42x...

Page 18: ...Ringdale UK Ltd 26 Victoria Way Burgess Hill West Sussex RH15 9NF United Kingdom Setting Purpose Enabled Enables or disables the button clicks when pressing on the front panel Inactivity Timeout seconds Specifies the inactivity timeout before the screensaver is switched on this value should be less than the Backlight Inactivity Timeout ...

Page 19: ...loader tool is running the FollowMe Terminal should be added to the list of devices to deploy this is done by clicking the Add button Multiple IP addresses can be entered when entering they should be separated via a carriage return 2 When configuring the FollowMe Terminal an Action must be selected The available actions for the FollowMe Terminal are the following Setting Purpose Install The instal...

Page 20: ...erminal 3 Select the Terminal tab page to enter the FollowMe Terminal device specific settings a Under Device Credentials enter the FollowMe Terminal embedded web browser Username and Password The default credentials are listed below Input Field Value Defaults Username admin Password password b When using the Update Settings Action the device settings can be applied Settings Enter the standard set...

Page 21: ...be used for communication with the FollowMe Q Server Logging The embedded software client is capable of logging additional information or diagnosing an issue The default logging option is No debug and should not be changed unless specifically requested by a FollowMe support representative Authentication Prompt The authentication method which will be displayed on the MFP front panel is chosen here ...

Page 22: ...ader on card swipe Beeps the Proximity card reader when a card has been read Beep Proximity reader on authentication Beeps the Proximity card reader upon a successful authentication or feedback beeps Importing Settings For devices with the embedded software client already loaded the embedded settings can be imported directly from the device to avoid incorrect data entry and simply the configuratio...

Page 23: ... subnet address or the IP Address of the device xxx xxx xxx 255 will find all devices on the network without having to enter a specific IP address and click OK The address will appear on the list in the Network Restrictions dialog box c Ensure that the address is selected highlighted before clicking OK d Click the Requery Network button to list the device in the Devices window 2 Configuring a devi...

Page 24: ...ched and configured one also needs to add a device profile into the FollowMe Q Server software Adding the Device Profile 1 Add a new printer 2 Select the FollowMe Print Spooler and enter the printers IP Address or FQDN and give it a descriptive name 3 Specify the IP Address or FQDN of the FollowMe Terminal IMPORTANT The FollowMe Terminal will have a different IP address to the printer MFP 4 Select...

Page 25: ...hical User Interface GUI is displayed on the front panel requiring a User once authenticated to select which print jobs they wish to release Enrol GUI Setting Defines if the Enrolment Graphical User Interface GUI is displayed allowing the User once authenticated to assign an ID card to themselves without any administrative overhead Cost Code GUI Setting Defines if the Cost Code Graphical User Inte...

Page 26: ... unknown Since the FollowMe Terminal can be configured in DHCP or static IP mode it means the recovery process will differ slightly depending on which mode DHCP Attach the FollowMe Terminal to the network wait for it to pick up an IP address and then check in the DHCP server to see which IP address has been assigned Static For static addresses or when no access is available to the DHCP server to i...

Reviews: