


• Bolt and Straight Threads – Thread the desired
length – watch closely for any interference between
the parts.
Move the throwout lever to the OPEN position, retracting
dies.
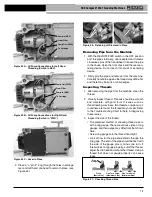
Receding Self-Opening Die Heads
The Model 728 and 928 receding self-opening die heads
are used on 1233 threading machine for 2
1
/
2
" and 3" pipe
sizes. A trigger is used to open the die head when the
thread is complete, and is adjustable to change thread
length.
Figure 15 – Receding Self-Opening Die Head
Inserting/Changing the Dies
1. Place the die head with numbers facing up.
2. Pull back on adjuster knob on die head and fully
open die head by sliding cam plate in direction of
CHANGE DIES arrow on cam plate.
Figure 16 – Inserting Dies
3. Remove dies from die head.
Insert appropriate dies into the die head, numbered
edge up. Numbers on the dies must correspond with
those on the die head slots
(see Figure 16)
. The die
slots have a ball detent that engages with the groove
on dies when properly installed. Always change dies
as sets – do not mix dies from different sets.
4. Pull back on adjuster knob and rotate cam plate to
desired size setting.
5. Engage adjuster knob into slot.
Adjusting Thread Size
1. Loosen the adjustment nut for the desired pipe size.
2. When setting for new dies, start with the adjusting
slide index line aligned with the size mark on the size
bar.
3. If thread size needs to be adjusted, set the index line
slightly off the mark on the size bar in the + direction
(larger thread diameter, less
turns of fitting engage ment)
or in the - direction (smaller
thread diameter, more turns
of fitting engagement) as
shown on the size bar.
4. Tighten the adjustment nut.
Adjusting Thread Length
1. Loosen the screw on bot-
tom trigger.
2. For short threads, shift the
bottom trigger towards the
machine spindle. For long
threads, shift it away from the spindle (
see Figure 18
– factory settings shown). Long threads are typically
preferred in Far East and short threads in Europe. Set
as desired.
3. Re-tighten the screw.
Figure 18 – Adjusting Thread Length
11
300 Compact/1233 Threading Machines
Figure 17 – Adjusting
Thread Size
Size
Bar
Adjustment
Slide Index
Line
Front
Back
Adjuster
Knob
Adjuster
Slide
Trigger
Cam Plate
Size Bar
Adjustment
Nuts
“Change
Dies”
Arrow
Groove
Ball
Detent
Ball
Detent
For Long
Threads
For Short
Threads
Top Trigger Hole
Location
Short Threads
Long Threads
Top Trigger
Bottom
Trigger
Adjustment
Nut
+
-
Summary of Contents for 300 Compact
Page 22: ...20 300 Compact 1233 Threading Machines ...
Page 44: ...42 Fileteuses 300 Compact et 1233 ...
Page 85: ...83 300精致型 1233型电动套丝机 ...
Page 86: ...84 300精致型 1233型电动套丝机 ...


