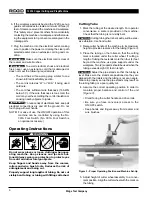
background image

Cutting Tube

1. Mark the tubing at the desired length. For operator

convenience, a scale is provided on the machine.
Check that the tubing is not visibly bent.

Cutting tubing that is bent will result in exces-

sive vibration. Use hand cutter.

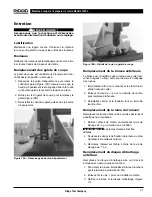
2. Raise cutter handle of the machine to its maximum

height to provide clearance for the tubing (Figure 3).

3. Place the tubing on the rollers so that the cutting

mark is located under the cutter wheel. If cutting a
length of tubing that extends more than four (4) feet
beyond the machine, use pipe supports under the
workpiece. Two (2) supports should be used when the
tubing exceeds eight (8) feet in length.

Adjust the pipe stands so that the tubing is

level. Make sure the stands are positioned so they are
aligned with the rollers and the tubing is not at an angle.
Failure to properly set up the pipe stands may result on
the tubing falling or a poor quality cut.

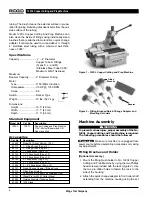
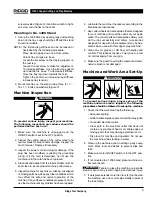
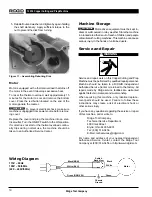
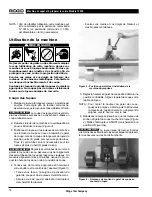
4. Assume the correct operating position in order to

maintain proper balance and control of the unit
(Figure 3).

• Stand facing the cutter handle and drive rolls.

• Be sure you have convenient access to the

ON/OFF switch.

• Keep hands and fingers away from reamer and

wire brushes.

Figure 3 – Proper Operating Position and Machine Set-Up

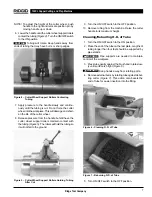
5. Adjust height of cutter wheel assembly to a conve-

nient position. Align the cutter wheel with the mark on
the tubing.

Ridge Tool Company

6

6. If the workpiece extends beyond the 122XL, set-up

guards or barricades to create a minimum of three (3)
feet of clearance around the machine and workpiece.
This “safety zone” prevents others from accidentally
contacting the machine or workpiece and either caus-
ing the equipment to tip or become entangled in the
rotating parts.

7. Plug the machine into the electrical outlet, making

sure to position the power cord along the clear path
selected earlier. Use an extension cord in good con-
dition.

Make sure the electrical cord is clear of

the reamer and wire brushes.

To avoid electrical shock and electrical

fires, never use an extension cord that is damaged or
does not meet the following requirements:

• The cord has a three-prong plug similar to one

shown in Electrical Safety section.

• The cord is rated as “W” or “W-A” if being used

outdoors.

• The cord has sufficient wire thickness (16 AWG

below 50

). If the wire thickness is too small, the

cord may overheat, melting the cord’s insulation or
causing nearby objects to ignite.

To reduce risk of electrical shock, keep all

electrical connections dry and off the ground. Do not
touch plug with wet hands.

NOTE! For ease of use, the ON/OFF operation of this

machine can be controlled by using the No.
301A Foot Switch. (No. 301A Foot Switch is
an optional accessory.)

Operating Instructions

WARNING

Do not wear gloves or loose clothing when oper-
ating machine. Keep sleeves and jackets but-
toned. Always wear eye protection to protect eyes
from dirt and other foreign objects.

Keep fingers and hands away from the reamer,
rollers and wire brush tools. Reduces the risk of
entanglement and being cut.

Properly support long lengths of tubing. Do not cut
visibly bent tubing or tubing with fittings attached.

122XL Copper Cutting and Prep Machine

WARNING

WARNING

CAUTION

WARNING

CAUTION

Summary of Contents for 122XL

Page 1: ...MANUAL Fran ais 11 Castellano p g 23 122XL WARNING Read this Operator s Manual carefully before using this tool Failure to understand and follow the contents of this manual may result in electri cal...

Page 2: ...essories 4 Machine Assembly Fitting Brushes and Holder 4 Mounting on 1206 Stand 5 Machine Inspection 5 Machine and Work Area Set Up 5 Operating Instructions Cutting Tube 6 Cleaning Deburring O D of Tu...

Page 3: ...122XL Copper Cutting and Prep Machine Record Serial Number below and retain product serial number which is located on nameplate Serial No 122XL Copper Cutting and Prep Machine...

Page 4: ...es better control of the tool in unexpected situations Ridge Tool Company 2 General Safety Information WARNING Read and understand all instructions Failure to follow all instructions listed below may...

Page 5: ...y Information WARNING Read this operator s manual carefully before using the 122XL Copper Cutting and Prep Machine Failure to understand and follow the contents of this man ual may result in electrica...

Page 6: ...quired The following procedures should be followed Make sure machine is unplugged from power source before assembling accessories or making any adjustments Fitting Brushes and Holder Optional Accessor...

Page 7: ...fe and normal operation of the machine If any of these conditions are present do not use the machine until any problem has been repaired 6 Lubricate the machine if necessary according to the Maintenan...

Page 8: ...around the machine and workpiece This safety zone prevents others from accidentally contacting the machine or workpiece and either caus ing the equipment to tip or become entangled in the rotating par...

Page 9: ...to the OFF position Ridge Tool Company 7 NOTE To adjust the height of the cutter wheel push handle to the right and relocate position pin by moving handle up or down 6 Lower the handle until the cutte...

Page 10: ...s away from brush 4 Turn ON OFF switch to OFF position Figure 9 Cleaning Inside of Fittings Accessories WARNING Only the following RIDGID products have been designed to function with the No 122XL Copp...

Page 11: ...tively clean the tubing 1 Hold shaft stationary by gripping flat located near surface of housing 2 Remove 1 2 nut and washer from the shaft and replace the brush 3 Reinstall nut and washer and tighten...

Page 12: ...ildren and people unfamiliar with cutting machines This machine can cause serious injury in the hands of untrained users Service and Repair WARNING Service and repair work on this Copper Cutting and P...

Page 13: ...ne couper et pr parer le cuivre mod le 122XL Machine couper et pr parer le cuivre Mod le 122XL Inscrivez ci dessous le num ro de s rie de la plaque signal tique l appareil pour future r f rence N de s...

Page 14: ...hine Montage des brosses et du support 16 Installation sur tr pied type 1206 16 Inspection de la machine 16 Pr paration de la machine et du chantier 17 Utilisation de la machine Coupe des tuyaux 18 Ne...

Page 15: ...ra ner de graves blessures lorsque l on utilise un appareil lectrique Consignes g n rales de s curit MISE EN GARDE Familiarisez vous compl tement avec l ensemble des instructions Le non respect de ces...

Page 16: ...tretenez les outils consciencieusement Main tenez les outils de coupe bien aff t s et en bon tat de propret Les outils bien entretenus et aff t s r duisent les risques de grippage et sont plus faciles...

Page 17: ...e de rouleaux d entra nement et l avancement manuel d un galet de coupe mont sur cr maill re L al soir permet d limin er les bavures l int rieur du tuyaux La brosse permet de nettoyer l ext rieur du t...

Page 18: ...s jambes du tr pied peut tre aug ment e ou diminu e de la mani re suivante Posez le tr pied l envers sur une surface plane D verrouillez le plateau afin de lib rer les jambes Rep rez la vis de blocage...

Page 19: ...te risque de faire surchauffer la rallonge fondre sa gaine isolante ou enflammer les objets proximit Afin d viter les chocs lectriques gardez toutes connexions lectriques au sec et sur lev es Ne jamai...

Page 20: ...ojection de d bris Ecartez vos mains et vos doigts de l al soir des rouleaux et des brosses m talliques Cela limitera les risques d enchev trement et de coupe Soutenez les tuyaux de grande longueur de...

Page 21: ...e porte tubes est n ces saire afin de stabiliser le tuyau 3 Appuyez le tuyau d licatement contre la brosse en le faisant tourner jusqu ce qu il brille Figure 6 Ecartez vos mains des pi ces rota tives...

Page 22: ...DGID suivants sont pr vus pour la machine couper et pr parer le cuivre Mod le 122XL Toute tentative d adaptation d accessoires pr vus pour d autres types d appareils peut s av rer dangereuse Afin d vi...

Page 23: ...u galet de coupe Remplacement de la brosse ext rieure La brosse est consid r e us e lorsque ses poils devi ennent in gaux ou trop courts pour assurer le nettoyage des tuyaux 1 Immobilisez l arbre en l...

Page 24: ...Stockez la machine dans un endroit clos hors de la port e des enfants et des personnes non familiaris s avec les d gorgeoirs Cette machine peut tre tr s dan gereuse entre les mains d un novice Entreti...

Page 25: ...rtadora y preparadora de tubos de cobre 122XL M quina cortadora y preparadora de tubos de cobre 122XL A continuaci n anote el n mero de serie que aparece en la placa de caracter sticas del producto No...

Page 26: ...Revisi n de la m quina 28 Preparaci n de la m quina y de la zona de trabajo 29 Instrucciones para el funcionamiento Corte de tubos 30 Limpieza y eliminaci n de rebabas del di metro exterior del tubo 3...

Page 27: ...Pueden ocurrir golpes el ctricos incen dios y o lesiones personales graves si no se siguen todas las instrucciones detalladas a continuaci n GUARDE ESTAS INSTRUCCIONES Seguridad en la zona de trabajo...

Page 28: ...de poner la m quina en marcha involuntariamente Almacene las m quinas que no est n en uso fuera del alcance de los ni os y de otras personas sin entrenamiento Las m quinas son peligrosas en las manos...

Page 29: ...mientras una rueda de corte se acciona manualmente mediante cremallera y pi n El escariador quita las rebabas del interior del tubo La escobilla limpia su superficie exterior dejando al tubo listo pa...

Page 30: ...uedar r gidas y el soporte no debe tambalearse NOTA La rigidez de las tres patas del soporte puede au mentarse o disminuirse de la siguiente manera Ponga el soporte patas para arriba sobre una superfi...

Page 31: ...en la secci n Seguridad El ctrica estar clasificado como W W A si ser usado a la intemperie tener el grosor suficiente 16 AWG si mide menos de 50 pies de largo Si el grosor del cable es insuficiente...

Page 32: ...rucciones de funcionamiento ADVERTENCIA No use guantes o ropa suelta cuando haga fun cionar esta Cortadora Mantenga chaquetas y pu os abotonados Siempre lleve protecci n para los ojos para que no les...

Page 33: ...manivela de la cortadora a su altura m xima Limpieza y eliminaci n de rebabas del di metro exterior del tubo 1 Mueva el interruptor de ON OFF a la posici n de ON encendido 2 Coloque el extremo del tu...

Page 34: ...pie todo su di metro interior Mantenga sus dedos apartados de la esco billa 4 Mueva el interruptor de ON OFF a la posici n de OFF apagado Figura 9 Limpieza del interior de un fitting Accesorios ADVERT...

Page 35: ...rte Recambio de la escobilla para la limpieza externa del tubo La escobilla se considera desgastada cuando sus cerdas se han tornado desiguales o demasiado cortas como para limpiar el tubo eficazmente...

Page 36: ...entro Autorizado Almacenamiento de la m quina Los equipos a motor deben guardarse dentro bajo techo o bien cubiertos para guarecerlos de la lluvia Almacene la m quina bajo llave fuera del alcance de l...

Page 37: ...uina cortadora y preparadora de tubos de cobre 122XL Diagrama de cableado 115V 60 Hz 100V 50 60Hz 220 240V 50Hz Negro CAF Interruptor visto desde atr s Verde VERDE AMARILLO Blanco AZUL Negro Blanco Ve...

Page 38: ...Ridge Tool Company 36 M quina cortadora y preparadora de tubos de cobre 122XL...

Page 39: ...TOOL y devuelto sin costo o si a n resulta defectuoso despu s de haber sido reparado o sustituido tres veces durante el per odo de su garant a Ud puede optar por recibir un reembolso por el valor tot...

Reviews: