background image

• 

Open handles to a comfortable distance, and screw rivet nut/rivet stud into 

the mandrel. Adjust the fixing screw if necessary. (

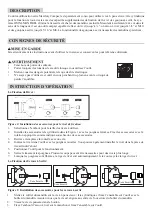
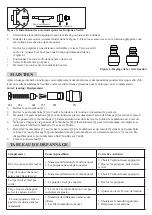
Figure 4

)

• 

Position the rivet nut/rivet stud into the work piece.

• 

Squeeze the handles.

• 

Screw out the mandrel from the rivet nut by rotating the knob.

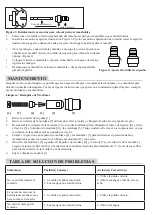
MAINTENANCE

After extensive use, jaws and mandrels cleaning or replacement might be required to obtain maximum performance. 

Please follow the instructions below for cleaning or replacement. 

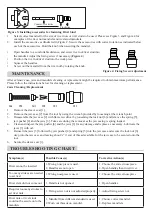
Jaws Cleaning / Replacement

1.  Remove the sleave seat [1].

2.  Remove the jaw case [2] from the tool by using the wrench provided by loosening at the wrench point. 

3. 

Disassemble the jaw case [2] with flat screw driver by loosening the lock nut [6] and remove the spring [5], 


jaw pusher [4] and the jaws [3]. Take care during the removal as the jaw casing is spring loaded. 

4.  Clean and inspect the jaw pusher [4] and the jaws [3] for any damage and replace as necessary. Lubricate the 

jaws [3] with oil.

5.  Reinsert the jaws [3] followed by jaw pusher [4] and spring [5] into the jaw case and secure the lock nut [6] 

deep into the jaw case and leaving about ¾” (1cm) of thread available for the jaw case to be secured onto the 

tool. 

6.  Secure the sleave seat [1].

TROUBLESHOOTING CHART

Symptom(s)

Possible Cause(s)

Corrective Action(s)

Rivet cannot be inserted 

1. Wrong nose piece is used.  

2. Handles are not open

1. Choose the correct nosepiece. 

2. Open handles then insert rivet.

Too many strokes are needed 

to set rivet

1. Wrong nosepiece is used. 

1. Choose the correct nosepiece.

Rivet stem did not come out. 1. Handle is not opened.

1. Open handles.

Requires too many strokes to 

set rivet nuts. 

1. Fixing screw nut is not adjusted properly.

1. Adjust fixing screw nut.

Rivet nuts or rivet studs 

could not be secure onto the 

mandrels

1. Mandrel from different standard is used. 


2. Worn out threads on mandrel.

1. Choose correct mandrel.

2. Replace mandrels

[6]

[5]

[4]

[3]

[2]

[1]

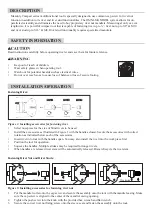
Figure 4: Fixing Screw Adjustment

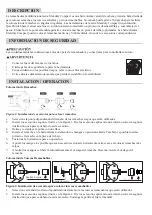
Figure 3: Installing accessories for fastening Rivet Stud

1.  Select correct mandrel for the size of rivet nuts or rivet studs to be used. Please see Figure 3 and Figure 4 for 

examples of the rivet nut mandrels and rivet stud mandrels.

2.  Install the accessories as illustrated in Figure 2. Secure the accessories with correct rotation as indicated below 

each of the accessories. Hold the knob when securing the mandrel.

Clockwise

Counter-Clockwise

Summary of Contents for 101- MC201

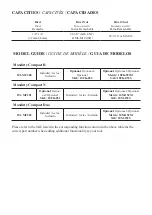
Page 1: ...Instruction Manual Mode d emploi Manual de Instrucciones MaxDuty Compact Series Heavy Duty Multifunctional Riveter Riveteuse Multifonctionnelle Remachadora Multifuncional ...

Page 2: ...l SKU 10FK 052 Optional Optionnel Opcional Metric 10FK 053M SAE 10FK 053S Maxduty Compact N 101 MC201 Optional Option nel Opcional SKU 10FK 051 Included Inclus Incluido Optional Optionnel Opcional Metric 10M 152M SAE 10M 152S Maxduty Compact Duo 101 MC202 Included Inclus Incluido Included Inclus Incluido Optional Optionnel Opcional Metric 10M 152M SAE 10M 152S Please refer to the SKU listed in the...

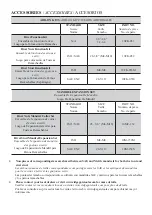
Page 3: ...e collier d écrous à sertir Juego de Expansión del collar para Tuercas Remachables ISO SAE 8 3 8 M4 M10 10MC 132 Rivet Stud Mandrel Expansion Set Ensemble de l expansion de mandrin des goujons à sertir Juego de Expansión de Mandril para Pernos Remachables ISO M4 M8 10M 152M SAE UNC 8 5 16 10M 152S Nosepieces of corresponding sizes are shared between SAE and Metric mandrels for both rivet nut and r...

Page 4: ...igure 1 Installing accessories for fastening rivet Select nosepiece for the size of blind rivets to be used Install the accessories as illustrated in Figure 1 with the handles closed Secure the accessories with correct rotation as indicated below each of the accessories Insert rivet into tool with the handles open You may also install the rivet into the work piece first Position the tool for opera...

Page 5: ...leaving about 1cm of thread available for the jaw case to be secured onto the tool 6 Secure the sleave seat 1 TROUBLESHOOTING CHART Symptom s Possible Cause s Corrective Action s Rivet cannot be inserted 1 Wrong nose piece is used 2 Handles are not open 1 Choose the correct nosepiece 2 Open handles then insert rivet Too many strokes are needed to set rivet 1 Wrong nosepiece is used 1 Choose the co...

Page 6: ...nd workmanship for two years from the date of purchase This warranty does not cover products or parts that are improperly used abused or altered This warranty does not cover normal wear and tear and replacement parts such as jaws and mandrels Deficient products will be replaced or repaired Please contact your local dealers or contact us directly Telephone Toll Free US Canada 1 866 97 RIDGE 74343 O...

Page 7: ...e Rivet Figure 1 Installation des accessoires pour le rivet de fixation 1 Sélectionnez l embout pour la taille des rivets à utiliser 2 Installez les accessoires tels qu illustré dans la Figure 1 avec les poignées fermées Fixer les accessoires avec la rotation appropriée comme indiqué sous chacune de ces accessoires 3 Retirez et remplacez la tourelle avec une clé 4 Insérez le rivet dans l outil ave...

Page 8: ...ge 6 profondément dans le porte mâchoire et en laissant environ 1 cm de fils disponibles pour le porte mâchoire afin d être fixé sur l outil 6 Fixez le porte embout 1 TABLEAU DE DÉPANNAGE Symptôme s Cause s possible s Corrective Action s Rivet ne peut pas être inséré 1 Mauvaise utilisation de l embout nasal 2 Les poignées ne sont pas ouvertes 1 Choisir l embout nasal approprié 2 Ouvrez les poignée...

Page 9: ... ans à compter de la date d achat La garantie présente ne couvre pas les dommages causés par une utilisation abusifs ou inappropriée ou les modifications du produit La garantie présente ne couvre pas l usure normale ou bris ou des pièces de rechanges tels que les mâchoires et les mandrins Les produits défectueux seront remplacés ou réparés S il vous plaît contactez votre revendeur local ou contact...

Page 10: ... Colocación de Remaches Figura 1 Instalación de accesorios para colocar remaches 1 Seleccione la punta dependiendo del tamaño de los remaches ciegos que serán utilizados 2 Instale los accesorios según se ilustra en la Figura 1 Fije los accesorios aplicando una rotación correcta según la ilustración que aparece debajo de cada accesorio 3 Retire y reemplace la punta con una llave 4 Inserte el remach...

Page 11: ...plácelos según sea necesario Lubrique las mordazas 3 con aceite 5 Reinserte las mordazas 3 seguidas del impulsor de mordaza 4 y el resorte 5 en la cubierta de la mordaza y asegure la tuerca de fijación 6 en la cubierta de la mordaza dejando aproximadamente 1cm de rosca libre para fijar la cubierta de la mordaza a la herramienta 6 Fije la cubierta de la punta 1 TABLA DE SOLUCION DE PROBLEMAS Síntom...

Page 12: ...on el uso normal ni las partes de reemplazo tales como mordazas y mandriles Los productos deficientes serán reemplazados o reparados Por favor consulte a su proveedor local o póngase en contacto directo con RidgeGate Teléfono Sin Costo Estados Unidos Canadá 1 866 97 RIDGE 74343 Fuera de los Estados Unidos y Canadá 1 604 888 7709 Telefax 1 604 888 0979 Email support ridgegatetools com Es necesario ...

Page 13: ...NOTE REMARQUE NOTA ...
Page 14: ...m for more details and ordering information Veuillez contacter vos revendeurs locaux ou visitez www ridgegatetools com pour plus de détails et renseignements sur les commandes Por favor consulte a su proveedor local o visite el sitio web www ridgegatetools com para obtener mayor información e información sobre pedidos ...

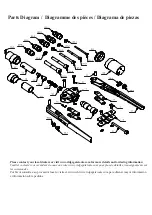
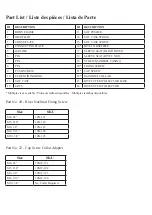
Page 15: ... ID DESCRIPTION ID DESCRIPTION 1 BODY FRAME 13 JAW PUSHER 2 DRAWBAR 14 JAW CASE SPRING 3 CROSS PLATE 15 JAW CASE SCREW 4 CONNECTING PLATE 16 RIVET NOSEPIECE 5 HANDLE 17 SLEEVE SEAT BLIND RIVET 6 PIN 18 SLEEVE SEAT RIVET NUT 7 PIN 19 SCREW MANDREL CASING 8 PIN 20 FIXING SCREW 9 PUSH SCREW 21 CAP SCREW 10 E4 RETAINING RING 22 MANDREL COLLAR 11 JAW CASE 23 RIVET STEM COLLECTOR BASE 12 JAWS 24 RIVET S...

Page 16: ...W RIDGEGATETOOLS COM RidgeGate Tools Technologies Inc Address 2 20279 97th Ave Langley B C Canada V1M 4B9 Tel 1 866 97 RIDGE 74343 US CAN 1 604 888 7709 Outside US CAN info ridgegatetools com Rev 2017 09 ...

Reviews: