background image

English

5

English

Usage Notice

a) PJ WXC1110 Series weighs approximately 0.5kg. 

The projector must be installed in a location that 

is sturdy enough to support the full weight of the 

projector and brackets. 

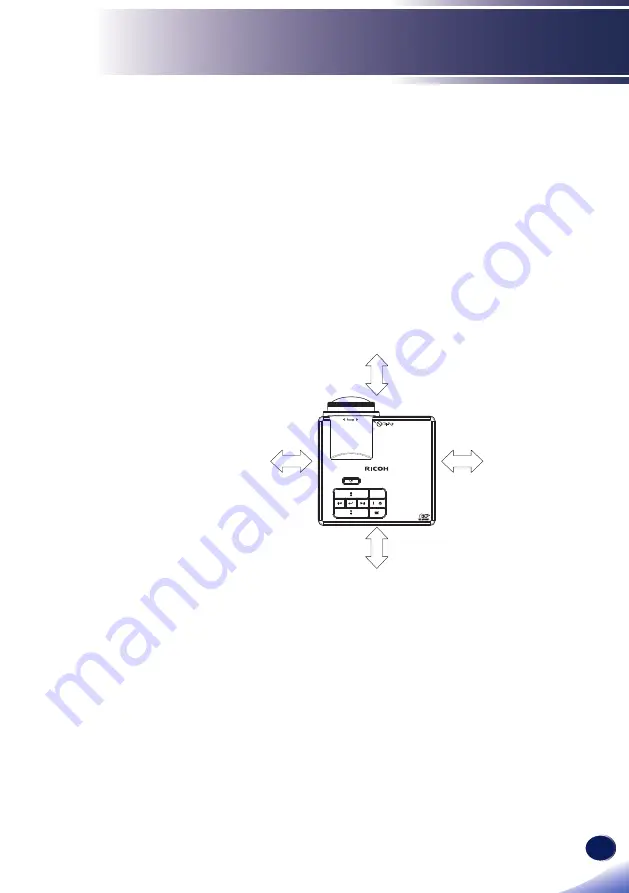
b) For 360° installation, install the projector with the 

intake vent and exhaust vent at the bottom and leave a 

space at least following distance from the floor.


Warning-


Do not mount this machine on the wall or ceiling. It 

may fall, possibly causing serious injury.


Warning-


There is a screw hole on the bottom face of the 

projector body, which can be used to mount the 

projector on a tripod or other structure.


Use only a structure that is designed to support the 

weight of the projector (0.5 kg).


100mm

100mm

250mm

250mm

■ 

Caution- 

Keep the machine away from humidity and dust. 

Otherwise a fire or an electric shock might occur.

■ 

Caution- 

Do not place any objects on the machine. Doing 

so may cause the machine to topple over, possibly 

resulting in injury.

■ 

Caution- 

Do not place the machine on an unstable or tilted 

surface. If it topples over, an injury might occur.

■ 

Caution- 

Do not place the machine or use it in an environment 

where it might get wet such as from snow, rain, or 

being near water. Doing so could result in fire or 

electric shock.

Summary of Contents for PJ WXC1110

Page 1: ...tion User Settings Basic Operations Introduction Usage Notice Appendices Read this manual carefully before you use this machine and keep it handy for future reference For safe and correct use be sure...

Page 2: ......

Page 3: ...26 Connect to Computer 26 Connect to Video 27 Powering On Off the Projector 28 Powering On the Projector 28 Powering Off the Projector 29 Warning Indicator 30 Adjusting the Projected Image 31 Adjusti...

Page 4: ...Keep the machine and attachments out of the reach of children If the machine is near children it may cause injury Warning Plastic bags can be dangerous please do not leave near babies and young child...

Page 5: ...ng The power cord s inner wires are exposed broken etc The power cord s coating has a crack or dent When bending the power cord the power turns off and on Part of the power cord becomes hot The power...

Page 6: ...ine topples or if a cover or other part gets broken you must turn off its power immediately After turning off the power be sure to disconnect the power cord plug from the wall outlet Then contact your...

Page 7: ...of the projector body which can be used to mount the projector on a tripod or other structure Use only a structure that is designed to support the weight of the projector 0 5 kg 100mm 100mm 250mm 250...

Page 8: ...amage to the machine or an accident Caution Do not obstruct the machine s vents Doing so risks fire caused by overheated internal components Caution Push the power plug all the way into the power outl...

Page 9: ...e Contact your sales or service representative for details about and charges for cleaning the machine s interior Caution Unplug the power cord from the wall outlet before you move the machine While mo...

Page 10: ...ury Caution Unauthorized substitutions may result in fire electric shock or other hazards Upon completion of any service or repairs to this product ask the service technician to perform safety checks...

Page 11: ...from children If you think batteries might have been swallowed or placed inside any part of the body seek immediate medical attention Notes Be sure to use CR2025 lithium 3V coin battery Dispose of bat...

Page 12: ...o the lens while the LED lamp is on The strong light from the LED lamp may cause damage to your eyesight If you wish to discard this product please contact your local authorities the shop where you bo...

Page 13: ...hese limits are designed to provide reasonable protection against harmful interference in a residential installation This device generates uses and can radiate radio frequency energy and if not instal...

Page 14: ...d the user s author ity which is granted by the Federal Communications Commission to operate this projector Notes to Users in the State of California Perchlorate Material special handling may apply Se...

Page 15: ...ndon NW1 3BF United Kingdom User Information on Electrical and Electronic Equipment Users in the countries where this symbol shown in this section has been specified in national law on collection and...

Page 16: ...uman health which could otherwise result from inappropriate handling Recycling of products helps to conserve natural resources and protect the environment For more detailed information on collection a...

Page 17: ...inted on batteries and accumulators This symbol means that in the European Union used batteries and accumulators should be disposed of separately from your household waste In the EU there are separate...

Page 18: ...en viewing images using 3D glasses with projector How 3D images are viewed may vary according to the individual Do not use 3D glasses for viewing any material other than 3D images Before viewing 3D im...

Page 19: ...tible LED light source 20000H life Multi Auto functions Auto detection Auto image and Auto saving the adjustments Full function remote control User friendly multilingual on screen display Advanced dig...

Page 20: ...heck to make sure your unit is complete Contact your dealer immediately if anything is missing RGB cable Documentation Read This First Warranty Card Power cord Input Aspect Power Picture AV Mute Exit...

Page 21: ...19 English Introduction Product Overview 1 Control panel 2 Focus ring 3 Lens 4 Adjustable feet 5 Lens cap 6 Ventilation inlet 7 Infrared remote sensor 8 Connection ports 9 Ventilation outlet 1 7 6 5 3...

Page 22: ...20 English Introduction Connection Ports 1 Anti theft lock hole 2 MicroSD card slot 3 USB Type A terminal 4 DC IN pluged jack 5 Headphone jack 6 HDMI MHL terminal 7 Computer In terminal 1 2 3 4 5 6 7...

Page 23: ...Indicator Indicate the projector s temperature status 3 Error Indicator Indicate the projector s error status 4 Menu Press the button to launch the Onscreen display OSD 5 Four Directional Select Keys...

Page 24: ...jector on off 2 AV Mute Mutes unmutes audio and or video depending on the chosen mute option in the OSD menu Menu Setup Advanced Mute 3 Menu Turns the main menu on off or returns to upper level in the...

Page 25: ...ect Input sources 8 Aspect Selects Aspect among Auto 4 3 16 9 16 10 9 Picture Select Picture mode 10 Uses to operate menu 11 Exit Returns to the previous page 12 Enter Confirms your section of items i...

Page 26: ...hat the side with a is facing up 2 To ensure safe operation please observe the following precautions Never throw batteries into a fire Do not ingest battery Chemical Burn Hazard Keep new and used batt...

Page 27: ...ecome short If there are any obstacles between the remote control and the remote control signal receiver the remote control may not operate correctly When the remote control signal receiver is lit wit...

Page 28: ...t to Computer 1 2 3 6 4 5 Make sure that the power plug is fully inserted into all the AC adapter AC inlet the wall outlet and projector DC jack USB A to USB A Cable is used for data trasnferring betw...

Page 29: ...outlet and projector DC jack Check the MHL support of the smartphone or other devices If the device is not support MHL they can not be connected to the projector with MHL cable Supports MicroSD MicroS...

Page 30: ...t to Multimedia Change the input source of the projector if necessary Powering On Off the Projector CAUTION Do not look into the lens while the projector is on The strong light from the lamp may cause...

Page 31: ...ss the Power again to confirm 3 After 3 5 seconds the Power indicator will light amber When the light starts flashing the projector has entered standby mode If you wish to turn the projector back on y...

Page 32: ...temperature Please contact a service center for repair When the Temp indicator flashes red 2 secs on 0 5 sec off and the message below displays on screen it indicates one of the fans has failed The pr...

Page 33: ...tor Image The projector is equipped with adjustable feet to raise and lower the image to fill the screen To raise lower the image 1 Use to fine tune the display angle You can raise the projector front...

Page 34: ...glish Basic Operations Focus Ring Adjusting the Projector Focus To focus the image rotate the focus ring until the image is clear The projector will focus at distances from 2 82 to 5 64 feet 0 86 to 1...

Page 35: ...60 1 29 0 81 50 79 31 89 1 03 3 92 0 65 1 40 0 88 55 12 34 65 1 12 3 67 0 70 1 51 0 94 59 45 37 01 1 21 3 96 0 80 1 72 1 08 67 72 42 52 1 38 4 52 0 90 1 94 1 21 76 38 47 64 1 55 5 09 0 100 2 15 1 35...

Page 36: ...or buttons on the Control Panel or Remote Control 3 To adjust settings press the or buttons on the Control Panel or Remote Control 4 To exit the OSD press the button on the Control Panel or the Menu...

Page 37: ...edia Volume 0 10 5 Picture Mode Bright PC PC sRGB Wide 1 Wide 2 ECO Brightness 0 10 5 Contrast 0 10 5 Image Saturation 0 20 10 Hue 10 10 0 Aspect Ratio Auto Auto 4 3 16 9 16 10 Zoom 50 75 100 125 150...

Page 38: ...Level 3rd Level Range Default Value Display Auto Keystone On On Off Keystone 40 40 0 Projection Auto keystone on No reverse Left Right reverse Auto keystone off No reverse Left right reverse Up down...

Page 39: ...Polish Dutch Russian Swedish Greek Janpanese Korean Turkish Boot up Source Auto Computer HDMI MHL Media Direct Power On On Off Off Sleep Timer Auto Auto Off 0 30 1 00 3 00 8 00 12 00 Advanced Mute Aud...

Page 40: ...HDMI MHL as input source HDMI MHL Searching HDMI MHL Media Set Media as input source Media Searching Media Volume Adjust the volume Press the to turn up the volume up to 10 Press the to turn down the...

Page 41: ...aturation depend on Picture mode Default value of each mode as follows Brightness Adjust the brightness of the image Press the to increase the brightness of the screen up to 20 Press the to reduce the...

Page 42: ...40 English User Settings Image Go to Image sub menu Display Go to Display sub menu Setup Go to Setup sub menu...

Page 43: ...ays the image by automatically switching the screen sizes between 4 3 and 16 9 4 3 Input signal is displayed to full screen This mode is for 4 3 aspect images 16 9 Input signal is displayed with 16 9...

Page 44: ...er Color Space Select an appropriate color matrix type from Auto RGB and YCbCr Frequency Adjust to achieve an optimal image when there is a vertical flickering in the image Phase Adjust to achieve an...

Page 45: ...upon how the projector is mounted Auto Keystone On No reverse Left Right reverse Auto Keystone Off No reverse Left Right reverse Up Down reverse Left Right and Up Down reverse Display Display On Auto...

Page 46: ...the countdown timer interval between 0 30 1 00 3 00 8 00 12 00 Auto or Off The countdown timer will start with or without a signal being sent to the projector The projector will automatically power of...

Page 47: ...Enter a password 6 Digits Exit Reset Return all data to the factory defaults After choosing this option a confirmation message appears on the screen Select Yes to confirm or No to cancel reset Reset...

Page 48: ...switch between the left and right of an image to display Change the setting if the 3D images you see appear not as expected On Select when left and right 3D images are swapped to be displayed Off If...

Page 49: ...gits Use 4 directional keys to enter new password Enter the new password 6 Digits Change Password Exit Confirm New Password 6 digits Enter the same password that you entered Change Password Enter the...

Page 50: ...48 English User Settings If the confirmed Password doesn not match with the entered Password Input the new Password again By entering Menu key you can cancel the Change Password menu...

Page 51: ...Format Video Codec Decode Max Resolution Max Bit Rate bps Audio Codec Profile MPG MPEG MPEG1 2 1920 x 1080 30fps 30M bps MPEG1 L1 3 LPCM AVI MOV MP4 MKV H 264 1920 x 1080 30fps 30M bps MPEG1L1 3 AAC...

Page 52: ...20MB Word 97 2000 2002 2003 Word 2007 docx Up to 30MB Word2010 docx Microsoft Excel Excel 5 95 Row Limit up to 300 Column Limit up to 100 Sheet up to 50 Up to 14MB Excel 97 2000 2002 2003 Excel 2007 x...

Page 53: ...n set the input source to Media Please see page 38 3 Media Menu Select the Media menu Connect to PC Media How to use Multi Media projection with USB SD Card Internal Memory A USB flash disk must be pl...

Page 54: ...tings 4 Select the file type Access the Internal Memory SD Card or USB menu Select the multimedia file s in one of the following folders Photo Video Music or Office Internal Memory SD Card USB Setting...

Page 55: ...er with image format data will be displayed The folder without image data will not be displayed Select the folder you want to display by using the four directional keys and then press Enter If you pre...

Page 56: ...isplay the Control Command bar press Enter key Control the Slideshow by using the Control Command bar icons You can choose the icon by using keys on the Control Panel or Remote Control and then press...

Page 57: ...by using keys You can exit Slideshow by pressing Exit key on the Remote Control 5 2 Video After Video tab is selected the video filename and folder with video data will be displayed The folder without...

Page 58: ...ar press Enter key Control the video playback by using the Control Command bar icons You can choose the icon by using keys on the Control Panel or Remote Control and then press Enter Goes to the previ...

Page 59: ...he video Rewinds the playback rewind speed changes in 3 steps Forwards the playback forward speed changes in 3 steps Exit Stops the playback and goes to the file list 5 3 Music After Music tab is sele...

Page 60: ...are displayed at bottom of the screen Icon are permanently visible as long as the music playback window is opened Control the music playback by using the Control Command bar icons You can choose the...

Page 61: ...Control Pauses Plays the music file Rewinds the playback Forwards the playback Exit Stops the playback and goes to file list 5 4 Office Viewer As the projector is using the simplified Office Viewer so...

Page 62: ...fice files will be displayed on the screen Office Choose one of the folders and press Enter You will see the contents of the selected folder on the screen Office Select the Office data or folder you w...

Page 63: ...so disappear if you press Exit key on the Remote Control If you want to display the Control Command bar press Enter key Control dislaying the Office file by using the Control Command bar icons You can...

Page 64: ...splayed area Goes to Setting menu Closes the content and goes to the file list In Move mode the display area can only be moved within the same page If you want to change the page switch back to the No...

Page 65: ...ter Displays Control Panel Magnify Magnifies Enlarges Reduces the image Switches to the Move mode In Move mode Moves the displayed area to 4 directions Enter Displays Control Panel Magnify Magnifies E...

Page 66: ...ntent We strongly recommend you to preview the displayed file s before performing the presentation To ensure the correct displaying of the PDF file you need to use the embedded fonts when creating the...

Page 67: ...System System Version Update USB Use this menu to update the system Version View the current Media firmware Update Update the Media firmware only from the USB flash stick For more information check th...

Page 68: ...e slideshow between Off Mode A Mode B or Mode C Display Interval Select the slideshow duration between 10 sec 30 sec or 1 min The image will automatically switch to the next photo after the preset tim...

Page 69: ...Off Display Ratio Select the display ratio of the Video between Auto or Full screen Repeat Mode Select the video repeat mode between Sequence Single Random or Off Select and press Enter to save the s...

Page 70: ...4 Music Music Repeat Mode Off Repeat Mode Select the music play mode between Sequence Single or Random Select and press Enter to save the settings and exit the menu Select and press Enter to exit the...

Page 71: ...wer Office Display Mode Fit to Width Display Mode Select the display mode between Fit to width Fit to Height or Fit to screen Select and press Enter to save the settings and exit the menu Select and p...

Page 72: ...ternal memory Follow these steps to transfer the files from the computer to the internal memory 7 1 Turn the projector on Please see page 28 7 2 Set the input source to Media and select Connect to PC...

Page 73: ...contents of micro SD card Internal Memory of the projector Micro SD card of the projector 7 4 Drag and drop the file to the Internal memory You can only view the content of the micro SD card 7 5 Unpl...

Page 74: ...tial scrolling or incorrectly displayed image If you are using a Notebook 1 First follow the steps above to adjust resolution of the computer 2 Press the toggle output settings Example Fn F3 PANASONIC...

Page 75: ...y to correct it Refer to Menu Image Phase or Frequency in Computer source only menu for more information Change the monitor setting from your computer Check and reconfigure the display mode of your gr...

Page 76: ...ol or Menu button on the control panel and go to Menu Image Zoom and adjust the zoom Problem Image is reversed Select Menu Display Projection from the OSD and adjust the projection direction Problem I...

Page 77: ...hat the ambient temperature is within operational range Warning The projector will switch off automatically Over temperature Please contact a service center for repair Fan failed one of the system fan...

Page 78: ...68 60 75 120 1 2 60 75 SXGA 1280 x 1024 60 75 60 WXGA 1280 x 768 60 75 WXGA 1280 x 800 60 60 WXGA 1366 x 768 60 60 WXGA 1440 x 900 60 75 SXGA 1400 X1050 60 60 WSXGA 1680 x 1050 60 60 HDMI YPbPr via VG...

Page 79: ...or HDMI MHL 2 0 connector DVI Digital Signal supports up to 1920x1080 60Hz HDMI Video audio MHL Digital Signal max 1080P 30Hz MHL Output 5V voltage max 900mA Headphone out connector 3 5mm phone jack E...

Page 80: ...demark or trademark of Microsoft Corporation in the United States and or other countries Adobe PDF Adobe Reader Adobe Acrobat are either a registered trademark or trademark of Adobe Systems Incorporat...

Page 81: ......

Page 82: ...Y0AB 6221 AU EN GB EN...

Reviews: