background image

68

English

LAN Control

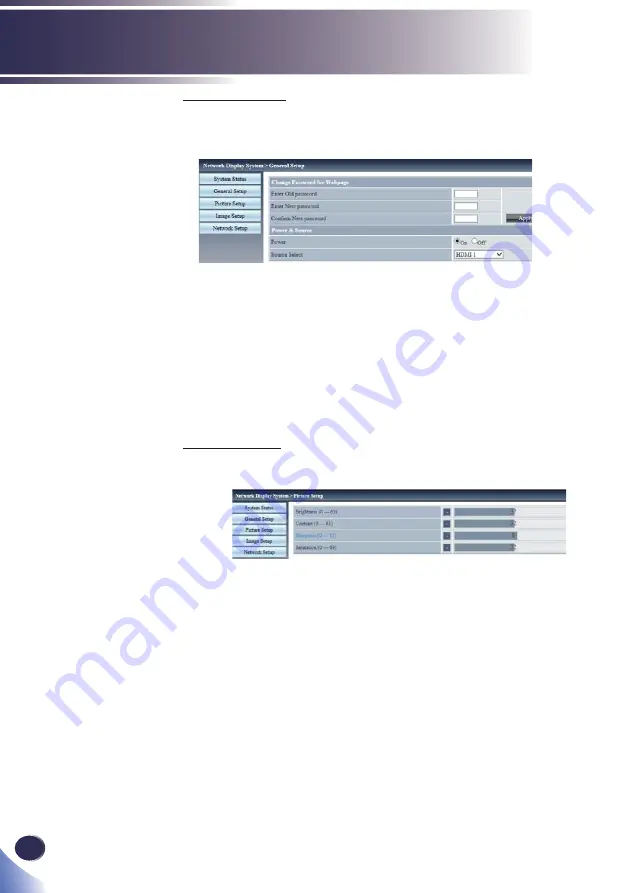
General Setup

You can change the password for the projector.
And you can control the Power and Input Source of the projector.


  Enter Old password: Enter the existing password.


 Enter New password: Enter a new password.


 Con

fi

 rm New password: Enter the new password again for con

fi

 rmation.


 Apply: Updates the settings.


 Power: Switches the power of the projector between On and Off.


 Source Select: Switches the input source of the projector.

Picture Setup

You can change the values to adjust the projected image.


 Brightness: Adjusts the brightness of the projected image.


 Contrast: Adjusts the contrast of the projected image.


 Sharpness: Adjusts the sharpness of the projected image.


 Saturation: Adjusts the saturation of the projected image.

Summary of Contents for PJ WUC4650

Page 1: ...8 LAN Control...

Page 2: ......

Page 3: ...he Projector 30 Turn off the projector 31 Input Source Signal Selection 32 Adjust the projected image 34 Adjust the focal length of the projector 35 Lens Shift adjustment 35 Adjust the screen size 36...

Page 4: ...h objects or substances fall inside this machine Warning Keep the machine and attachments out of the reach of children If the machine is near children it may cause injury Warning Plastic bags can be d...

Page 5: ...aged Doing so could result in fire or electric shock If the connection cable is deformed cracked or damaged contact your service representative to request a replacement cable Warning When using an ext...

Page 6: ...in this manual There are high voltage components inside the machine that may cause electric shock Contact your service representative if any of the machine s internal components require maintenance a...

Page 7: ...n accident due to hot air coming from the exhaust vents Caution Do not use the machine on soft material such as paper or cloth that might get sucked into the intake vents Doing so may cause heat build...

Page 8: ...it is turned off especially the vents Caution Do not place the machine on other equipment or vice versa Doing so may cause heat buildup inside the machine or cause the other equipment to malfunction C...

Page 9: ...is operating Things placed in front of the lens may overheat and burn or start a fire Caution Unauthorized substitutions may result in fire electric shock or other hazards Only the replacement of the...

Page 10: ...at the top sides and rear of the shell for ventilation and projector cooling The following figure shows minimum distances to be reserved If the projector is placed in a cabinet or an enclosed environ...

Page 11: ...te medical attention Notes Be sure to use AAA R03 size batteries Dispose of batteries in a designated disposal area Attention should be drawn to the environmental aspects of battery disposal If the re...

Page 12: ...s N o obstrua ou tape as sa das de ventila o WARNING VORSICHT AVERTISSEMENT AVVERTIMENTO ADVERTENCIA AVISO Apparaten skall anslutas till jordat uttag Apparatet m tilkoples jordet stikkontakt Laite on...

Page 13: ...English 11 English Usage Notice Power Switch Symbols The meaning of the symbols for the switches on this machine as follows On Standby Off...

Page 14: ...for a Class B digital device pursuant to Part 15 of the FCC rules These limits are designed to provide reasonable protection against harmful interference in a residential installation This equipment g...

Page 15: ...hielded cables to maintain compliance with FCC regulations Caution Changes or modifications not expressly approved by the manufacturer could void the user s authority which is granted by the Federal C...

Page 16: ...Japan Importer Ricoh Europe PLC 20 Triton Street London NW1 3BF United Kingdom User Information on Electrical and Electronic Equipment Users in the countries where this symbol shown in this section ha...

Page 17: ...human health which could otherwise result from inappropriate handling Recycling of products helps to conserve natural resources and protect the environment For more detailed information on collection...

Page 18: ...d on batteries and accumulators This symbol means that in the European Union used batteries and accumulators should be disposed of separately from your household waste In the EU there are separate col...

Page 19: ...such as freeze magnify or zoom to broadcast images for commercial purposes or public viewing Varying the aspect ratio of images or movies using a function that changes the screen size to broadcast im...

Page 20: ...ard Input Auto set Menu AV Mute Picture ECO Enter Computer Video Freeze Aspect Keystone Volume Magnify Status Projector Remote control AAA R03 battery x2 RGB cable Power cord CD ROM Due to the differe...

Page 21: ...s Ring Lens Shift Screw 5 Indicator 6 Remote Receiver front 7 Control Panel 8 Speaker inside 9 Ventilation inlet 10 Remote Receiver rear 11 Connection Ports 12 Adjustable feet 13 Air Filter 14 AC In S...

Page 22: ...AN terminal 5 HDMI1 In terminal 6 HDMI2 MHL In terminal 7 USB PC terminal 8 USB terminal 9 Audio 1 In R L terminal 10 PC Control terminal 11 Audio2 In terminal 12 Monitor Out Comp 1 terminal 13 Audio...

Page 23: ...your selection 3 Input Select the input source 4 Enter button Select or confirm settings 5 Menu Press Menu to launch the on screen display OSD or go back to the previous menu See page 38 6 AV Mute Pa...

Page 24: ...audio and video 4 Menu Press Menu to launch the On Screen Display OSD back to the top level of OSD for the OSD main menu operation See page38 5 Picture Select the preset picture mode 6 HDMI Press HDM...

Page 25: ...ompensate for distortion caused by tilting the projector 14 Network Press Network to choose Network source 15 Aspect Use this function to choose your desired aspect ratio 16 Freeze Pause the screen im...

Page 26: ...rol in an overly hot or humid place Do not drop the remote control Do not use a new battery and a used one at the same time Using a different battery than specified in this manual may cause an explosi...

Page 27: ...control sensing windows front and rear on the projector When the remote control is pointed at the signal receiver on the projector the effective range of the remote control is about 8 meters 24 feet...

Page 28: ...eral guidelines Position the projector on a flat surface at a right angle to the screen Position the projector to the desired distance from the screen The distance from the lens of the projector to th...

Page 29: ...er Audio cable RGB cable RGB cable HDMI cable io e Audio cable When Audio Out is connected the built in speaker doesn t produce sound To ensure the projector works well with your computer please make...

Page 30: ...28 English Basic Operations Connecting a Video Device Video Audio cable Audio cable Audio cable Powered Speaker When Audio Out is connected the built in speaker doesn t produce sound Note...

Page 31: ...English 29 English Basic Operations Connecting a USB Device and USB Display USB PC and USB USB memory device USB A B cable...

Page 32: ...en will display and the Power indicator will turn green 3 The first time you use the projector you will be asked to select the preferred language Turn on your source computer notebook video player etc...

Page 33: ...or glows red steadily the projector can be turned on again Note Turn off the projector 1 Press the button on the side control panel or the button on the remote control The following dialog box will po...

Page 34: ...that connects to the HDMI1 terminal with an HDMI cable choose HDMI 1 HDMI1 If the video input signal connects to the Video In terminal with a Video cable choose Video Video Basic Operations Press the...

Page 35: ...iewer or Network Still Scale Auto setting and Image functions are unavailable When the input source comes from the Net work to the LAN choose Network To use display via LAN see P62 for instruc tion Wh...

Page 36: ...s perpendicular to the screen 2 Using the adjustable feet you can adjust the projection angle to 1 6 degrees 3 Rotate the adjustable feet and tilt the projector to an appropriate height 4 To raise the...

Page 37: ...image Rotate left zoom out the image 2 Open the Focus Lens Shift cover and rotate the focus ring to adjust the focal length of the image 3 Open the Focus Lens Shift cover use a screwdriver and select...

Page 38: ...al RICOH PJ WXC4660 WXGA 70 to 130 RICOH PJ WUC4650 WUXGA 70 to 130 Adjust the screen size Width W Height H Diagonal D Projection distance A Bottom of the projector bottom of the screen Top of the pro...

Page 39: ...th W mm Wide Tele Wide Tele MIN MAX MIN MAX mm mm mm mm mm mm mm mm 70 1 778 942 1 508 410 432 80 101 128 184 276 333 80 2 032 1 077 1 723 468 493 138 163 155 219 303 368 90 2 286 1 212 1 939 527 554...

Page 40: ...adjust as described above When there is no next menu in the submenu press the buttons to set related options When there is a next menu in the submenu the screen will display the icon Press the button...

Page 41: ...brightness Standard Mode for optimizing the balance between brightness and color reproduction Vivid Mode for emphasizing color sRGB Standard color values DICOM SIM This mode is suitable for projectin...

Page 42: ...y to decrease the amount of color in the image Press the key to increase the amount of color in the image Sharpness Adjust the sharpness of the image Press the button to soften the outline of the imag...

Page 43: ...o increase the red level G level press the button to decrease the green level Press the button to increase the green level B level press the button to decrease the blue level Press the button to incre...

Page 44: ...tio 16 10 Displays 16 10 aspect ratio Phase Eliminate flicker from the image displayed Use the or key to adjust the value Frequency This function is used to adjust or diminish the disruption from patt...

Page 45: ...of projected images in horizontal vertical directions Horizontal keystone correction Press the key to adjust the right Press the key to adjust the left Vertical keystone correction Press the key to ad...

Page 46: ...eave the center area unchanged while expanding the top and bottom Press the key correct the vertical line on the left and leave the center area unchanged while expanding the top and bottom Press the k...

Page 47: ...ter area and area below unchanged while expanding the upper corners Reset Restore all modified parameters to the factory settings Projection Use this function to select the projector mode depending up...

Page 48: ...e Startup Screen Use this function to choose your desired startup screen Logo Display logo on the start up screen User Customized start up screen Off Display an empty start up screen Background Color...

Page 49: ...l from AV equipment is input Limited Range Process the input image with a limited RGB range Test pattern Display the test patterns built in the projector Position size and other element settings are n...

Page 50: ...countdown when there is no signal input Auto Power Off is activated when the set time interval is due The luminous LED light source will turn off to cool down and enter the standby mode Auto Power Of...

Page 51: ...s pressed Network Configure the network settings DHCP Select On to allow the projector to obtain an IP address automatically from your network Select Off to man ually assign IP Subnet Mask and Gateway...

Page 52: ...on the remote control is not operable Security Select On to use the security verification when the turning on the projector Select Off to be able to switch on the projector without security verificati...

Page 53: ...Reset all Return the adjustments and settings to the factory default values not including the language and Security setting Choose Select to return the display parameters on all menus except Language...

Page 54: ...turn up the volume HDMI Audio Input You can connect an external device to the HDMI 1 In HDMI 2 MHL In or Audio 2 In terminal of the projector to output the audio When HDMI is selected audio from the...

Page 55: ...ified connection terminal Input Source Use this option to enable disable input sources Press the key to enter the sub menu and select which sources you require Press Enter to finalize the selection Th...

Page 56: ...use duration of the filter that is specify the cleaning cycle for the filter If the Filter Reminder is specified and the use duration exceeded the specified maximum value the screen displays an alert...

Page 57: ...tructions functions are unavailable Normal In the Normal mode serial communication functions and network functions are not limited Information Displays information related to the projector Detects pro...

Page 58: ...lide show of images you can specify the slide switching interval Sort Order If you want to project a slide show of images the display effects for switching slides can be customized Name Displays by fi...

Page 59: ...ee Rotates the image 180 Degree 270 Degree Rotates the image 270 Degree to the left Repeat You can specify whether to repeat display slides Off Returns to the thumbnail display after the last file is...

Page 60: ...USB 2 0 3 Maximum number of folders files that can be displayed is 500 4 Cannot play digital rights management DRM protected files Displaying the Memory Viewer Screen 1 Press the Input button on the...

Page 61: ...rts with all images in a same di rectly 1 Press the buttons on the remote control to select a file 2 Press to select Slideshow 3 Press the Enter button on the remote control Images are displayed in fu...

Page 62: ...GHER Display 640x480 pixels or more Displaying the USB Display 1 Connect the USB terminal of the projector to the computer by using a USB A B cable Items in gray are unavailable 2 Press the Input butt...

Page 63: ...rom the computer Play video Pause video Switches between playing and pausing images Start Stop Specifies whether to output images from the computer Exit Items in gray are unavailable Disabling the USB...

Page 64: ...rsions Windows 8 32 bit and 64 bit versions CPU Intel Core 2 Duo 2 0 GHz or other faster compatible processors Memory size Recommended memory size for the operating system of the computer Disk free sp...

Page 65: ...ype to Normal and keep the password blank The projector will be found as name RICOH PJ xxxx xxxx is last 4 digits of the projector s MAC address Starting pausing capture Starts or pauses capturing the...

Page 66: ...Basic Setting Specifies the language capture region size and so on Advanced Setting Specifies the image quality network port and so on Basic Setting Advanced Setting Global Setting Specifies remote co...

Page 67: ...Settings Projector Network Management Specifies the network user name and password for pwPresenter Multicast Setting Specifies the sound volume bandwidth capture rate and so on Disconnecting a connec...

Page 68: ...ice 1 Confirmation of the IP address of the device Select the Default Settings Network in the menu of this device and verify the IP address See pages 49 on the projector user s manual 2 Connection Ent...

Page 69: ...follows User Name admin with administrator privileges Password admin Login by clicking the Login button When you log in a navigation bar for setting the projector will be displayed on the left side o...

Page 70: ...password again for confirmation Apply Updates the settings Power Switches the power of the projector between On and Off Source Select Switches the input source of the projector Picture Setup You can c...

Page 71: ...ge Frequency Adjusts the frequency of the projected image Freeze Switches the image freezing function between on and off Auto PC Adj Implements automatic adjustment by the PC V Keystone Adjusts the ve...

Page 72: ...enter the IP address Subnet If no DHCP is used enter the subnet Gateway If no DHCP is used enter the gateway IP address DNS If no DHCP is used enter the DNS server IP address Supported characters Digi...

Page 73: ...mum of 100 projectors connected to the network can be managed using one computer Projector Management Utility operating environment is described below Supported operating system Windows Vista 32 bit 6...

Page 74: ...and then click X to close the user s manual window 3 Right click the CD ROM icon and select OPEN 4 Open Projector Management Utility folder stored on the CD ROM 5 Double click setup exe stored in the...

Page 75: ...English 73 English LAN Control Click Auto Search button List of projectors which support PJLink are displayed in the window Projector name is displayed as until authorization if password is enable...

Page 76: ...sword of the projector is set to enable Click OK button to return to the original screen 2 Directly specifies the IP address and registers the projector Enter IP address of the desired projector and c...

Page 77: ...ted from the Projector Group List Input button Switches the input source of the projectors or groups selected from the Projector Group List Input source will not be changed if the projector doesn t su...

Page 78: ...Mute button Turn On Off the muting of the projectors or groups selected from the Projector Group List The projector only supports Video Audio mute Detail Information button Show detail information of...

Page 79: ...tput settings usually need to be changed For details on the settings see the user manual for the computer Images can be displayed only 10s after the projector is turned on Check the input signal color...

Page 80: ...e remote control or on the OSD menu choose Image Adjustment Image Mode and specify an appropriate display aspect ratio Problem Projected image is too small or too big Adjust the zoom lever of the proj...

Page 81: ...mperature is excessively high After the projector fully cools down and the temperature restores to a normal value the power indicator is red and lit up The projector can now be turned on 1s When the i...

Page 82: ...h to gently clean the filter 4 Re install the filter Ensure that it is fully inserted into the projector Replacing the filter 1 Turn off the projector and unplug the AC power supply from the power soc...

Page 83: ...50 0 800 x 600 75 46 9 49 5 800 x 600 85 53 7 56 3 Mac 1152 x 864 75 67 5 108 SXGA 1280 x 1024 60 64 108 1280 x 1024 72 77 133 1280 x 1024 75 80 135 QVGA 1280 x 960 60 60 101 3 SXGA 1400 x 1050 60 65...

Page 84: ...480 67 35 0 26 8 640 x 480 72 37 9 31 5 640 x 480 75 37 5 31 5 640 x 480 85 43 3 36 0 SVGA 800 x 600 56 35 1 36 0 800 x 600 60 37 9 40 0 800 x 600 72 48 1 50 0 800 x 600 75 46 9 49 5 800 x 600 85 53...

Page 85: ...6p 720x576 50 31 3 27 720p 1280x720 60 45 74 25 1280x720 50 37 5 74 25 1080i 1920x1080 60 33 8 74 25 1920x1080 50 28 1 74 25 1080p 1920x1080 23 98 24 27 74 25 1920x1080 60 67 5 148 5 1920x1080 50 563...

Page 86: ...onizing input output 7 Grounding green 15 DDC Clock 8 Grounding blue PC Control Terminal D SUB 9 1 6 2 RXD 7 3 TXD 8 4 9 5 GND LAN terminal 1 TX 5 2 TX 6 RX 3 RX 7 4 8 HDMI terminal HDMI Type A 19 1 T...

Page 87: ...Monitor Out Audio 1 In Audio 2 In Audio OUT Mono R L PC Control Speaker 10W 8ohm x 2 Light source life 20000 hours Noise Full Typ 37 5dB A ECO Typ 33 5dB A Operating environment Operating temperature...

Page 88: ...86 English Appendices External Dimensions Ceiling nut 4 M4X10mm Tapped holes used for ceiling installation Screw M4 Depth 10 0mm Unit mm...

Page 89: ...High Definition Multimedia Interface are trademarks or registered trademarks of HDMI Licensing LLC MHL Mobile High Definition Link and MHL Logo are trademarks or registered trademarks of MHL LLC Kensi...

Page 90: ......

Reviews: