37
Operating Instructions
– 1. Getting Started - Guide to Components
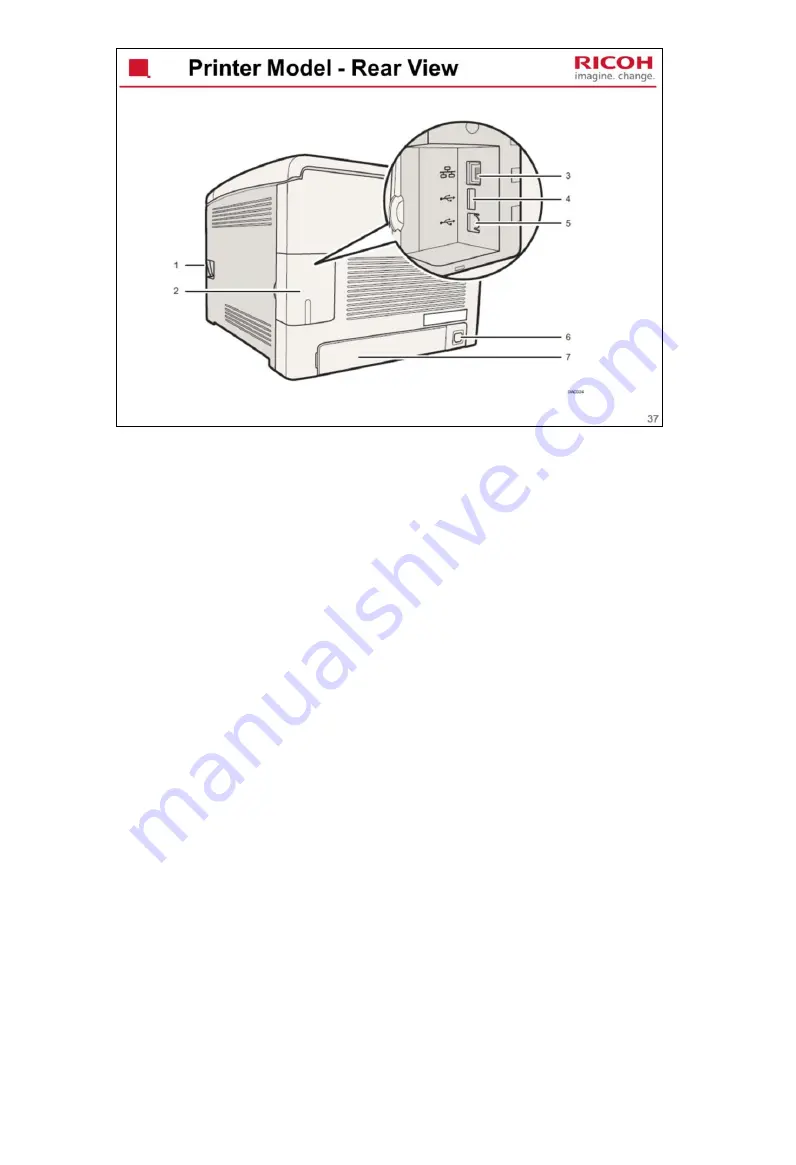
1. Front Cover Open Lever: To open the front cover, pull this lever on the
right side of the machine.
2. Cable Cover: Remove this cover when connecting cables to the machine.
3. Ethernet Port: For connecting the machine to the network using a network
interface cable.
4. USB Host Interface: Use a USB cable to connect the digital camera to the
machine. You can print images directly from a digital camera, without having
to connect to a computer.
5. USB Port: For connecting the machine to a computer using a USB cable.
6. Power Socket: For connecting the power cord to the machine.
7. Rear Cover: Remove this cover when loading paper longer than A4 in Tray
1.
Summary of Contents for M199
Page 2: ...2 This section provides an overview of the machine and the options that can be installed ...
Page 4: ...4 No additional notes ...
Page 6: ...6 No additional notes ...
Page 7: ...7 No additional notes ...
Page 8: ...8 No additional notes ...
Page 9: ...9 No additional notes ...
Page 14: ...14 No additional notes ...
Page 16: ...16 PDL for PE MF3a DDST GDI ...
Page 17: ...17 These specs are the same as PE P2 except where mentioned ...
Page 18: ...18 PDL for PE P2a DDST GDI ...
Page 19: ...19 No additional notes ...
Page 20: ...20 No additional notes ...
Page 22: ...22 No additional notes ...
Page 23: ...23 No additional notes ...
Page 24: ...24 No additional notes ...
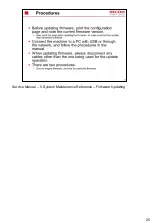
Page 25: ...25 Service Manual 5 System Maintenance Reference Firmware Updating ...
Page 26: ...26 No additional notes ...
Page 27: ...27 No additional notes ...
Page 28: ...28 No additional notes ...
Page 29: ...29 Service Manual Preventive Maintenance ...
Page 30: ...30 PE MF4c P4c has an expected life of 180k ...
Page 31: ...31 The expected yield of these parts is 90k ...
Page 32: ...32 No additional notes ...
Page 33: ...33 Service Manual Appendix 5 Machine Swap ...
Page 34: ...34 No additional notes ...
Page 35: ...35 No additional notes ...
Page 40: ...40 No additional notes ...
Page 41: ...41 No additional notes ...
Page 43: ...43 Operating Instructions 1 Getting Started See the operation manual for details ...
Page 46: ...46 No additional notes ...
Page 47: ...47 1 Paper path from tray 1 2 Duplex path 3 By pass tray 4 Paper path from tray 2 optional ...
Page 55: ...right of the ITB This process takes about 22 seconds to be completed 54 ...
Page 60: ...58 Service Manual Replacement and Adjustment Electrical Components EGB Engine Board ...
Page 63: ...61 Service Manual Troubleshooting Image Problems ...
Page 65: ...63 No additional notes ...
Page 66: ...64 No additional notes ...
Page 67: ...65 No additional notes ...
Page 68: ...66 No additional notes ...
Page 69: ...67 This is the same as the PE MF3 P2 ...
Page 71: ...69 No additional notes ...
Page 72: ...70 No additional notes ...
Page 73: ...71 MUSIC is done at the times explained in the process control section of the course ...
Page 74: ...72 No additional notes ...
Page 75: ...73 No additional notes ...
Page 76: ...74 No additional notes ...
Page 77: ...75 No additional notes ...
Page 78: ...76 No additional notes ...
Page 80: ...78 No additional notes ...
Page 81: ...79 The mechanism is the same as the PE MF3 P2 ...
Page 84: ...82 The color AIO motor drives the central gear as shown in the diagram below ...
Page 88: ...86 No additional notes ...
Page 89: ...87 This mixing mechanism prevents toner hardening and uneven image density in the outputs ...
Page 90: ...88 This machine uses mono component toner with no carrier so a TD sensor is not necessary ...
Page 91: ...89 This system is used instead of a quenching lamp ...
Page 93: ...91 No additional notes ...
Page 94: ...92 This is the same as the PE MF3 P2 ...
Page 96: ...94 The clutches are shown in blue ...
Page 97: ...95 No additional notes ...
Page 98: ...96 No additional notes ...
Page 100: ...98 No additional notes ...
Page 101: ...99 No additional notes ...
Page 102: ...100 No additional notes ...
Page 103: ...101 This is the same as the PE MF3 P2 ...
Page 104: ...102 No additional notes ...
Page 105: ...103 No additional notes ...
Page 106: ...104 No additional notes ...
Page 108: ...106 No additional notes ...
Page 112: ...110 No additional notes ...
Page 115: ...113 Transfer Roller Unit Contains the paper transfer roller ...
Page 116: ...114 No additional notes ...
Page 117: ...115 No additional notes ...
Page 118: ...116 This is the same as the PE MF3 P2 ...
Page 120: ...118 No additional notes ...
Page 122: ...120 No additional notes ...
Page 123: ...121 No additional notes ...
Page 124: ...122 No additional notes ...
Page 125: ...123 No additional notes ...
Page 126: ...124 No additional notes ...
Page 127: ...125 No additional notes ...
Page 129: ...127 No additional notes ...
Page 130: ...128 No additional notes ...
Page 131: ...129 No additional notes ...
Page 132: ...130 No additional notes ...
Page 133: ...131 No additional notes ...
Page 134: ...132 This is the same as the PE MF3 P2 ...
Page 136: ...134 No additional notes ...
Page 137: ...135 The next slide shows what happens after you put the tray in the machine ...
Page 138: ...136 No additional notes ...
Page 139: ...137 No additional notes ...
Page 140: ...138 G849 Service Manual Replacement and Adjustment Paper Feed Unit Friction Pad ...
Page 141: ...139 The End ...


