background image

Firmware Updating 

SM 5-5 

M018/M019 

Syste

m


Ma

in

te

na

n

ce 

Referen

ce 


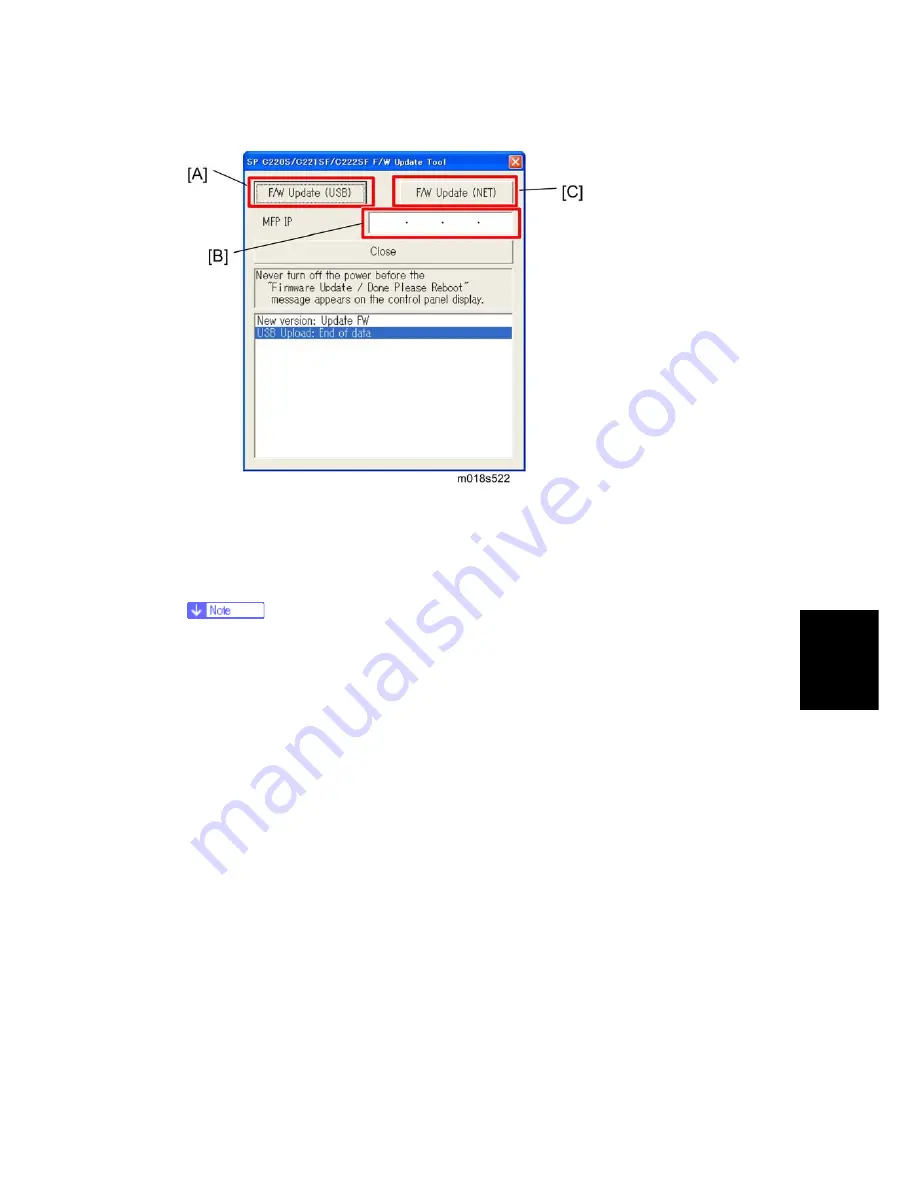
7.  For a USB connection, click [F/W Update (USB)] [A]. For a network connection, enter 

the machine’s IP address in [MFP IP] [B], and then click [F/W Update (NET)] [C]. 

8.  Check the control panel display for messages and the update’s current percentage of 

completion. 


ƒ


The Update may take a while to complete. Do not turn off the power during the 

update. 

ƒ


Turn off the power only when the machine beeps and “Firmware Update Done 

Please Reboot” appears on the control panel display. 

9.  Wait until the machine beeps once and “Firmware Update Done Please Reboot” 

appears on the control panel display. 

ƒ


Click [Close] to the update tool. 

10.  Turn off the power, and turn it back on. 

ƒ


After you turn the power back on, “Initializing” appears on the control panel display. 

11.  Wait until the initial screen appears on the control panel display. 

ƒ


If the initial screen does not appear after more than one minute, the update is not 

complete. In this case, see “Updating Failure”. 

12.  Repeat Steps 3 to 5 to print the configuration page again. 

Take note of the new firmware version (shown under “Firmware Version” on the 

configuration page). 

13.  Reconnect the telephone line cable to the machine. 

Summary of Contents for M018

Page 1: ...M018 M019 SERVICE MANUAL 004349MIU ...

Page 2: ......

Page 3: ...M018 M019 SERVICE MANUAL ...

Page 4: ......

Page 5: ...M018 M019 SERVICE MANUAL 004349MIU ...

Page 6: ......

Page 7: ...SION OF RICOH AMERICAS CORPORATION All product names domain names or product illustrations including desktop images used in this document are trademarks registered trademarks or the property of their respective companies They are used throughout this book in an informational or editorial fashion only and for the benefit of such companies No such use or the use of any trade name or web site is inte...

Page 8: ......

Page 9: ...ation Users of this manual should be either service trained or certified by successfully completing a Ricoh Technical Training Program Untrained and uncertified users utilizing information contained in this service manual to repair or modify Ricoh equipment risk personal injury damage to property or loss of warranty protection Ricoh Americas Corporation WARNING ...

Page 10: ......

Page 11: ... PRODUCT CODE GESTETNER LANIER RICOH SAVIN M018 SP C231SF SP C231SF Aficio SP C231SF SP C231SF M019 SP C232SF SP C232SF Aficio SP C232SF SP C232SF DOCUMENTATION HISTORY REV NO DATE COMMENTS 02 2009 Original Printing ...

Page 12: ......

Page 13: ...Scanner 1 3 1 2 2 PAPER PATH 1 4 Engine 1 4 ADF 1 4 1 2 3 DRIVE LAYOUT 1 5 1 3 MACHINE CONFIGURATION 1 7 1 4 GUIDANCE FOR THOSE WHO ARE FAMILIAR WITH PREDECESSOR PRODUCTS 1 8 INSTALLATION 2 INSTALLATION 2 1 2 1 INSTALLATION REQUIREMENTS 2 1 2 1 1 ENVIRONMENT 2 1 2 1 2 MACHINE LEVEL 2 1 2 1 3 MACHINE SPACE REQUIREMENT 2 2 2 1 4 POWER REQUIREMENTS 2 3 2 1 5 INSTALLATION PROCEDURE 2 3 ...

Page 14: ...acing the laser optics housing unit 4 11 4 5 AIO CARTRIDGE 4 12 4 5 1 AIO CARTRIDGE ALL IN ONE CARTRIDGE 4 12 4 5 2 BLACK AIO MOTOR 4 13 4 5 3 COLOR AIO MOTOR 4 16 4 6 IMAGE TRANSFER 4 17 4 6 1 IMAGE TRANSFER BELT UNIT 4 17 After replacing the image transfer belt unit 4 18 4 6 2 ITB IMAGE TRANSFER BELT CLEANING UNIT 4 19 4 6 3 AGITATOR MOTOR 4 20 4 6 4 ITB IMAGE TRANSFER BELT CONTACT MOTOR 4 21 4 ...

Page 15: ... SENSOR 4 39 4 10 PAPER EXIT 4 40 4 10 1 PAPER EXIT ROLLER 4 40 When reinstalling the paper exit roller 4 41 4 10 2 PAPER EXIT SENSOR 4 42 4 11 ELECTRICAL COMPONENTS 4 43 4 11 1 CONTROLLER BOARD 4 43 Main Controller Board 4 43 PDL Board M019 only 4 44 4 11 2 EGB ENGINE BOARD 4 45 When installing the new EGB 4 46 4 11 3 FCU 4 46 4 11 4 INTERLOCK SWITCHES 4 47 4 11 5 FUSING FAN MOTOR 4 48 4 11 6 LSU...

Page 16: ... 4 13 SCANNER 4 70 4 13 1 SCANNER UNIT 4 70 4 13 2 SCANNER TOP COVER 4 72 4 13 3 SCANNER CARRIAGE UNIT 4 73 4 13 4 EXPOSURE LAMP 4 75 When reinstalling the exposure lamp 4 76 4 13 5 LAMP STABILIZER BOARD 4 77 4 13 6 SCANNER MOTOR 4 78 SYSTEM MAINTENANCE REFERENCE 5 SYSTEM MAINTENANCE REFERENCE 5 1 5 1 SERVICE PROGRAM 5 1 5 1 1 OVERVIEW 5 1 5 2 CONFIGURATION PAGE INFORMATION 5 2 5 2 1 OVERVIEW 5 2 ...

Page 17: ... 5 BOOT LOADER FIRMWARE 5 13 TROUBLESHOOTING 6 TROUBLESHOOTING 6 1 6 1 TROUBLESHOOTING GUIDE 6 1 6 2 IMAGE PROBLEMS 6 2 6 2 1 OVERVIEW 6 2 6 2 2 CHECKING A SAMPLE PRINTOUT 6 3 Printer Driver Setting for Printing a Sample 6 4 M018 M019 SERVICE MANUAL APPENDICES SEE M018 M019 SERVICE MANUAL APPENDICES SECTION FOR DETAILED TABLE OF CONTENTS ...

Page 18: ......

Page 19: ...PREVENTIVE MAINTENANCE APPENDIX TROUBLESHOOTING GUIDE REPLACEMENT AND ADJUSTMENT APPENDIX SP MODE TABLES SYSTEM MAINTENANCE REFERENCE APPENDIX MACHINE SWAP TROUBLESHOOTING TAB POSITION 2 TAB POSITION 1 TAB POSITION 3 TAB POSITION 4 TAB POSITION 6 TAB POSITION 5 TAB POSITION 8 TAB POSITION 7 ...

Page 20: ......

Page 21: ...me extremely hot while the machine is operating Be careful to avoid touching those components with your bare hands Health Safety Conditions Toner is non toxic but if you get either of them in your eyes by accident it may cause temporary eye discomfort Try to remove with eye drops or flush with water as first aid If unsuccessful get medical attention Observance of Electrical Safety Standards The ma...

Page 22: ...ical units in the field The optical housing unit can only be repaired in a factory or at a location with the requisite equipment The laser subsystem is replaceable in the field by a qualified Customer Engineer The laser chassis is not repairable in the field Customer engineers are therefore directed to return all chassis and laser subsystems to the factory or service depot when replacement of the ...

Page 23: ...s of Microsoft Corporation in the United States and or other countries PostScript is a registered trademark of Adobe Systems Incorporated PCL is a registered trademark of Hewlett Packard Company Ethernet is a registered trademark of Xerox Corporation PowerPC is a registered trademark of International Business Machines Corporation Other product names used herein are for identification purposes only...

Page 24: ......

Page 25: ...SPECIFICATIONS SPECIFICATIONS REVISION HISTORY Page Date Added Updated New None ...

Page 26: ......

Page 27: ...Specifications SM 1 1 M018 M019 Product Information 1 PRODUCT INFORMATION 1 1 SPECIFICATIONS See Appendices for the following information General Specifications Supported Paper Sizes ...

Page 28: ...Engine 1 Laser Optics Housing Unit 2 Print Cartridge AIO 3 Development Roller AIO 4 Paper Exit 5 Fusing Unit 6 Fusing Lamp 7 Duplex Path 8 Transfer Roller 9 Registration Roller 10 By pass 11 Paper Feed Roller 12 ITB Image Transfer Belt Unit 13 OPC AIO 14 Tray 1 15 EGB Controller ...

Page 29: ...t Information ADF 1 Feed Sensor 2 Feed Roller 3 Separation Roller 4 Pick up Roller 5 Exit Roller 6 Original Set Sensor 7 DF Exposure Glass Scanner 1 Scanner Carriage Unit 2 DF Exposure Glass 3 Exposure Glass 4 Carriage Drive Bar 5 White Plate ...

Page 30: ...Machine Overview M018 M019 1 4 SM 1 2 2 PAPER PATH Engine 1 Paper path from tray 1 2 Duplex path 3 By pass tray 4 Paper path from tray 2 optional ADF 1 Original path ...

Page 31: ...TB Image Transfer Belt Contact Motor Color AIO Motor This drives the color AIOs Cyan Magenta and Yellow Black AIO Motor This drives the black AIO and the ITB Image Transfer Belt Duplex Motor This drives the paper exit roller and the duplex roller Transport Fusing Motor This drives the fusing unit paper feed roller registration roller and paper exit roller via the paper feed clutch registration clu...

Page 32: ...port fusing motor to the registration roller Paper Feed Clutch This transfers drive from the transport fusing motor to the paper feed roller Agitator Motor This moves the agitators in the waste toner bottle ITB Contact Motor This moves the ITB into contact with and away from the color OPCs ...

Page 33: ...chine Configuration SM 1 7 M018 M019 Product Information 1 3 MACHINE CONFIGURATION Models Duplex Unit Optional Memory Optional Tray G849 DDST GDI PCL PS Fax M018 Auto N 500x1 Y N Y M019 Auto Y 500x1 N Y Y ...

Page 34: ...els are similar to the G181 G183 G184 series If you have experience with those products the following information will be of help when you read this manual Different Points from Previous Products M018 M019 G181 G183 G184 Print Cartridge AIO Longer life Print Cartridge AIO Operation Panel Four separated menu keys and user tool button One menu key and no user tool button ...

Page 35: ...INSTALLATION INSTALLATION REVISION HISTORY Page Date Added Updated New None ...

Page 36: ......

Page 37: ... get sudden temperature changes This includes Areas directly exposed to cool air from an air conditioner Areas directly exposed to heat from a heater 6 Do not put the machine in areas that get exposed to corrosive gas 7 Do not install the machine at locations over 2 500 m 8 125 ft above sea level 8 Put the machine on a strong level base Inclination on any side must be no more than 5 mm 9 Do not pu...

Page 38: ...ents M018 M019 2 2 SM 2 1 3 MACHINE SPACE REQUIREMENT Put the machine near the power source with these clearances Left side Over 20 cm 7 9 Rear Over 20 cm 7 9 Right side Over 10 cm 4 Front Over 70 cm 27 5 Top Over 24 cm 9 5 ...

Page 39: ...iring Make sure that you ground the machine Input voltage level 120 V 60 Hz More than 11 A for North America 220 V to 240 V 50 Hz 60 Hz More than 6 A for Europe Asia Permitted voltage fluctuation 10 Do not set anything on the power cord 2 1 5 INSTALLATION PROCEDURE Refer to the Quick Installation Guide for details about installing the machine ...

Page 40: ......

Page 41: ...PREVENTIVE MAINTENANCE PREVENTIVE MAINTENANCE REVISION HISTORY Page Date Added Updated New None ...

Page 42: ......

Page 43: ...Preventive Maintenance SM 3 1 M018 M019 Preventive Maintenance 3 PREVENTIVE MAINTENANCE 3 1 PREVENTIVE MAINTENANCE See Appendices for the User Replaceable Items ...

Page 44: ......

Page 45: ...REPLACEMENT ADJUSTMENT REPLACEMENT ADJUSTMENT REVISION HISTORY Page Date Added Updated New 58 59 02 03 2010 Added PnP Name Plug and Play Procedure ...

Page 46: ......

Page 47: ...ment Adjustment 4 REPLACEMENT ADJUSTMENT 4 1 BEFORE YOU START If there are printer jobs in the machine print out all jobs in the printer buffer Turn off the main power switch and unplug the machine before you do the procedures in this section ...

Page 48: ...Special Tools M018 M019 4 2 SM 4 2 SPECIAL TOOLS PC Windows 2000 XP Vista Windows Server 2003 2003 R2 or Mac OS X USB cable or Crossover cable ...

Page 49: ...s SM 4 3 M018 M019 Replacement Adjustment 4 3 EXTERIOR COVERS Turn off the main power switch and unplug the machine before you do the procedures in this section 4 3 1 REAR COVER 1 Rear tray cover A 2 Rear cover B x 2 ...

Page 50: ...Exterior Covers M018 M019 4 4 SM 4 3 2 OPERATION PANEL 1 Open the top cover A 2 Open the front cover B 3 Front harness cover C x 1 4 Operation panel D x 1 x 1 ...

Page 51: ...tment 4 3 3 RIGHT COVER 1 Rear cover p 4 3 2 Operation panel p 4 4 3 Right cover A x 4 Top front screw M3x8 others M4x10 4 3 4 LEFT COVER 1 Rear cover p 4 3 2 Operation panel p 4 4 3 Left cover A x 3 hook at arrow mark Top front screw M3x8 others M4x10 ...

Page 52: ...r Covers M018 M019 4 6 SM 4 3 5 FRONT COVER UNIT 1 Rear cover p 4 3 2 Operation panel p 4 4 3 Transfer unit p 4 27 4 Right cover p 4 5 5 Cover link gear unit A x 2 6 Release the belt B 7 Front cover unit C x 4 ...

Page 53: ... can cause serious eye injury 4 4 1 CAUTION DECAL LOCATION Caution decals are attached as shown below Be sure to turn off the main power switch and disconnect the power plug from the power outlet before beginning any disassembly or adjustment of the laser unit This printer uses a class IIIb laser beam with a wavelength of 780 nm and an output of 7 mW The laser can cause serious eye injury ...

Page 54: ...SER OPTICS HOUSING UNIT 1 Rear cover p 4 3 2 Controller box cover p 4 43 Controller Board 3 Remove the controller bracket p 4 45 EGB Engine Board 4 Disconnect the three harnesses from CN301 302 and 303 on the EGB x 3 5 Open the top cover A ...

Page 55: ... B of the harness guide at the rear left frame and slide the harness guide to the right 7 Remove the springs D left side and right side 8 Stoppers C x 2 each left side and right side 9 Remove the laser optics housing unit E from the top cover and place it on the main body ...

Page 56: ... Always use two hands when carrying the laser optics housing unit Be sure not to drop the laser optics housing unit 10 Take out the harnesses F x 1 11 Pull out the harnesses from the rear side 12 Remove the laser optics housing unit ...

Page 57: ...e released separately and will contain lists of input data for each lot number Input the data for this lot number from the information sheets with steps 3 to 7 below 3 Open the front cover and turn on the machine 4 Input the setting values for the laser optics housing unit User Tools Maintenance Mode Engine Maintenance LSU Adjustment 5 Close the front cover 6 Execute Color Registration in the Engi...

Page 58: ...AIO Cartridge M018 M019 4 12 SM 4 5 AIO CARTRIDGE 4 5 1 AIO CARTRIDGE ALL IN ONE CARTRIDGE 1 Open the top cover 2 AIO cartridge A ...

Page 59: ... 2 BLACK AIO MOTOR 1 Left cover p 4 5 2 Disconnect the fusing connector A and remove the fusing relay harness B hooks 3 Fusing harness guide C x 2 4 Disconnect the connectors shown by arrows in the above picture and release all harnesses on the harness guide D ...

Page 60: ...8 M019 4 14 SM 5 Harness guide D x 4 6 Interlock switch base Interlock Switches 7 Controller bracket p 4 43 Controller Board 8 Disconnect the connector CN305 on the EGB 9 LSU fan motor base E x 2 x 1 10 Drive unit F x 4 ...

Page 61: ...AIO Cartridge SM 4 15 M018 M019 Replacement Adjustment 11 Drive unit guide G x 3 12 Black AIO gear H snap ring x 1 13 Black AIO motor I x 3 ...

Page 62: ...AIO Cartridge M018 M019 4 16 SM 4 5 3 COLOR AIO MOTOR 1 Drive unit p 4 13 Black AIO Motor 2 Drive unit guide A x 3 3 Color AIO gears B ring stopper x 1 each 4 Color AIO motor C x 3 ...

Page 63: ...E TRANSFER 4 6 1 IMAGE TRANSFER BELT UNIT 1 Remove all the AIO cartridges p 4 12 2 Transfer unit p 4 27 3 Pull out the waste toner bottle A 4 Release the hook B under the guide plate 5 Move the guide plate C underneath the fusing unit to the left and then remove it ...

Page 64: ... of the machine open 1 Open the front cover and turn on the machine 2 Execute Reset Transfer Unit Life Counter with the Engine Maintenance menu 3 Close the front cover 4 Execute Trans Belt Adjust with the Engine Maintenance menu 5 Adjust the registration settings for each tray and for the front and rear sides of the paper with the Engine Maintenance menu if necessary ...

Page 65: ... IMAGE TRANSFER BELT CLEANING UNIT The ITB cleaning unit contains waste toner When removing the ITB cleaning unit put it on a sheet of paper 1 Image transfer belt unit p 4 17 2 Left handle A hook bushing x 1 3 Right handle B hook bushing x 1 4 ITB cleaning unit C x 2 ...

Page 66: ...Image Transfer M018 M019 4 20 SM 4 6 3 AGITATOR MOTOR 1 Right cover p 4 5 2 Motor bracket A x 2 3 Agitator motor assembly B x 1 x 1 4 Agitator motor C x 2 ...

Page 67: ...e Transfer SM 4 21 M018 M019 Replacement Adjustment 4 6 4 ITB IMAGE TRANSFER BELT CONTACT MOTOR 1 Agitator motor p 4 20 2 Release the wire A 3 ITB contact motor assembly B x 1 x 1 4 ITB contact motor C x 2 ...

Page 68: ...ge Transfer M018 M019 4 22 SM 4 6 5 ITB IMAGE TRANSFER BELT CONTACT SENSOR 1 Right cover p 4 5 2 High voltage power supply board p 4 54 3 ITB contact sensor assembly A x 1 x 1 4 ITB contact sensor B hooks ...

Page 69: ...Open the top cover 2 Remove all AIO cartridges p 4 12 3 Slide the ITB unit to the front side or remove it 4 Rear cover p 4 5 5 Controller box cover p 4 43 Controller Board 6 Controller bracket p 4 45 EGB Engine Board 7 Disconnect CN306 on the EGB x 1 8 Harness cover A hook 9 TM sensor base B ...

Page 70: ...M018 M019 4 24 SM 4 6 7 WASTE TONER BOTTLE SET SENSOR 1 Remove all AIO cartridges p 4 12 2 Image transfer belt unit p 4 17 3 EGB p 4 45 4 Remove two screws A for the waste toner sensor base 5 Waste toner sensor base B ...

Page 71: ...acement Adjustment 6 Remove the mylar fixing three hooks of the waste toner bottle set sensor 7 Waste toner bottle set sensor C hooks x 1 When reinstalling the waste toner bottle set sensor connect it to the white connector of the harness ...

Page 72: ...nsfer belt unit p 4 17 3 EGB p 4 45 4 Waste toner sensor base p 4 24 Waste Toner Bottle Set Sensor 5 Remove the mylar fixing three hooks of the waste toner bottle set sensor 6 Waste toner overflow sensor A hooks x 1 When reinstalling the waste toner overflow sensor connect it to the black connector of the harness ...

Page 73: ...Paper Transfer SM 4 27 M018 M019 Replacement Adjustment 4 7 PAPER TRANSFER 4 7 1 TRANSFER UNIT 1 Open the front cover 2 Release the locks A 3 Transfer unit B ...

Page 74: ...Paper Transfer M018 M019 4 28 SM 4 7 2 TRANSFER ROLLER 1 Transfer Unit p 4 27 1 Release the two hooks A at both sides of the transfer unit 2 Open the transfer roller unit B and remove it ...

Page 75: ...Paper Transfer SM 4 29 M018 M019 Replacement Adjustment 3 Transfer roller assembly C x 2 4 Release the holder D at the left side of the transfer roller unit hook 5 Transfer roller E ...

Page 76: ...ion springs A both sides 4 Registration idle roller B x 2 gear x 1 bushing x 2 5 Registration roller C x 2 gear x 2 bushing x 2 Reassembling the registration roller unit When installing the tension spring make sure that the tension spring correctly hooks onto the bushing of the registration idle roller as shown above A ...

Page 77: ...Paper Transfer SM 4 31 M018 M019 Replacement Adjustment 4 7 4 REGISTRATION SENSOR 1 Rear cover p 4 3 2 Right Cover p 4 5 3 Registration sensor assembly A x 1 x 1 4 Registration sensor B hooks ...

Page 78: ...Paper Transfer M018 M019 4 32 SM 4 7 5 REGISTRATION CLUTCH 1 Rear cover p 4 3 2 Left cover p 4 5 3 Transport Fusing motor p 4 35 4 Registration clutch A x 1 ...

Page 79: ...very hot Make sure to restore the insulators shields etc after you service the fusing unit 4 8 1 FUSING UNIT 1 Open the front cover 2 Rear cover p 4 3 3 Right cover p 4 5 4 Left cover p 4 5 5 Disconnect the connectors A hook B The sponge C clamps the harness Install this sponge in the same position after reinstalling the fusing unit 6 Fusing unit D x 2 ...

Page 80: ...MP 1 Fusing unit p 4 33 2 Fusing front cover A x 4 3 Fusing lamp B x 2 ground cable x 1 When Reinstalling the Fusing Lamp The terminal A which shows the voltage and power ratings must be placed at the left side of the fusing unit fusing cable side ...

Page 81: ...t 4 8 3 TRANSPORT FUSING MOTOR 1 Rear cover p 4 3 2 Left cover p 4 5 3 Disconnect the fusing connector A hook 4 Fusing harness guide B x 2 5 Duplex timing belt C 6 Transport Fusing motor assembly D x 3 x 3 ground plate x 1 7 Transport Fusing motor E x 3 ...

Page 82: ...Paper Feed M018 M019 4 36 SM 4 9 PAPER FEED 4 9 1 PAPER FEED CLUTCH 1 Rear cover p 4 3 2 Left cover p 4 5 3 Disconnect the fusing relay harness A hook 4 Paper feed clutch B x 1 x 1 ...

Page 83: ...artridges 2 Remove the waste toner bottle 3 Rear cover p 4 3 4 Left cover p 4 5 5 Paper feed clutch p 4 36 6 Close the top cover and front cover 7 Pull out the tray 8 Stand the machine with the rear side facing the table 9 Slide the paper feed shaft A to the left side x 2 10 Paper feed roller B hook ...

Page 84: ...AD 1 Pull out the tray 2 Push down the bottom plate A 3 Separation pad B hooks spring x 1 When reinstalling the separation pad make sure that the mylar C is not placed under the separation pad The right side image above shows incorrect installation ...

Page 85: ...eed SM 4 39 M018 M019 Replacement Adjustment 4 9 4 PAPER END SENSOR 1 Rear cover p 4 3 2 Right cover p 4 5 3 High voltage power supply board p 4 54 4 Paper end sensor assembly A x 1 5 Paper end sensor B hooks ...

Page 86: ... 4 40 SM 4 10 PAPER EXIT 4 10 1 PAPER EXIT ROLLER 1 Operation panel p 4 4 2 Remove the bushing A x 1 3 Move the bushing B to the left side x 1 4 Paper exit roller B 5 Remove the four exit guides D gear E x 1 and bushing F ...

Page 87: ... 41 M018 M019 Replacement Adjustment When reinstalling the paper exit roller Make sure that the ground wire A from the discharge sheet touches the ground plate B on the machine after reinstalling the paper exit roller ...

Page 88: ...019 4 42 SM 4 10 2 PAPER EXIT SENSOR 1 Rear cover p 4 3 2 Right cover p 4 5 3 Right bracket A x 3 M3x8 x 1 B M4x10 4 Mylar C This mylar is necessary for reinstalling the paper exit sensor 5 Paper exit sensor D hooks x 1 ...

Page 89: ...trical Components SM 4 43 M018 M019 Replacement Adjustment 4 11 ELECTRICAL COMPONENTS 4 11 1 CONTROLLER BOARD Main Controller Board 1 Rear cover p 4 3 2 Controller box cover A x 7 3 Interface bracket B x 2 ...

Page 90: ...able x 1 all s x 6 The photo above left shows the M019 and the photo above right shows the M018 PDL Board M019 only 1 Rear cover p 4 3 2 Controller box cover see p 4 43 Main Controller Board above 3 Interface bracket see p 4 43 Main Controller Board above 4 PDL board A x 4 ...

Page 91: ...SM 4 45 M018 M019 Replacement Adjustment 4 11 2 EGB ENGINE BOARD 1 Rear cover p 4 3 2 Controller box cover p 4 43 Controller Board 3 Controller bracket A x 3 ground cable x 1 all s flat cable x 1 4 EGB B x 6 all s 5 EEPROM C ...

Page 92: ...er you replace the EGB 3 Replace the EEPROM if the EEPROM on the old EGB is defective Keep the EEPROM away from any objects that can cause static electricity Static electricity can damage EEPROM data Make sure that the EEPROM is correctly installed on the EGB 4 11 3 FCU 1 Rear cover p 4 3 2 Controller box cover p 4 43 Controller Board 3 Controller bracket p 4 45 EGB Engine Board 4 FCU A x 4 ...

Page 93: ...ion panel p 4 4 2 Rear cover p 4 3 3 Left cover p 4 5 4 Remove the spring A 5 Interlock switch base B x 4 all s Remove all the connectors after the interlock switch base has been removed 6 Two interlock switches C at the outside of the base and one interlock switch D at the inside of the base hooks ...

Page 94: ...AN MOTOR 1 Operation panel p 4 4 2 Rear cover p 4 3 3 Left cover p 4 5 4 Interlock switch base p 4 47 Interlock Switches 5 Fusing fan base A x 2 x 1 6 Fusing fan motor B hooks x 1 Install the fusing fan motor with its decal facing the outside of the machine ...

Page 95: ...M 4 49 M018 M019 Replacement Adjustment 4 11 6 LSU FAN MOTOR 1 Operation panel p 4 4 2 Rear cover p 4 3 3 Left cover p 4 5 4 LSU fan motor A hooks x 1 Install the LSU fan motor with its decal facing the outside of the machine ...

Page 96: ...s M018 M019 4 50 SM 4 11 7 ID CHIP BOARD 1 Operation panel p 4 4 2 Rear cover p 4 3 3 Left cover p 4 5 4 Controller bracket p 4 43 Controller Board 5 Disconnect the connector CN305 on the EGB 6 Interlock switch base p 4 47 ...

Page 97: ...M018 M019 Replacement Adjustment Interlock Switches 7 Fusing fan base p 4 48 Fusing Fan Motor 8 Drive unit p 4 13 Black AIO Motor 9 Take the harnesses aside around the LSU fan base A 10 LSU fan base A x 2 x 1 11 ID Chip Board B x 3 ...

Page 98: ...1 Operation panel p 4 4 2 Rear cover p 4 3 3 Left cover p 4 5 4 Drive unit p 4 13 Black AIO Motor 5 LSU fan base p 4 49 LSU Fan Motor 6 PSU guide A x 3 7 Power cord bracket B x 2 8 Ground cable C x 1 9 Power switch assembly D washer screw a x 2 x 1 x 2 ...

Page 99: ...Adjustment 10 PSU assembly E x 4 all s 11 PSU F x 4 There are two types of PSUs for this model Do not install a wrong PSU in the machine PSU that has yellow a on the transistor is for NA models and PSU that has green b on the transistor is for EU models ...

Page 100: ... rating fuse for the fuse replacement Never use a wrong rating fuse If you do so the machine may be damaged Never try direct connection of PSU circuit without a fuse 4 11 9 HIGH VOLTAGE POWER SUPPLY BOARD 1 Remove all AIO cartridges 1 Operation panel p 4 4 2 Rear cover p 4 3 3 Right cover p 4 5 4 High Voltage Power Supply Board A x 7 ground cable x 1 x 1 ...

Page 101: ...Electrical Components SM 4 55 M018 M019 Replacement Adjustment 4 11 10 TEMPERATURE HUMIDITY SENSOR 1 Operation panel p 4 4 2 Rear cover p 4 3 3 Right cover p 4 5 4 Temperature Humidity sensor A x 1 x 1 ...

Page 102: ...mponents M018 M019 4 56 SM 4 11 11 DUPLEX MOTOR 1 Operation panel p 4 4 2 Rear cover p 4 3 3 Left cover p 4 5 4 Disconnect the fusing connector A 5 Duplex timing belt B 6 Left bracket C x 4 7 Duplex motor D x 2 x 1 ...

Page 103: ...Electrical Components SM 4 57 M018 M019 Replacement Adjustment 4 11 12 SPEAKER 1 Rear cover p 4 3 2 Controller box cover p 4 43 Controller Board 3 Speaker A x 2 x 1 ...

Page 104: ...enance Mode Menu 3 Select Init Engine EEPROM item and execute it to initialize the EEPROM 4 Press the Clear Stop key to exit the Engine Maintenance menu 5 Select the Serial No item and then input a serial number Ask your supervisor about how to access the serial number input display 6 Exit the serial number input display and then enter Engine Maintenance again 7 Select Destination and then select ...

Page 105: ...H Gestetner Not used LANIER NRG Savin Generic B Model Brand Ricoh 1 Gestetner LANIER NRG Savin A 2 4 5 or 6 Generic 7 Model 0x00 0x11 0x12 0x13 0x A4 0xA5 0xA6 0x77 0x78 0x79 Name not used not used Aficio SP C231SF Aficio SP C232SF not used SP C231SF SP C232SF not used C231SF C232SF Brand ID 0x01 default This ID is not related to the PnP Brand name Do not change the setting otherwise a malfunction...

Page 106: ...ADF M018 M019 4 60 SM 4 12 ADF 4 12 1 ADF UNIT 1 Stand left cover A 2 Disconnect the ADF harness B and power cord C 3 Open the ADF unit D ...

Page 107: ...ADF SM 4 61 M018 M019 Replacement Adjustment 4 Release the three hooks of the right hinge E 5 Lift the ADF unit 4 12 2 ORIGINAL TRAY 1 Open the ADF cover 2 Release the front tab A 3 Original tray B ...

Page 108: ...019 4 62 SM 4 12 3 ADF FEED UNIT 1 Open the ADF cover 2 Release the lock lever A 3 ADF feed unit B 4 12 4 ADF SEPARATION PAD 1 Open the ADF cover 2 ADF feed unit p 4 62 3 ADF separation pad A hook x 2 spring x 1 ...

Page 109: ...nt Adjustment 4 12 5 ADF FRONT COVER 1 ADF unit p 4 60 2 Original Tray p 4 61 3 ADF feed unit p 4 62 4 ADF front cover A x 1 4 12 6 ADF REAR COVER 1 ADF unit p 4 60 2 Original Tray p 4 61 3 ADF feed unit p 4 62 4 ADF rear cover A x 2 ...

Page 110: ...ADF M018 M019 4 64 SM 4 12 7 ADF COVER 1 ADF unit p 4 60 2 ADF front cover p 4 63 3 ADF rear cover p 4 63 4 ADF top cover A two tabs ...

Page 111: ...eplacement Adjustment 4 12 8 ADF MOTOR 1 ADF unit p 4 60 2 Original Tray p 4 61 3 ADF feed unit p 4 62 4 ADF front cover p 4 63 5 ADF rear cover p 4 63 6 ADF drive unit A x 4 all s 7 ADF motor assembly B x 2 8 ADF motor C x 2 ...

Page 112: ...ADF M018 M019 4 66 SM 4 12 9 ORIGINAL SET SENSOR 1 ADF unit p 4 60 2 ADF feed unit p 4 62 3 ADF motor assembly p 4 65 4 Feed roller holder A x 1 5 Upper guide B x 2 6 Original set sensor C hooks ...

Page 113: ...ADF SM 4 67 M018 M019 Replacement Adjustment 4 12 10 ADF COVER OPEN SENSOR 1 Original tray p 4 61 2 ADF rear cover p 4 63 3 ADF cover open sensor x 1 x 1 ...

Page 114: ...ADF M018 M019 4 68 SM 4 12 11 ADF FEED SENSOR 1 ADF unit p 4 60 2 ADF feed unit p 4 62 3 Sensor cover A x 2 4 ADF feed sensor B hooks ...

Page 115: ...ADF SM 4 69 M018 M019 Replacement Adjustment 4 12 12 ADF DRIVE BOARD 1 Original tray p 4 61 2 ADF rear cover p 4 63 3 ADF drive board A all s hooks ...

Page 116: ...p 4 43 Controller Board 2 Disconnect the flat cable A 3 Stand left cover B and right cover C 1 hook each 4 Disconnect the scanner harness power cord and ground cable and the ADF harness and power cord if the ADF is installed in the scanner unit x 1 5 Open the top cover of the machine ...

Page 117: ...Scanner SM 4 71 M018 M019 Replacement Adjustment 6 Remove the stepped screw D 7 Push the lock button E and slide the scanner unit to the rear side 8 ADF unit p 4 60 9 Scanner unit ...

Page 118: ... M018 M019 4 72 SM 4 13 2 SCANNER TOP COVER 1 Scanner unit p 4 70 2 Turn over the scanner unit 3 Scanner front cover A tabs x 3 4 Remove the six screws at the bottom of the scanner base B 5 Scanner top cover C ...

Page 119: ...djustment 4 13 3 SCANNER CARRIAGE UNIT 1 Scanner unit p 4 70 2 Scanner top cover p 4 72 3 Slide the scanner carriage unit A to the right side 4 Remove the timing belt tension spring B 5 Remove the flat cable C from the scanner carriage unit ...

Page 120: ...Scanner M018 M019 4 74 SM 6 Bar holder D x 1 7 Carriage bar E and scanner carriage unit F ...

Page 121: ...Scanner SM 4 75 M018 M019 Replacement Adjustment 4 13 4 EXPOSURE LAMP 1 Scanner carriage unit p 4 73 2 Carriage top cover A x 2 x 1 3 Exposure lamp B hooks ...

Page 122: ...18 M019 4 76 SM When reinstalling the exposure lamp Wire the lamp cords as shown above Otherwise the top cover pinches the lamp cords and damages them when reinstalling the top cover on the scanner carriage unit ...

Page 123: ...Scanner SM 4 77 M018 M019 Replacement Adjustment 4 13 5 LAMP STABILIZER BOARD 1 Scanner carriage unit p 4 73 2 Carriage bottom cover A x 2 3 Lamp stabilizer B x 1 ...

Page 124: ...Scanner M018 M019 4 78 SM 4 13 6 SCANNER MOTOR 1 Scanner carriage unit p 4 73 2 Scanner motor A x 3 3 Carriage rail B x 2 4 Ground plate C double sided tape 5 Scanner motor ...

Page 125: ...SYSTEM MAINTENANCE REFERENCE SYSTEM MAINTENANCE REFERENCE REVISION HISTORY Page Date Added Updated New None ...

Page 126: ......

Page 127: ...NTENANCE REFERENCE 5 1 SERVICE PROGRAM See Appendices for Service Menu 5 1 1 OVERVIEW There is an LCD on these models To execute the service program access the Maintenance Mode Menu or Fax Service Menu with special key assignments For details refer to the Service Menu section ...

Page 128: ...shown below Check the configuration page or maintenance page when doing machine maintenance To Print the Configuration Page Maintenance Page 1 Turn on the machine 2 Press the User Tools key 3 Press the or key to select Reports Print and then press the OK key 4 Press the or key to select Configuration Page or Maintenance Page and then press the OK key 5 The configuration page or maintenance page is...

Page 129: ...lay the Firmware version Controller and Engine FW version 5 3 2 UPDATING THE CONTROLLER FIRMWARE Using the following procedure to update the controller firmware Be sure to print the configuration page both before and after the update Comparing pre and post update configuration pages allows you to check whether or not the update was successful Follow the procedure carefully and note that it will va...

Page 130: ...strators or Power Users group member to acquire this permission The following procedure is based on Windows XP as an example 1 Disconnect the telephone line cable from the machine 2 Turn on the machine 3 Press any menu key on the machine s control panel 4 Press the keys to select Reports Print and then press the OK key 5 Press the keys to select Configuration Page and then press the OK key The con...

Page 131: ... control panel display 9 Wait until the machine beeps once and Firmware Update Done Please Reboot appears on the control panel display Click Close to the update tool 10 Turn off the power and turn it back on After you turn the power back on Initializing appears on the control panel display 11 Wait until the initial screen appears on the control panel display If the initial screen does not appear a...

Page 132: ...fax mode following the firmware update Messages that appear in the update tool window Message Cause Solutions The firmware file brn dwn or setting file ini is not stored in the same folder as the update tool Make sure that the firmware file brn dwn and setting file ini are stored in the same folder as the update tool Also make sure that you do not modify the setting file The path to the location o...

Page 133: ...and then perform the update again If this message reappears after you turn the power back on see Error and Status Messages on the Screen in the User Guide The IP address specified for either the machine or your computer is invalid Check that both IP addresses are valid The F W Update USB or F W Update NET button was clicked when the update was already in progress Clicking the F W Update USB or F W...

Page 134: ...g performed through the operation panel Put the machine into standby mode and then perform the update again Your computer is searching the network for the machine Net Server Connecting Wait a while until the machine is found Firmware has been transferred to the machine successfully Net Upload End of data Follow the instructions in this manual to complete the update Firmware has been transferred to...

Page 135: ...F W Update NET button during the update process does not interfere with any ongoing update Ignore this error message and complete the update using the procedure shown in this manual The machine is being operated through the operation panel USB Upload FAIL Cancel any operations being performed through the operation panel Put the machine into standby mode and then perform the update again 1 X indica...

Page 136: ...computer using a USB cable 2 While Initializing is shown on the operation panel display double click the UpdateTool exe icon to launch the firmware update tool 3 Click F W Update USB 4 Wait until Please Download FW Again Now appears on the operation panel display Make sure that you keep the power of the machine turned on 5 Click F W Update USB again 6 Check the operation panel display for messages...

Page 137: ...mware Version on the configuration page 13 Reconnect the telephone line cable to the machine The update s percentage of completion might not be displayed depending on which version of the firmware is currently installed In addition to printing a configuration page you can check the machine s firmware version by accessing the machine using a web browser For details see Checking Machine Status in th...

Page 138: ...g program 4 Click Eng F W Update USB or NET to send the engine firmware from PC to MF printer The F W Update USB or NET buttons are for designer use only Do not use these buttons 5 The machine makes a beep sound when starting the firmware update 6 The image above is displayed at the PC and Firmware update and Updating are displayed on the operation panel 7 Then you can close this window at your PC...

Page 139: ...You can also switch from an Ethernet connection to a USB connection and see if that works If you still cannot download the firmware it may be necessary to change the EGB and or the controller board If power failed during the download try again If you still cannot download the firmware it may be necessary to change the EGB and or the controller board 5 3 5 BOOT LOADER FIRMWARE This is also listed o...

Page 140: ......

Page 141: ...TROUBLESHOOTING TROUBLESHOOTING REVISION HISTORY Page Date Added Updated New None ...

Page 142: ......

Page 143: ...Troubleshooting Guide SM 6 1 M018 M019 Trouble shooting 6 TROUBLESHOOTING 6 1 TROUBLESHOOTING GUIDE See Appendices for the following information Error Messages Service Call Conditions ...

Page 144: ...ervals Paper feed roller Abnormal image at 25 5 mm intervals Image transfer belt unit Colored spots at 27 mm intervals Print cartridge Development roller Abnormal image at 30 mm intervals Charge roller Abnormal image at 38 mm intervals Registration roller Abnormal image at 60 mm intervals Transfer roller Colored spots at 76 mm intervals Print cartridge OPC drum Abnormal image at 110 mm intervals F...

Page 145: ...unit A sample page is provided with the printer driver s CD You can print the sample page from the printer driver s CD Before printing you have to adjust the printer driver settings to make the problem become obvious For details about adjusting the settings refer to Printer Driver Setting for Printing a Sample described below Occurs with 1 3 colors AIO unit s failure Occurs with all four colors Im...

Page 146: ...er driver 2 Click the Print Quality tab 3 Check Manual in the color setting 4 Click Advanced 5 Select Off from the pull down menu in Color Profile in the Text area 6 Select Off from the pull down menu in Color Profile in the Graphics area 7 Select Off from the pull down menu in Color Profile in the Photo area ...

Page 147: ...M018 M019 SERVICE MANUAL APPENDICES ...

Page 148: ......

Page 149: ...2 1 PREVENTIVE MAINTENANCE 2 1 2 1 1 USER REPLACEABLE ITEMS 2 1 3 APPENDIX TROUBLESHOOTING GUIDE 3 1 3 1 ERROR MESSAGES 3 1 3 1 1 OVERVIEW 3 1 3 1 2 ERROR MESSAGES LIST 3 1 3 2 SERVICE CALL CONDITIONS 3 6 3 2 1 SUMMARY 3 6 3 2 2 ENGINE SC 3 7 SC 1xx Other Error 3 7 SC 2xx Laser Optics Error 3 7 SC 3xx Charge Error 3 9 SC 4xx Image Transfer and Transfer Error 3 10 SC 5xx Motor and Fusing Error 3 12...

Page 150: ...FAX SERVICE TEST MENU 4 14 Entering the Fax Service Test Menu 4 14 Selecting an Item 4 14 Going into the Next Level Returning to the Previous Level 4 14 Exiting the Maintenance Mode Menu 4 14 Menu List 4 14 5 APPENDIX MACHINE SWAP 5 1 5 1 EXCHANGE AND REPLACE PROCEDURE 5 1 5 1 1 INSTRUCTION 5 1 Before the substitute machine gets to the customer site 5 1 When the substitute machine gets to the cust...

Page 151: ...APPENDIX SPECIFICATIONS SPECIFICATIONS REVISION HISTORY Page Date Added Updated New None ...

Page 152: ......

Page 153: ...electro photographic printing Mono component toner development Technology 4 drum tandem method Resolution dpi bit pixel 600 600 dpi Speed 1bit 600 600 dpi Standard 2bits 600 600 dpi Fine 4bits Printing Speed General Paper A4 LT BW FC 20ppm LT 21ppm Mono 14 0 sec or less First Print Speed A4 LT SEF Std Tray F C 14 0 sec or less Duplex Printing Copying A4 LT B5 LG Exe Auto Dimensions W x D x H 420 x...

Page 154: ...B6 A6 Legal Letter HLT Executive Foolscap Folio Custom size Min 90mm x 148mm 3 6 x 5 92 Max 216mm x 356mm 8 64 x 14 24 Bypass Tray A4 B5 A5 B6 A6 Legal Letter HLT Executive Foolscap Folio Custom size Min 90mm x 148mm 3 6 x 5 92 Max 216mm x 356mm 8 64 x 14 24 Input Paper Size Op Paper Tray A4 Letter Std Tray Plain Paper Recycle Paper Application Paper Envelope Glossy Thick Paper Label Bypass Tray P...

Page 155: ... 7 215 9 mm 5 5 8 5 Length 139 7 355 6 mm 5 5 14 ADF Original weight 52 105 g m2 14 28lbs NA version 120V 60Hz Rating Power Spec EU version 220 to 240V 50 60Hz Max 1300W or less NA version Energy Saver M018 20 W or less M019 25 W or less Max 1300W or less Power Consumption EU version Energy Saver M018 20 W or less M019 25 W or less Warm up Time 48 sec or less from power on Sleep Mode 48 sec Uses a...

Page 156: ...6mm Platen B W 20 cpm A4 21 cpm LT FC 20 cpm A4 21 cpm LT Single Document Multiple Copy ADF B W 20 cpm FC 20 cpm A4 B W 21 cpm FC 21 cpm LT Copy Speed Multiple Document Single Copy ADF B W 20 cpm FC 10 cpm Multiple copy Up to 99 Scanning 600 x 600 dpi Flatbed 600 x 300 dpi ADF Resolution H x V Printing 600 x 600 dpi Grayscale 256 levels Fix NA 50 65 78 93 129 155 200 400 EU 50 71 82 93 122 141 200...

Page 157: ...de Text Photo Mixed Memory copy Yes Auto duplex copy No Interrupt copy No Combine copy 2 in 1 4 in 1 Only ADF APS AMS No No Auto Tray Switch No Directional Magnification No Directional Size Magnification No Photo Mode Yes Auto Start No User Program No Electronic Sorting Standard collation ADF only Image Rotation No Series Copy No ...

Page 158: ...c Gray Scale less than 5 sec Color less than 10 sec Platen B W less than 5 sec Gray Scale less than 5 sec Color less than 10 sec Platen Width max Up to 216mm Length max Up to 297mm Maximum original size ADF Width max Up to 216mm Length max Up to 356mm Scan Depth 48bit color processing input 24bit color processing output PC Interface USB2 0 10 100Base TX TWAIN Compliment TWAIN WIA Scanner utilities...

Page 159: ...gth 139 7 355 6 mm 5 5 14 Scanning width Max 210 mm 8 3 Printing width Max 208 mm 8 2 Gray scale 256 levels Polling type Standard Sequential Contrast control Normal Light Dark manual setting Resolution 8 x 3 85 8 x 7 7 lines mm 200 x 100 200 x 200 dpi Scanning Speed Less than 5 sec A4 SEF 200 dpi Modem Speed Automatic Fallback 33600 31200 28800 26400 24000 21600 19200 16800 14400 12000 9600 7200 4...

Page 160: ...mmunication source Public switched telephone network PC Fax utility Not available Automatic re dial 5 4 3 2 times after 5 minutes Default 5 times Auto Answer 1 99 rings Default 2 rings 1 1 2 OPTION Paper Feed Unit Paper Size A4 Letter Paper Weight 60 105g m2 16 28lb Paper capacity 500 sheets x 1 tray Dimensions W x D x H 400 x 450 x 127mm 16 x 18 x 5 08 inch Paper Tray 500x1 Weight 6 kg 13 2 lb ...

Page 161: ... the tray Need to select paper size by operation panel driver C Need to input paper size by operation panel and driver N Not supported Input Tray Type SEF LEF Size Standard Tray Option PFU Bypass Tray Auto Dup SEF 210x297 A A B Y A4 LEF 297x210 N N N N SEF 182x257 A N B Y B5 LEF 257x182 N N N N SEF 148x210 A N B N A5 LEF 210x148 N N N N SEF 128x182 B N B N B6 LEF 182x128 N N N N SEF 105x148 B N B ...

Page 162: ...EF 8 1 2 x14 A N B Y SEF 8 1 2 x11 A A B Y Letter LEF 11 x 8 1 2 N N N N Half Letter SEF 5 1 2 x 8 1 2 C N C N SEF 7 1 4 x10 1 2 A N B Y Executive LEF 10 1 2 x7 1 4 N N N N F SEF 8 x 13 B N B N Foolscap SEF 8 1 2 x 13 B N B N Plain Paper Folio SEF 8 1 4 x 13 B N B N 8 Kai SEF 267 x 390 N N N N SEF 195 x 267 C N C N Plain Paper 16 Kai LEF 267 x 195 N N N N ...

Page 163: ... SEF LEF Size Standard Tray Option PFU Bypass Tray Auto Dup Com10 SEF 4 1 8 x 9 1 2 C N C N Monarch SEF 3 7 8 x 7 1 2 C N C N C6 SEF 114 x 162 C N C N C5 SEF 162 x 229 C N C N Envelope DL Env SEF 110 x 220 C N C N Width 90 216mm 3 6 x 8 5 C N C N Custom Length 148 356mm 5 8 x 14 24 C N C N ...

Page 164: ......

Page 165: ...APPENDIX PREVENTIVE MAINTENANCE PREVENTIVE MAINTENACE REVISION HISTORY Page Date Added Updated New None ...

Page 166: ......

Page 167: ...prox 25 k prints bottle See condition 5 Condition 1 An A4 8 5 x11 5 chart was used to measure the above yield except the Print Cartridge AIO 2 The yield was measured at standard temperature and humidity 3 The expected yield measurement for the Print Cartridge AIO is based on the ISO 19798 ISO chart continuous prints 4 These yield values may change depending on the circumstances and printing condit...

Page 168: ......

Page 169: ...APPENDIX TROUBLESHOOTING GUIDE TROUBLESHOOTING GUIDE REVISION HISTORY Page Date Added Updated New None ...

Page 170: ......

Page 171: ...tomer 3 1 2 ERROR MESSAGES LIST Cover Open The front or top cover is open 000 1 Close the front or top cover 2 Replace the interlock switches or actuator mechanism 010 AIO Set Error Black 011 AIO Set Error Magenta 012 AIO Set Error Cyan 013 AIO Set Error Yellow Black AIO not set Defective connection of the ID chip terminal on the black AIO 1 Install the AIO black magenta cyan or yellow Reinstall o...

Page 172: ...in the machine Paper size requested by the job does not match the paper in the tray 030 1 Install the tray or put the correct size paper in the tray 2 Check the paper setting in the user menu mode Paper Selection Error Feed and Exit Paper size requested by the job does not match the paper in the tray Selection error for the paper feed and paper exit location in duplex mode 031 Check the paper feed...

Page 173: ...r exit sensor Paper Exit Jam Error Paper Exit Fusing Unit A sheet of paper stays at the paper exit sensor or winds around the rollers in the fusing unit Paper slipped A sheet of paper is wound around the rollers in the fusing unit 056 Remove the paper jam at the paper exit sensor or in the fusing unit Printing Error No Paper No paper in the tray 070 Put paper in the tray 080 Toner Near End Black A...

Page 174: ...genta AIO 084 Toner Near End Cyan AIO 085 Toner End Cyan AIO Cyan toner near end or end Replace the Cyan AIO 086 Toner Near End Yellow AIO 087 Toner End Yellow AIO Yellow toner near end or end Replace the yellow AIO 088 Waste Toner Bottle Near Full 089 Waste Toner Bottle Full Waste toner bottle near full or full Replace the waste toner bottle ...

Page 175: ...le Shooting Guide 999 Color Registration MUSIC Error Color registration MUSIC failure This error is not displayed even if this error occurs It is just logged This error is automatically recovered after the color registration MUSIC has been done successfully ...

Page 176: ...C code is issued 3 First disconnect then reconnect the connectors before you replace the PCBs if the problem concerns electrical circuit boards 4 First check the mechanical load before you replace motors or sensors if the problem concerns a motor lock 5 Fusing related SCs To prevent damage to the machine the main machine cannot be operated until the fusing related SC has been reset by a service re...

Page 177: ...rror motor does not reach the targeted operating speed within 5 sec after turning on or changing speed Polygon motor error 2 OFF timeout 203 The polygon mirror motor does not leave the READY status within 3 sec after the polygon motor switched off Polygon motor error 3 XSCRDY signal error The SCRDY_N signal remains HIGH for 200 ms while the LD unit is firing 204 Polygon motor driver board harness ...

Page 178: ...zing detection signal for LDB M C is not output after the LDB unit has turned on while the polygon motor is rotating normally 222 Disconnected cable from the laser synchronizing detection unit or defective connection Defective laser synchronizing detector Defective LDB Defective EGB 1 Check the connectors 2 Replace the laser optics unit 3 Replace the EGB LD error The IPU EGB detects a problem at t...

Page 179: ...l error is detected when the EGB monitors the black drum motor state This monitoring is done immediately after power on when the motor starts rotating and immediately after the motor stops 396 Disconnected or defective motor harness Motor slips due to excessive load 1 Check the harness from the black drum motor Replace it if necessary Color drum motor error The LOCK signal error is detected when t...

Page 180: ...he contact position ITB Image Transfer Belt Unit No contact Position Error The ITB contact sensor does not detect the home position of the ITB for 5 seconds after the ITB unit has moved to no contact position 445 Defective ITB contact motor Defective ITB contact sensor Defective ITB unit 1 Replace the ITB contact motor 2 Replace the ITB contact sensor 3 Replace the ITB unit Agitator Motor Error Th...

Page 181: ...8 M019 Appendix Trouble Shooting Guide ITB Image Transfer Belt Unit Set Error The TM sensor does not detect the reflection from the ITB 490 No ITB unit in the machine Dirty TM sensor 1 Check the installation of the ITB unit 2 Clean the TM sensor ...

Page 182: ...tor Replace it if necessary LSU Fan Motor Error A LOCK signal is not detected for more than ten seconds while the motor START signal is on and if this error occurs twice consecutively this SC is issued 530 Disconnected or defective motor harness Defective LSU fan motor 1 Check or replace the motor harness 2 Replace the LSU fan motor Fusing Fan Motor Error A LOCK signal is not detected for more tha...

Page 183: ...this SC code and cannot be operated Print Ready Temperature Error The heating roller temperature increase during a set time is not correct The fusing temperature does not reach the print ready temperature within a set time after the fusing lamp has turned on 542 Defective thermistor Incorrect power supply input at the main power socket Defective fusing lamp 1 Check the voltage of the wall outlet 2...

Page 184: ...the EGB Execute Engine Maintenance Menu to recover the machine after completing the recovery procedure Otherwise the machine continues to issue this SC code and cannot be operated Heating Lamp Full Power Error The fusing lamp is fully powered for a certain time while the fusing unit stays in the stand by mode and is not rotating 545 Deformed thermistor Thermistor not in the correct position Defect...

Page 185: ...on Execute Engine Maintenance Menu to recover the machine after completing the recovery procedure Otherwise the machine continues to issue this SC code and cannot be operated Low Temperature Error The center thermistor detects 100 C or less for 4 seconds 548 Defective fusing lamp Defective thermistor 1 Replace the fusing unit 2 Replace the fusing lamp Execute Engine Maintenance Menu to recover the...

Page 186: ...g the recovery procedure Otherwise the machine continues to issue this SC code and cannot be operated Consecutive Fusing Jam The paper jam counter for the fusing unit reaches 3 The paper jam counter is cleared if the paper is fed correctly This SC is activated only when this function is enabled with Engine Maintenance default OFF 559 Defective fusing unit Defective fusing control 1 Clear this SC t...

Page 187: ...alue exists in the initialization flag of the EEPROM 669 EEPROM not initialized Defective EEPROM 1 Initialize the EEPROM 2 Replace the EEPROM 3 Replace the EGB GAVD Communication Error The ID of the GAVD is not identified during initialization The chip ID of the GAVD cannot be detected by the machine at power on 690 Defective EGB 1 Replace the EGB ...

Page 188: ...controller boards for this machine 2 Replace the controller board USB Network Device Error An interface error in the USB connection or NIB connection occurs 823 Controller board detective 1 Replace the controller board EEPROM Error An EEPROM check error at power on occurs 824 Controller board detective 1 Replace the controller board On Board Memory Check Error An on board memory check error at pow...

Page 189: ...Service Call Conditions SM Appendix 3 19 M018 M019 Appendix Trouble Shooting Guide ROM Checksum Error A ROM checksum error at power on occurs 828 1 Replace the controller board ...

Page 190: ......

Page 191: ...ISTORY Page Date Added Updated New 1 09 29 2010 Added Menu Mode key sequence 14 15 07 02 2009 Updated Information Service Menu 70 06 29 2009 Corrected Copy Data Security Unit Type F B829 112 142 12 10 2008 Added Scanner Accessibility Option Type 5000 ...

Page 192: ......

Page 193: ...rial number after the Engine Board EEPROM has been replaced Please contact your Technical Service Manager for details Each menu is classified as follows Menu Mode Function Maintenance Mode Menu This is a menu for maintenance and service Special Mode This mode is used to input the serial number Fax Service Test Menu This is a menu for checking the fax mode 4 1 2 MAINTENANCE MODE MENU Selecting an I...

Page 194: ... PDL Firmware Version Printer Counter Displays the following counters of the printer engine Total Page Color Image Black Image Scanner Counter Displays the sum total of scanner counters for each mode Total Page Black Page Color Page ADF Used Jam Counter Displays the number of paper jams at each location Total ADF Printer Output Bin Internal Tray1 Tray2 Duplex Counter Coverage 1 Coverage 2 Coverage...

Page 195: ...250 Default 10 step Setting 0 Off Graphic Determines the maximum amount of ink toner you can use in any area of your graphic This is where you are controlling exactly how much ink will be used during printing 200 to 400 250 Default 10 step Setting 0 Off Toner Limit Image Determines the maximum amount of ink toner you can use in any area of your image This is where you are controlling exactly how m...

Page 196: ...lain Paper 90 105 g m2 Plain Paper Thick Paper 1405 110 g m2 Thin Paper 60 75 g 2 Thick Paper Post Card Envelop Cardstock Bond paper Label Paper Prepunched Preprinted Letterhead Color Recycled Horiz Tray1 Adjusts the horizontal registration for tray 1 If the machine settings are reset to the factory defaults this value does not change 15 to 15 0 Default 4 mm step Vert Tray1 Adjusts the vertical re...

Page 197: ...et to the factory defaults this value does not change 15 to 15 0 Default 0 3 mm step Horiz Dup Back Adjusts the horizontal registration for the back side in duplex mode If the machine settings are reset to the factory defaults this value does not change 15 to 15 0 Default 4 mm step Registration Vert Dup Back Adjusts the vertical registration for the back side in duplex mode If the machine settings...

Page 198: ...o not change this setting Designed for Factory Use LSU Adjustment Input 160 bytes setting Character alphanumeric 0 9 a f A F only valid data can be input Input length 160 bytes Trans Belt Adjust When you execute Trans Belt Adjust the transfer belt adjustment is done This calibrates the motor speed to match the length of the new transfer belt Fuser SC Detect On Off If On the engine detects SC559 If...

Page 199: ...SP Mode Tables Engine Maintenance Fuser SC Reset This button is for resetting an SC related with the fusing errors Special Mode For future use this mode is not used in this mode 0 to 7F Write command EEC34 0xA2 0x00 to 7F Read command EEC34 0xE2 0x01 ...

Page 200: ...e Flatbed Scan main scan registration 2 0 to 2 0 0 Default 0 1 mm step Regist Adjust Flatbed Sub Reg Adjusts the Flatbed Scan sub scan registration 2 0 to 2 0 0 Default 0 1 mm step ADF Main Reg Adjusts the ADF Scan main scan magnification 0 9 to 0 9 0 Default 0 1 step ADF Sub Reg Adjusts the ADF Scan sub scan magnification 0 9 to 0 9 0 Default 0 1 step Flatbed Main Reg Adjusts the Flatbed Scan mai...

Page 201: ...alogue signals on the telephone line 0Km Default 1 8Km 3 6Km 7 2Km Training Retries This sets the number of training retries to be repeated before automatic fallback 1 Time 2 Times Default 3 Times 4 Times Protocol Definition Encoding Sets the compression method for Tx Rx MMR MR MH Default MR MH MH T0 Timer Timeout for response from the called station in automatic sending mode 35 Sec 45 Sec 55 Sec ...

Page 202: ... by this setting 5 Sec Default 10 Sec CNG Cycles Number of CNG cycles to be detected This setting is only effective for FAX TAD mode 1 5 Cycle Default 2 0 Cycle Tone Sound Monitoring Determines the period when tones from the line are monitored No Monitoring Up To Phase B Default All TX Phases Stop Clear key Pressing the Stop Clear key can stop the current receiving operation Received data is lost ...

Page 203: ...ng Dial Pulse Type This sets the number of pulses that are generated during dialing N Dialing 0 generates 10 pulses Dialing 9 generates 9 pulses N 1 Dialing 0 generates 1 pulses Dialing 9 generates 10 pulses 10 N Dialing 0 generates 10 pulses Dialing 9 generates 1 pulse Tone Signal Transmission Time Length Sets the tone signal transmission time length 100 ms Default Minimum Pause In Tone Dialing S...

Page 204: ... 7 0 Sec 10 5 Sec 14 0 Sec 1Dial Tone Detection Timeout Length This setting sets the time out length for the 1st dial tone detection The machine waits for a dial tone for the specified time and disconnects itself from the line when no dial tone is input 10 Sec Default 15 Sec 20 Sec 30 Sec BT Setting DFU Off On BT Busy tone BT Frequency DFU 300 550 Hz 300 650 Hz 325 525 Hz 340 550 Hz 350 500 Hz 350...

Page 205: ...ctors set the equalizer s training level to be applied if training fails due to poor line connection Automatic Default 4 Points 16 Points Redialing Resend when a communication error occurs Disabled Default Not Disabled First TX Speed Sets the first transmission speed choice before fallback 2400 Bps 4800 Bps 7200 Bps 9600 Bps 12000 Bps 14400 Bps 16800 Bps 19200 Bps 21600 Bps 24000 Bps 26400 Bps 288...

Page 206: ...g and will perform a soft boot 8 When the unit returns to the ready condition reboot by turing the Main Switch OFF and then ON 9 Set Language Fax Number Name and Country 10 Reboot the machine 4 1 3 FAX SERVICE TEST MENU Entering the Fax Service Test Menu Turn ON the machine while pressing the Fax key Selecting an Item To select the item press the Up or Down key Going into the Next Level Returning ...

Page 207: ...st Tone Stop Executes the Stop DTMF tone test V34 33600 bps Generates the V34 33600 bps signal V34 28800 bps Generates the V34 28800 bps signal V17 14400 bps Generates the V17 14400 bps signal V17 12000 bps Generates the V17 12000 bps signal V17 9600 bps Generates the V17 9600 bps signal V17 7200 bps Generates the V17 7200 bps signal V29 9600 bps Generates the V29 9600 bps signal V29 7200 bps Gene...

Page 208: ......

Page 209: ...APPENDIX MACHINE SWAP MACHINE SWAP REVISION HISTORY Page Date Added Updated New None ...

Page 210: ......

Page 211: ...r to do the following procedure Before the substitute machine gets to the customer site Save the customer settings by using a web browser For details refer to the User Guide Clear customer settings in the problem machine When the substitute machine gets to the customer site 1 Remove the four print cartridges AIO from the problem machine 2 Install the four print cartridges AIO into the substitute m...

Page 212: ...edure M018 M019 5 2 SM Appendix 5 1 2 CLEANING POINTS AFTER MACHINE ARRIVAL AT DEPOT 1 Open the front cover 2 Release the locks A 3 Transfer unit B 4 Pull out the waste toner bottle A 5 Release the hook A under the guide plate ...

Page 213: ...ate B underneath the fusing unit to the left and then remove it 7 Pull out the image transfer belt unit A x 2 8 Clean inside the machine especially around the circled area A 9 Clean the circled area at the waste toner bottle A and circled area B at image transfer belt unit 10 Reassemble the machine ...

Page 214: ...PAPER FEED UNIT TK1010 G849 PAPER FEED UNIT TK1010 G849 REVISION HISTORY Page Date Added Updated New None ...

Page 215: ......

Page 216: ... 2 PAPER FEED AND RELAY CLUTCH 1 1 1 3 PAPER END AND RELAY SENSOR 2 1 1 4 PAPER FEED ROLLER 3 When reassembling 4 1 1 5 FRICTION PAD 5 When reassembling 5 2 DETAILED SECTION DESCRIPTIONS 7 2 1 OVERVIEW 7 2 1 1 COMPONENT LAYOUT 7 2 2 BASIC OPERATION 8 2 2 1 PAPER SEPARATION AND FEED 8 2 2 2 PAPER LIFT 9 2 2 3 PAPER END DETECTION 10 ...

Page 217: ......

Page 218: ...ocedure Safety Turn off the main power switch and unplug the machine before beginning any of the replacement procedures in this manual Symbols Used in this Manual This manual uses the following symbols See or Refer to Screws Connector Clip ring E ring ...

Page 219: ......

Page 220: ...ed Unit TK1010 G849 1 REPLACEMENT AND ADJUSTMENT 1 1 PAPER FEED UNIT 1 1 1 TOP COVER 1 Top left cover A x 1 2 Top cover B x 6 1 1 2 PAPER FEED AND RELAY CLUTCH 1 Top cover Top Cover 2 Paper feed clutch A x 1 x 1 3 Relay clutch B x 1 x 1 ...

Page 221: ...Paper Feed Unit G849 2 SM 1 1 3 PAPER END AND RELAY SENSOR 1 Top cover Top Cover 2 Paper end sensor A hooks x 1 3 Relay sensor B hooks x 1 ...

Page 222: ...EED ROLLER 1 Top cover Top Cover 2 Paper feed clutch Top Cover 3 Paper guide A hooks 4 Remove the e ring B at the right edge of the feed roller shaft 5 Slide the paper feed roller C to the right side hook 6 Pull out the feed roller shaft D to the left side bushing x 1 ...

Page 223: ...Paper Feed Unit G849 4 SM When reassembling If the feed roller shaft A cannot be inserted easily pull the gear B and then insert the feed roller shaft ...

Page 224: ...Unit TK1010 G849 1 1 5 FRICTION PAD 1 Pull out the tray A 2 Press down the bottom plate B 3 Friction pad C hooks spring x 1 When reassembling When re installing the friction pad make sure that the mylar A does not go under the friction pad ...

Page 225: ......

Page 226: ... Unit TK1010 G849 2 DETAILED SECTION DESCRIPTIONS 2 1 OVERVIEW 2 1 1 COMPONENT LAYOUT 1 Side Fence 2 Paper End Sensor 3 Paper Feed Roller 4 Relay Sensor 5 Relay Roller 6 Friction Pad 7 Paper Height Lever 8 Bottom Plate 9 Rear Fence ...

Page 227: ...ed unit uses a friction pad system The gear A is driven by the transport fusing motor in the mainframe The relay clutch B and paper feed clutch C control drive from the mainframe When the optional tray is selected as the feed tray the relay clutch and paper feed clutch transmit drive power to the relay roller and paper feed roller ...

Page 228: ...en you insert the tray in the machine The bottom tray lock levers A hold the tabs B under the bottom plate after the bottom plate is pressed down When the tray is inserted in the machine the lock lever guides C in the paper feed unit push the bottom plate lock levers and then the lock levers release the tabs under the bottom plate As a result the bottom plate is lifted by the spring ...

Page 229: ...SM 2 2 3 PAPER END DETECTION There is a paper end sensor A in the tray The feeler B drops into the cutout C in the bottom plate and the actuator interrupts the paper end sensor This sensor also detects whether the tray is set ...

Reviews: