background image

32

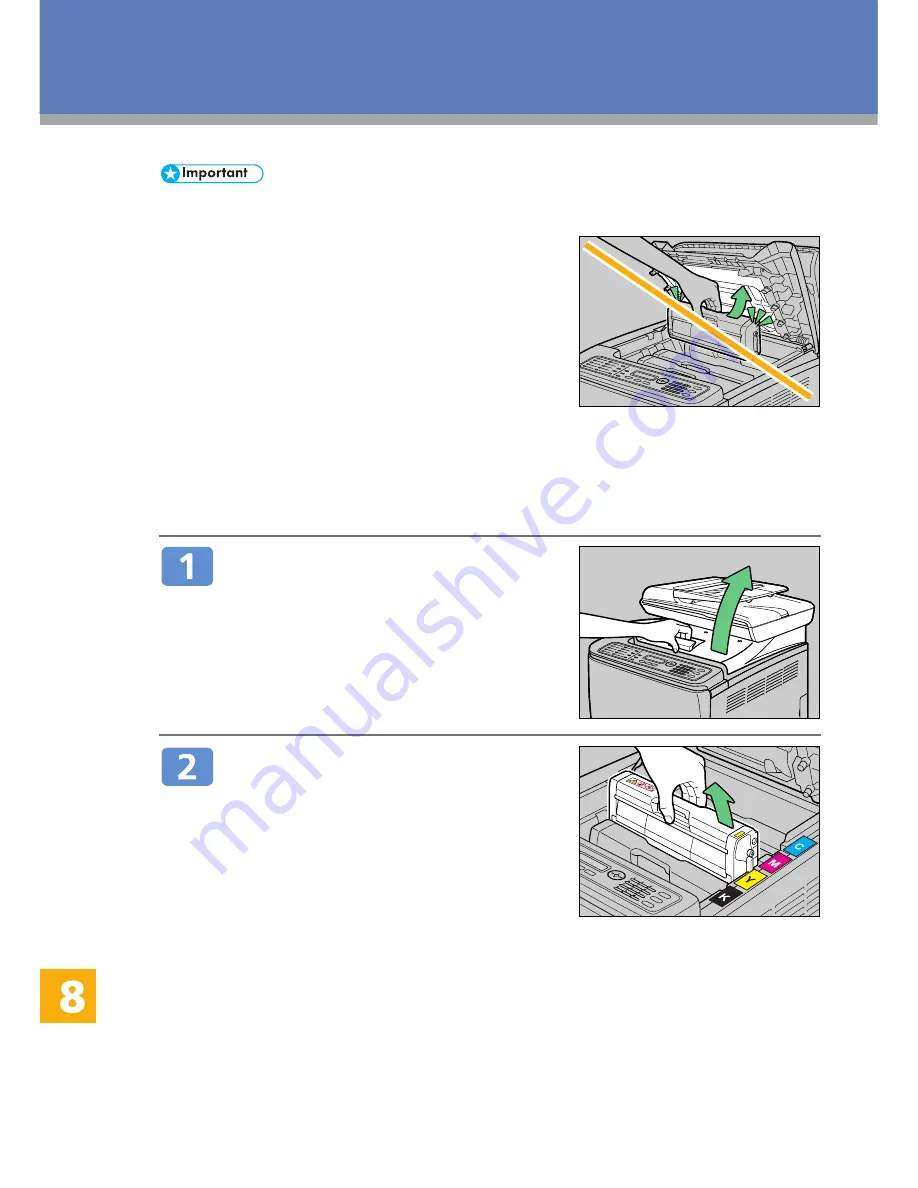
• When removing print cartridges, be careful not to touch the Laser Scanning Unit on the

underside of the upper cover (the white area in the illustration).

• If cyan, magenta, or yellow toner runs out, you can print in black and white using just the black

toner. Change the color mode setting to Black and White using the machine's driver.

• If black toner runs out, you cannot print in black and white or color until the black print cartridge

is replaced.

  Pull up the lever on the top cover,

and then carefully raise the top
cover.

Make sure that the exposure glass cover or
ADF is closed.

  Tilt the print cartridge forward and

pull it out.

• Do not shake the removed print cartridge.

Doing so can cause remaining toner to
leak.

• Place the old print cartridge on paper or

similar material to avoid dirtying your
workspace.

• The toner color is indicated by the label

on each print cartridge.

BAA315S

BAA358S

BAA316S

Replacing Print Cartridges

Summary of Contents for Aficio SP C222SF

Page 1: ...Fax Function Error Messages Removing Paper Jams Troubleshooting Replacing Print Cartridges Read this manual carefully before you use the product and keep it handy for future reference For safe and co...

Page 2: ...the print cartridges Tray 1 Front Cover Open this cover to replace the waste toner bottle or remove jammed paper Control Panel Output Tray Printed paper is output here Output Tray for the ADF Origina...

Page 3: ...oad from the machine rear in the order of cyan C magenta M yellow Y and black K Transfer Unit Remove this unit when replacing the waste toner bottle BAA303S BAA308S Waste Toner Bottle Collects excess...

Page 4: ...m settings or enter the next level of the menu tree Number keys Use to enter numerical values when specifying settings such as fax numbers and copy quantities or enter letters when specifying names B...

Page 5: ...de scanner mode fax mode Density key copier mode scanner mode fax mode Reduce Enlarge key copier mode scanner mode Copy key Press to switch to copier mode Facsimile key Press to switch to fax mode Sca...

Page 6: ...ure glass if you place originals both in the ADF and on the exposure glass Press the Copy key Place the original face down on the exposure glass or face up in the ADF Lift the ADF carefully without ho...

Page 7: ...r Stop key If a paper jam occurs printing stops after the current page has been printed out After the jammed paper is removed printing restarts from the jammed page automatically If a scanning jam occ...

Page 8: ...s set in the ADF not when it is set on the exposure glass To use this function the paper tray specified for photocopying must contain A4 Letter or Legal size paper You can combine two or four pages of...

Page 9: ...nal that you are scanning 1 Press the Image Quality key 2 Press the Image Quality key or keys to select the desired document type and then press the OK key For more details about the copier function s...

Page 10: ...r details see Using the Scanner Function User Guide To send files via e mail SMTP and DNS settings must be configured properly in advance For details see Configuring the Machine Using a Web Browser Us...

Page 11: ...necessary configure advanced scan settings For more details see Advanced Scan Settings on page 13 Press the Address book key You can press the keys to scroll the address book Search for the desired de...

Page 12: ...ginals are scanned When all originals have been scanned press 2 to start sending the scanned file To cancel scanning press the Clear Stop key The scan files are discarded If paper is jammed in the ADF...

Page 13: ...ity for the current job 1 Press the Density key 2 Press the Density key or keys to select the desired density level and then press the OK key Lightest Darkest Specifying Resolution You can specify the...

Page 14: ...blish a telephone line connection and configure the settings for fax transmis sion in advance The original in the ADF takes precedence over the original on the exposure glass if you place originals bo...

Page 15: ...up to 40 characters using the number keys Press the B W Start key Depending on the machine s settings you will be prompted to place another original on the exposure glass In this case proceed to the...

Page 16: ...e ADF the jammed page has not been scanned properly When the machine is in Immediate Transmission mode resend the fax starting from the jammed page When in Memory Transmission mode scan the entire ori...

Page 17: ...for the current job 1 Press the Image Quality key 2 Press the Image Quality or keys to select the desired resolution setting and then press the OK key For more details about the fax function see Usin...

Page 18: ...paper to the bypass tray See Loading Paper in the Bypass Tray User Guide Press the B W Start key or Color Start key to begin printing or press the Clear Stop key to cancel the job Press the B W Start...

Page 19: ...21 Reinstall the print cartridge See Replacing Print Cartridges on page 30 Prepare a new print cartridge If several originals are still to be scanned it is recommended to start printing now and copy...

Page 20: ...for the document differs from the type of the paper in the tray Paper has been jammed in the machine Load paper of the selected size in the tray or change the paper size setting See Specifying Paper T...

Page 21: ...jams and possibly damage the machine Paper Jam Positions If a paper jam occurs paper may be jammed inside the machine or in the ADF If paper is jammed inside the machine check the following positions...

Page 22: ...hot Caution should be taken when removing jammed paper Since the temperature around the guide is high wait for it to cool before checking for jammed paper Pull the opening lever on the front cover an...

Page 23: ...ving from the Tray Pull the opening lever on the front cover and then carefully lower the front cover Pull out the jammed paper carefully If paper has become jammed inside the transfer unit pull the p...

Page 24: ...the Transfer Unit Pull the opening lever on the front cover and then carefully lower the front cover Carefully remove any paper that is jammed under the transfer unit If you cannot find the jammed pa...

Page 25: ...l to remove it Be careful not to pull the original too hard as it may rip If you cannot pull out the jammed original easily unlock the paper feed roller by raising the green lever Lift the paper feed...

Page 26: ...you cannot pull out the jammed original easily raise the input tray to see if the original is jammed in the output area Gently pull the jammed original to remove it Put the paper feed roller back in...

Page 27: ...r Close the ADF cover Lift the ADF and if there is original remaining in the ADF gently pull the jammed original to remove it Be careful not to hold the input tray when lifting the ADF for the tray mi...

Page 28: ...ch printed areas Copied pages or scanned files are dirty Toner or correction fluid on the original is not dry Before placing originals on the exposure glass make sure that toner or correction fluid is...

Page 29: ...tray For more details see Loading Paper User Guide A fax you sent appears blank when received The original was placed upside down Place the original in the correct orientation For more details see Pl...

Page 30: ...t the toner into the fabric and may make removing the stain impossible If toner or used toner gets into your eyes flush immediately with large amounts of water Consult a doctor if necessary If toner o...

Page 31: ...s for Replacing Print Cartridges Replace the indicated print cartridge when any of the following messages appear on the screen Life End K Toner Cartridge Life End M Toner Cartridge Life End C Toner Ca...

Page 32: ...cannot print in black and white or color until the black print cartridge is replaced Pull up the lever on the top cover and then carefully raise the top cover Make sure that the exposure glass cover o...

Page 33: ...artridge and shake it from side to side five or six times Even distribution of toner within the bottle improves print quality Remove the cover from the print cartridge Check that the toner color and l...

Page 34: ...old print cartridge Then put the old print cartridge into the bag and then put it into the box Make sure to cover the old print cartridge with the protective cover for recycling and environ mental pur...

Page 35: ...nce you can chage how long the machine waits before entering Sleep Mode by configuring the Power Saver setting under Admin Settings For details about Power Saver see Administrator Settings User Guide...

Page 36: ...ames and Locations Using the Copier Function Using the Scanner Function Using the Fax Function Error Messages Removing Paper Jams Troubleshooting Replacing Print Cartridges GB GB EN USA G184 8508 SP C...

Reviews: