


Quick Reference Fax Guide
c
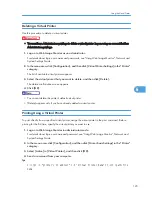
Please put this guide above your machine
g
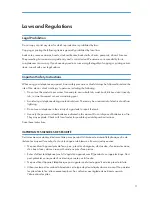
1. Receive File indicator
2. Communicating indicator
3.
{
Memory Trans.
}
key
4.
{
On Hook Dial
}
key
5.
{
Facsimile
}
key
Press to switch to the facsimile mode.
6.
{
Search Destination
}
key
7.
{
Check Destination
}
key
8.
{
Job Information
}
key
9. Function keys
10. Indicators
11. Display panel
12. Selection keys
13. Scroll keys
14.
{
User Tools/Counter
}
key
15.
{
Clear/Stop
}
key
16.
{
Clear Modes
}
key
Press to clear the current settings.
17. Main power indicator
18. Operation switch
19.
{
Start
}
key
20.
{
#
}
key (enter key)
21. Number keys
22.
{
OK
}
key
Press to set a selected item or an
entered numeric value.
23.
{
Escape
}
key
Press to cancel operation or return to
the previous display.
24.
{
Lighter
}
key,
{
Darker
}
key
25. Data In indicator
26. Quick Dial keys
27.
{
Resolution
}
key
28.
{
Pause/Redial
}
key
29. User Function keys
You can assign frequently-used
functions to these keys.
A
Specify a transmission mode by pressing the
{
Memory Trans.
}
key:
• Memory Transmission, or
• Immediate Transmission
B
Place the original.
• Exposure glass
(face down)
• ADF (face up)
C
Make the scan
settings you require.
D
Specify a destination.
E
Press the
{
Start
}
key.
If you choose Memory Transmission, you can
send to more destinations at once. To do this,
after step 4, press:
- [Add Dest] and specify destinations
How to send a fax...
(1. Transmission)
Please see the <Facsimile Reference> Operating
Instructions:
- SUB/SEP Codes (2. Other Transmission Features)
Privacy can be protected when faxing with a SUB/SEP
Code, since only people who know the SUB/SEP Code can
receive or print the fax document.
- Printed reports (4. Confirming Communication Information)
Inform you if a fax has been saved, sent, or failed to be
transmitted.
- LAN-Fax features - Sending a fax from a computer
(5. Fax via Computer)
Advanced Fax Features
Immediate
Before the original is scanned = before pressing the
{
Start
}
key:
A
Press the
{
Clear Modes
}
key.
While the original is being scanned = after pressing the
{
Start
}
key:
A
Press the
{
Clear/Stop
}
key.
Memory
While the original is being transmitted:
A
Press the
{
Clear/Stop
}
key.
B
Select the file you want to cancel, and then press [Stop TX].
C
Press [Delete].
D
Press the
{
Escape
}
key.
Before the transmission is started:
A
Press the
{
Job Information
}
key.
B
Select [Check/Stop TX File], and then press the
{
OK
}
key.
C
Select the file you want to cancel, and then press [Stop TX].
D
Press [Delete].
E
Press the
{
Escape
}
key twice.
How to cancel a transmission...
(1. Transmission)
Facsimile
Copier
Scanner
Printer
To select an item on the display…
• Use
{U}
or
{T}
to scroll the display.
• Press the
{
OK
}
key to set the currently
selected item and to proceed to the next
display.
How to fax via a network
(1. Transmission,
5. Fax via Computer)
Internet Fax
This machine converts scanned document
images to e-mail format and transmits the data
over the Internet.
- Press [
] to display in the destination
display column.
- Specify the e-mail address as a destination.
IP-Fax
The IP-Fax function sends or receives
documents between two facsimiles directly via a
TCP/IP network.
- Specify the protocol (H.323 or SIP). After
you specify the protocol, appears in the
destination display column.
- Specify the IP address as a destination.
LAN-Fax
Using the LAN-Fax Driver, you can send a
document created with a Windows application
from a computer connected to the machine to
another fax machine. To use LAN-Fax, install the
LAN-Fax Driver on your computer.
How to register a Quick Dial...
(1. Transmission)
A
Press the
{
User Tools/Counter
}
key.
B
Select [System Settings], and then press the
{
OK
}
key.
C
Select [Administrator Tools], and then press the
{
OK
}
key.
D
Select [Address Book Management], and then press the
{
OK
}
key.
E
Select [Program/Change], and then press the
{
OK
}
key.
F
Enter the registration number you want to program, and then press
the
{
OK
}
key.
G
Enter the name, and then press the
{
OK
}
key.
H
Press [Details].
I
Select [Fax Settings], and then press the
{
OK
}
key.
J
Enter the fax number and specify optional settings.
K
Press [End].
L
Press the
{
OK
}
key.
M
Press the
{
User Tools/Counter
}
key.
N
You will get a message ‘Settings have been updated...’. Press [Exit].
Copyright © 2008
Printed in China
EN USA D069-7104
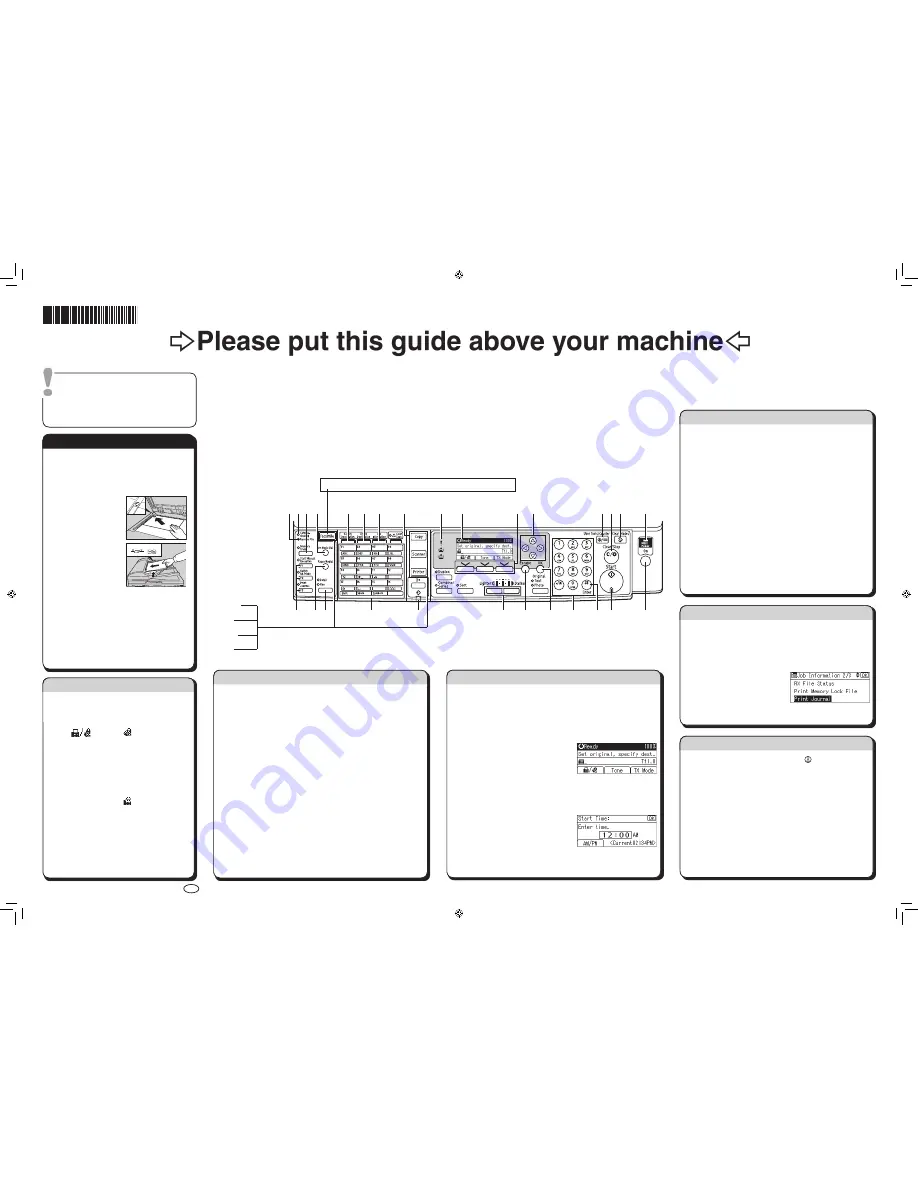
How to send at a specific time (Send Later)
(2. Other Transmission
Features)
Using this function, you can instruct the machine to send the fax
at a later time via Memory Transmission.
Advantage: you can take advantage of off-peak telephone
charges, without being at the machine.
A
Place the original, and then select the scan settings you require.
B
Press [TX Mode].
C
Select [Send Later], and then press
the
{
OK
}
key.
D
Select [Send at Specified Time], and then press the
{
OK
}
key.
E
Enter the time using the number keys
and press [AM/PM] to switch between
AM and PM. Then press the
{
OK
}
key.
F
Press the
{
Escape
}
key.
G
Specify a destination, and then press the
{
Start
}
key.
Chapter references in this guide refer to the bundled OI CD; Facsimile Reference.
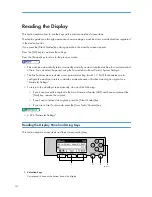
The Journal is printed automatically after every 50
communications. You can also request a Journal at any
time, by following the procedure below.
A
Press the
{
Job Information
}
key.
B
Select [Print Journal], and
then press the
{
OK
}
key.
C
Press the
{
Start
}
key.
D
Press the
{
Escape
}
key.
How to print the Journal...
(4. Confirming Communication
Information)
This button needs to be selected as first step
D0697104
5
12 13
1
10
11
7
9
8
6
2 3 4
14 15 16
17
18
19
20
21
22
23
24
25
26
27
28
29
StellaC4_FaxQR_F1-EN.indd 1
12/8/2008 8:07:24 PM
Summary of Contents for Aficio MP 171
Page 2: ......
Page 29: ...28 ...
Page 37: ...1 Simple Search 36 1 ...
Page 59: ...2 Getting Started 58 2 ...
Page 63: ...Paper Orientation BRA020S 3 Adding Paper 62 3 ...
Page 79: ...3 Adding Paper 78 3 ...
Page 90: ...Keyboard Type A BRA036S Keyboard Type B BRA037S Entering Text 89 5 ...
Page 91: ...Keyboard Type C BRA038S Keyboard Type D BRA039S 5 Entering Text 90 5 ...
Page 107: ...7 Remarks 106 7 ...
Page 123: ...8 Appendix 122 8 ...
Page 128: ...MEMO 127 ...
Page 129: ...MEMO 128 EN USA D069 6752 ...
Page 130: ...Copyright 2008 ...
Page 133: ......
Page 142: ...10 ...
Page 156: ...1 Placing Originals 24 1 ...
Page 198: ...3 Copier Features 66 3 ...
Page 202: ...4 Appendix 70 4 ...
Page 205: ...Copyright 2008 ...
Page 210: ......
Page 263: ... For details about envelopes see Envelopes About This Machine 2 Printing Documents 54 2 ...
Page 265: ... p 58 Printing on both sides of sheets p 111 System 2 Printing Documents 56 2 ...
Page 271: ...2 pages per sheet BMF018S BMF023S BMF024S 4 pages per sheet BMF019S 2 Printing Documents 62 2 ...
Page 273: ... Only the PCL6 printer driver is supported 2 Printing Documents 64 2 ...
Page 275: ...BAC016S Set Collate when using the PCL printer driver 2 Printing Documents 66 2 ...
Page 283: ...2 Printing Documents 74 2 ...
Page 328: ...The Default setting is On p 105 Accessing User Tools PS Menu 119 5 ...
Page 341: ...MEMO 132 GB GB EN USA AE AE D468 ...
Page 342: ...Copyright 2008 ...
Page 343: ...Operating Instructions Printer Reference D468 6701 EN USA ...
Page 346: ......
Page 361: ... p 203 E mail Settings p 205 IP Fax Settings 16 ...
Page 467: ...2 Other Transmission Features 122 2 ...
Page 487: ... p 226 Parameter Settings 3 Reception 142 3 ...
Page 495: ...3 Reception 150 3 ...
Page 515: ...4 Confirming Communication Information 170 4 ...
Page 585: ...8 Press the User Tools Counter key 6 Fax Features 240 6 ...
Page 607: ...7 Appendix 262 7 ...
Page 614: ...Copyright 2008 ...
Page 618: ......
Page 668: ...1 Sending Scan Files by E mail 50 1 ...
Page 698: ...2 Sending Scan Files to Folders 80 2 ...
Page 704: ... p 95 Changing a Scan Profile 3 Sending Scan Files Using WSD 86 3 ...
Page 716: ...3 Sending Scan Files Using WSD 98 3 ...
Page 744: ...5 Delivering Scan Files 126 5 ...
Page 772: ...7 Various Scan Settings 154 7 ...
Page 805: ...MEMO 187 ...
Page 806: ...MEMO 188 GB GB EN USA AE AE D468 ...
Page 807: ...Copyright 2008 ...
Page 808: ...Operating Instructions Scanner Reference D468 6751 EN USA ...
Page 810: ......
Page 829: ...20 ...
Page 869: ...1 System Settings 60 1 ...
Page 913: ...2 Connecting the Machine 104 2 ...
Page 925: ...3 Using a Printer Server 116 3 ...
Page 1033: ...4 Monitoring and Configuring the Printer 224 4 ...
Page 1038: ... Printer Scanner p 235 Authentication Information Address Book 229 5 ...
Page 1142: ...7 Press Yes 8 Press the User Tools Counter key Registering Names to a Group 333 5 ...
Page 1169: ...6 Special Operations under Windows 360 6 ...
Page 1210: ...Copyright 2008 ...
Page 1213: ......
Page 1222: ...10 ...
Page 1264: ...1 Windows Configuration 52 1 ...
Page 1274: ...2 Mac OS Configuration 62 2 ...
Page 1312: ...4 Printer Utility for Mac 100 4 ...
Page 1317: ...Copyright 2008 ...
Page 1318: ...PostScript 3 Supplement EN USA D468 6800 AE AE GB GB ...
Page 1320: ......
Page 1343: ... p 21 Administrators 2 Configuring Administrator Authentication 24 2 ...
Page 1366: ...10 Press the OK key 11 Press the User Tools Counter key User Code Authentication 47 3 ...
Page 1408: ... p 217 Specifying the Extended Security Functions Printer Job Authentication 89 3 ...
Page 1417: ...3 Configuring User Authentication 98 3 ...
Page 1425: ...4 Protecting Data from Information Leaks 106 4 ...
Page 1459: ...5 Securing Information Sent over the Network or Stored on Hard Disk 140 5 ...
Page 1535: ...7 Enhanced Network Security 216 7 ...
Page 1553: ...8 Specifying the Extended Security Functions 234 8 ...
Page 1566: ... p 241 Supervisor Operations Supervisor Operations 247 10 ...
Page 1636: ...Copyright 2008 ...
Page 1675: ...36 GB GB EN USA AE AE D468 6801 ...
Page 1676: ...Copyright 2008 ...
Page 1677: ...UNIX Supplement GB GB EN USA AE AE D468 6801 ...
Page 1679: ......
Page 1682: ...7 Appendix Trademarks 97 INDEX 99 4 ...
Page 1708: ...2 Troubleshooting When Using the Copy Function 30 2 ...
Page 1772: ...BQP004S When A is displayed BQP005S 6 Clearing Misfeeds 94 6 ...
Page 1773: ...When P is displayed BQP003S When Y1 is displayed BQP006S Removing Jammed Paper 95 6 ...
Page 1774: ...When Y2 is displayed BQP007S 6 Clearing Misfeeds 96 6 ...
Page 1779: ...Copyright 2008 ...


