background image

MAINTENANCE

2407TL   01/11

Maintenance Section 5-4

© 2011 Alamo Group Inc.

MAINTENANCE

Lubrication Schedule

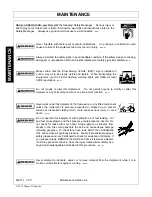
Before operating your Loader, take the time to inspect and repair any damage to the machine or tractor. Only a
minimum of time and effort is required to regularly maintain this machine to provide long life and trouble free
operation.

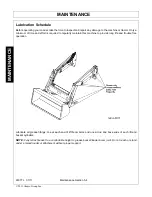
Lubricate all grease fittings: one at each end of lift boom arms and one at rod and base ends of each lift and
bucket cylinders.

NOTE:

 Fully retract bucket to a comfortable height to grease bucket/loader boom joint. Do not reach or stand

under a raised loader or attachment without proper support.

Summary of Contents for 2407TL

Page 1: ...IL 60936 800 446 5158 Email parts servis rhino com LOADER This Operator s Manual is an integral part of the safe operation of this machine and must be maintained with the unit at all times READ UNDER...

Page 2: ...safety equipment properly attached to minimize the chance of accidents BEFORE YOU START Read the safety messages on the implement and shown in your manual Observe the rules of safety and common sense...

Page 3: ...3 4 Dismounting Loader 3 4 Mounting Loader 3 6 Attaching Pin on Bucket 3 7 OPERATION SECTION 4 1 Standard Equipment and Specifications 4 3 Operator Requirements 4 4 Tractor Requirements 4 6 ROPS and...

Page 4: ...rication Schedule 5 4 Daily Maintenance 5 5 Adjusting Bucket Lever Indicator 5 5 Cylinder Service 5 6 Lift and Bucket Cylinder Disassembly 5 6 Lift and Bucket Cylinder Reassembly 5 7 Storage 5 8 Prope...

Page 5: ...Safety Section 1 1 SAFETY SECTION...

Page 6: ...owner operator of impending hazards and the degree of possible injury faced when operating this equipment Indicates an imminently hazardous situation that if not avoided WILL result in DEATH OR VERY S...

Page 7: ...ate the equipment safely Before operating the Tractor or Implement an operator on prescription or over the counter medication must consult a medical professional regarding any side effects of the medi...

Page 8: ...RING LOSS Tractors with or without an Implement attached can often be noisy enough to cause permanent hearing loss We recommend that you always wear hearing protection if the noise in the Operator s p...

Page 9: ...te environmental exposure Be safe and always wear proper protection Short or long term exposure to certain chemicals and materials can result in serious injury or death SL 19 Repeated or substantial b...

Page 10: ...or in gear can result in injury or death Read the Tractor operators manual for proper starting instructions SG 13 Operate the Tractor and or Implement controls only while properly seated in the Tracto...

Page 11: ...injury SL 05 Use extra care when turning or stopping Allow for increased length and weight of added loader The loader adds five to six feet of length in front of the tractor and significant weight All...

Page 12: ...der tractor or attachments Falling off the loader could result in serious injury and or tractor run over SL 14 Do not operate the loader from the ground Operate the tractor and loader only while seate...

Page 13: ...u have clear visibility in daylight or with adequate artificial lighting Never operate in darkness or foggy conditions where you cannot clearly see at least 100 feet in front and to the sides of the t...

Page 14: ...valve controls fail to functions properly discontinue use of the tractor and loader until the controls are properly repaired Sudden or unexpected movement or dropping of the loader and attachment cou...

Page 15: ...mplement determine the proper transport speeds for you and the equipment Make sure you abide by the following rules Test the tractor at a slow speed and increase the speed slowly Apply the Brakes smoo...

Page 16: ...bstruction with a raised loader could result in the tractor tipping over and causing serious bodily injury SL 21 Lower the loader to the bed of the truck or trailer when transporting the tractor and l...

Page 17: ...s Implement Do not permit anyone to modify or alter this Implement any of its components or any Implement function SG 8 Never work under the Implement the framework or any lifted component unless the...

Page 18: ...SG 34 Use caution and wear protective gloves when handling sharp objects such as blades knives and other cutting edges Be alert to worn component surfaces which have sharp edges Sharp surfaces can in...

Page 19: ...serious injury or death SL 13 Do not remove the attachment from the loader when the loader is disconnected from the tractor The attachment stabilizes the loader If the attachment is removed the loader...

Page 20: ...mote safe operation Damage to the decals may occur while in shipping use or reconditioning Rhino cares about the safety of its customers operators and bystanders and will replace the safety decals on...

Page 21: ...alve in Transport 6 52204 1 INSTRUCT Loader Positions 7 D469 1 WARNING Loader Safety 8 D468 2 DANGER Crushing Electrocution Falling Hazard 9 D471 1 WARNING Handling Bales 10 D470 1 DANGER Use ROPS Sea...

Page 22: ...SAFETY 2407TL 01 11 Safety Section 1 18 2011 Alamo Group Inc SAFETY Decal Description Rhino Left P N 49696 Rhino Right P N 51448 MODEL NAME 2407TL P N 52605...

Page 23: ...actor off and remove hydraulic pressure Never use hands to check for leaks Wear safety glasses oil impenetrable gloves and use cardboard to check for evidence of oil leaks If you suspect a leak remove...

Page 24: ...ransport for better visibility and to avoid overturns Keep bystanders 10 feet away when operating loader When parking or servicing unit lower bucket to the ground on level hard surface stop engine set...

Page 25: ...tractor at low speeds Failure to comply may result in serious injury or death D470 Slow Moving Vehicle Decal Keep SMV reflector clean and visible DO NOT transport or operate without the SMV P N 03200...

Page 26: ...dictated by the work environment Keep all guards in place when the machine is in operation Permit no riders on equipment Stop engine disconnect the power source and wait for all machine movement to s...

Page 27: ...Introduction Section 2 1 INTRODUCTION SECTION...

Page 28: ...st of Safety Messages that if followed will help protect the operator and bystanders from injury or death Many of the Safety Messages will be repeated throughout the manual The owner operator dealer s...

Page 29: ...aust some of its constituents and certain vehicle components contain or emit chemicals known to the state of California to cause cancer and birth defects or other reproductive harm SG 30 Never walk or...

Page 30: ...four wheel drive tractors They are intended to lift only loose materials that will fit in the bucket All cylinders are double acting Parking stands support loader so tractor can be driven in for quick...

Page 31: ...ctor and implement 2 Fill out the Warranty Card in full Be sure to answer all questions including the Serial Number of the implement Mail within 30 days of delivery date of this implement NOTE Warrant...

Page 32: ......

Page 33: ...Assembly Section 3 1 ASSEMBLY AND CONNECTING THE LOADER SECTION...

Page 34: ...perly attached to the tractor and the retaining pins securely lock the loader into position Improper mounting of the loader onto the tractor can result in the loader falling causing serious injury SL...

Page 35: ...11 Alamo Group Inc ASSEMBLY Proper Ballasting and Wheel Spacing Spread front wheels to maximum distance Spread rear wheels to maximum distance Add rear wheel weight rear ballast box or implement Make...

Page 36: ...nt not to put excessive weight on parking stands with lift cylinder retraction Damage may result 1 Locate tractor and loader on firm level ground 2 With bucket raised above ground tilt bucket down app...

Page 37: ...out of the mount allowing tractor to be pushed rearward Retract bucket cylinders until lower loader upright pins clear mount pin saddles and front tires See Figure Asm L 0026 9 Move tractor rearward a...

Page 38: ...upright pins contact mount vertical stop surfaces just above the mount pin saddles See Figure Asm L 0026 Extend bucket cylinders to FULLY seat both loader upright pins into mount pin saddles and raise...

Page 39: ...Always wear safety glasses when using a hammer to remove or install pins Material bucket can be installed using tools ordinarily available 1 Attach bucket to lift boom frame and bucket cylinders with...

Page 40: ......

Page 41: ...Operation Section 4 1 OPERATION SECTION...

Page 42: ...familiar with the loader and tractor operation and all associated safety practices before operating the loader and tractor Proper operation of the loader as detailed in this manual will help ensure y...

Page 43: ...aximum height 1035 lbs Breakout force at pivot pin 1770 lbs Total weight with bucket approx 735 lbs Raising time to full height 2 7 sec Lower time 2 0 sec Bucket dump time 2 6 sec Bucket rollback time...

Page 44: ...tor engine suddenly in an emergency Never allow inexperienced or untrained personnel to operate the Tractor or Implement without supervision Make sure the operator has fully read and understood the ma...

Page 45: ...ry or death SG 33 Use extreme care when loading carrying or handling any agricultural fertilizers chemicals or biological residue Follow the manufacturer s handling instructions and wear appropriate P...

Page 46: ...erator wear approved Personal Protective Equipment PPE for the job conditions when attaching operating servicing and repairing the equipment PPE is designed to provide operator protection and includes...

Page 47: ...tion bucket pivot point at the same height as boom pivot point on mast 3 1 ROPS and Seat Belt The tractor must be equipped with a Roll Over Protective Structure ROPS tractor cab or roll bar and seat b...

Page 48: ...ined by multiplying actual weight of equipment by 1 50 EXAMPLE Equipment weighing 800 pounds attached to tractor multiplied by 1 50 equals 1200 pounds of effective counterbalance weight at rear axle A...

Page 49: ...the tractor shift lever into a low range or parking gear to prevent the tractor from rolling Never dismount a Tractor that is moving or while the engine is running Operate the Tractor controls from t...

Page 50: ...rol Locate the engine throttle control Locate the brake pedals and the clutch Locate the parking brake Locate the PTO control Locate the 3 point hitch control lever Locate the hydraulic remote control...

Page 51: ...tractor must be performed This includes routine maintenance and scheduled lubrication inspecting that all safety devices are equipped and functional and performing needed repairs DO NOT operate the un...

Page 52: ...eaks Radiator free of debris Engine oil level and condition Engine coolant level and condition Power brake fluid level Power steering fluid level Fuel condition and level Sufficient lubrication at all...

Page 53: ...vidence of oil leaks If you suspect a leak REMOVE the HOSE and have it tested at a Dealer If oil does penetrate the skin have the injury treated immediately by a physician knowledgeable and skilled in...

Page 54: ...LINE INSPECTION Check for hydraulic leaks along hoses cylinders and fittings IMPORTANT DO NOT use your hands to check for oil leaks Use a piece of heavy paper or cardboard to check for hydraulic oil l...

Page 55: ...ing lights function properly The SMV Sign is clean and visible The tires are in good condition with proper pressure The wheel lug bolts are tight The tractor brakes are in good condition The steering...

Page 56: ...the Canister on the Loader All Safety Decals are in place and legible The Mounting frame bolts are in place and tight The Loader Arms are securely retained in frame mounts The Loader connection bolts...

Page 57: ...reases Determine the maximum transport speed not to exceed 20 mph 30 kph for transporting this equipment Test the equipment at a slow speed in turns Increase the speed through the turn only after you...

Page 58: ...will also prevent the tractor from rearing up and loss of steering control The tractor should never be operated at speeds that cannot be safely handled or which will prevent the operator from stopping...

Page 59: ...e Tractor and or Implement controls only while properly seated in the Tractor seat with the seat belt securely fastened around you Inadvertent movement of the Tractor or Implement may cause serious in...

Page 60: ...tor wheel contact with any wash out drop off or ground obstruction with a raised loader could result in the tractor tipping over and causing serious injury SL 12 Do not work from the loader or attachm...

Page 61: ...SL 33 Operate the tractor and loader only in conditions where you have clear visibility in daylight or with adequate artificial lighting Never operate in darkness or foggy conditions where you cannot...

Page 62: ...not raise the loader on a hillside Do not transport across a slope with a raised loader When the loader is raised the center of gravity of the tractor and loader is raised increasing the potential fo...

Page 63: ...ext and illustrations offer suggested loader and tractor operating techniques FILLING THE BUCKET Approach and enter the pile with a level bucket Loaders with 1 lever control ease lever back toward you...

Page 64: ...vel bucket throughout the lifting cycle resists bucket lift and increases breakaway effort NOTE Do not be concerned if the bucket is not completely filled during each pass Maximum productivity is dete...

Page 65: ...load keep the bucket positioned to avoid spillage Loader has mechanical self leveling of attachment in both raise and lower cycle Attachment can be adjusted by using bucket cylinders CARRYING THE LOAD...

Page 66: ...et as low as possible This keeps center of gravity low and will provide maximum stability When transporting the load keep bucket as low as possible to avoid tipping in case a wheel drops in a rut DUMP...

Page 67: ...OPERATION 2407TL 01 11 Operation Section 4 27 2011 Alamo Group Inc OPERATION LOWERING THE BUCKET After bucket is dumped back away from vehicle while lowering and rolling back bucket...

Page 68: ...cket level and put lift control in float position to permit bucket to float on working surface If hydraulic down pressure is exerted on bucket it will wear faster than normal Float will also prevent m...

Page 69: ...tion when undercutting high banks Dirt slides can be dangerous Load from as low as possible for maximum efficiency Loader lift and breakaway capacity diminish as loading height is increased Side cutti...

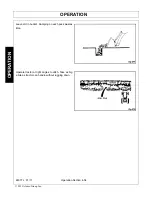
Page 70: ...ction 4 30 2011 Alamo Group Inc OPERATION Another method for large dirt piles is to build a ramp approach to the pile It is important to keep the bucket level when approaching a bank or pile This will...

Page 71: ...t cleanly With bucket level start a cut at notch approximately 2 inches deep Hold depth by feathering bucket control to adjust cutting lip up or down When front tires enter the notch adjust lift cylin...

Page 72: ...between pile and spreader Back grade occasionally with a loaded bucket to keep working surface free of ruts and holes Also hold lift control forward so full weight of bucket is scraping ground Do not...

Page 73: ...LLING Approach pile with a level bucket Poor methods actually move no more dirt and make it more difficult to hold a level grade Do not use bucket in dumped position for bulldozing This method shown a...

Page 74: ...01 11 Operation Section 4 34 2011 Alamo Group Inc OPERATION Leave dirt in bucket Dumping on each pass wastes time Operate tractor at right angles to ditch Take as big a bite as tractor can handle with...

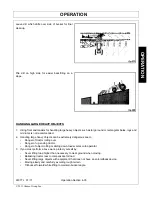
Page 75: ...ded 2 Handling large heavy objects can be extremely dangerous due to Danger of tractor rolling over Danger of up ending tractor Danger of object rolling or sliding down loader arms onto operator 3 If...

Page 76: ...es may electrify entire tractor and electrocute kill operator Loader equipped with bale spear is designed to handle round bales up to 2000 pounds Load bale spear by approaching from round end to preve...

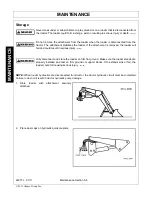
Page 77: ...rt of the next season Store the loader in a clean dry place resting securely on parking stands at ground level Use spray touch up enamel where necessary to prevent rust and maintain the appearance of...

Page 78: ...erating on roads or uneven ground Only transport the Tractor and Implement at the speeds which allow you to properly control the equipment Be aware of the operating conditions Do not operate the Tract...

Page 79: ...ity Reduce tractor ground speed when transporting a load Take extra care when traveling over rough terrain or on slopes OPS L 0011 Before transporting the tractor on a public roadway or boarding a tra...

Page 80: ...angular bright orange with reflective red trim for both easy day and night visibility Make sure the SMV sign is clean and visible from the rear of the unit before transporting the tractor and implemen...

Page 81: ...in compliance with the legal limits set for the areas that will be traveled through OPS U 0024 Use adequately sized and rated trailers and equipment to transport the tractor and implement Consult an...

Page 82: ...alve Air in hydraulic system Cycle lift cylinders and bucket cylinders several times to free system of air Cylinder leaks internally Replace seals Faulty relief valve tractor Clean and replace relief...

Page 83: ...kit See Cylinder Service Improper hydraulic valve Repair or replace valve operation Excessive wear on bucket Bucket is riding on cutting Use boom FLOAT position or cutting edge edge instead of wear r...

Page 84: ......

Page 85: ...Maintenance Section 5 1 MAINTENANCE SECTION...

Page 86: ...mit anyone to modify or alter this Implement any of its components or any Implement function SG 8 Never work under the Implement the framework or any lifted component unless the Implement is securely...

Page 87: ...lict severe laceration injuries if proper hand protection is not worn SG 37 Avoid contact with hot surfaces of the engine or muffler Use gloves and eye protection when servicing hot components Contact...

Page 88: ...inimum of time and effort is required to regularly maintain this machine to provide long life and trouble free operation Lubricate all grease fittings one at each end of lift boom arms and one at rod...

Page 89: ...king Hydraulic oil leaks should be repaired promptly to avoid loss of oil and serious personal injury from escaping oil Escaping hydraulic fluid under pressure can penetrate skin causing serious perso...

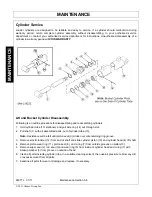
Page 90: ...Hold cylinder tube 13 stationary and pull wire ring 14 out through slot 2 Pull shaft 1 with all assembled parts out of cylinder tube 13 Note Resistance will be felt until piston seal 8 slides over wi...

Page 91: ...threaded end of shaft 1 Lubricate wiper seal 2 and rod seal 3 in head and carefully slide head onto shaft 5 Place o ring 10 piston seal 11 and piston wear ring 8 in grooves on outside of piston 9 Note...

Page 92: ...y around or on a loader that is disconnected from the tractor The loader could fall crushing a person resulting in serious injury or death SL 13 Do not remove the attachment from the loader when the l...

Page 93: ...MAINTENANCE 2407TL 01 11 Maintenance Section 5 9 2011 Alamo Group Inc MAINTENANCE 3 Do not remove attachment from stored loader 4 Do not allow children to play on or around loader...

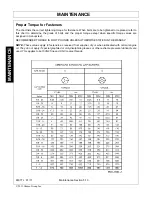
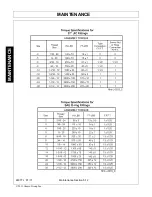
Page 94: ...he grade of bolts and the proper torque except when specific torque values are assigned in manual text RECOMMENDED TORQUE IN FOOT POUNDS UNLESS OTHERWISE STATED IN THE MANUAL NOTE These values apply t...

Page 95: ...MAINTENANCE 2407TL 01 11 Maintenance Section 5 11 2011 Alamo Group Inc MAINTENANCE...

Page 96: ...MAINTENANCE 2407TL 01 11 Maintenance Section 5 12 2011 Alamo Group Inc MAINTENANCE...

Page 97: ......

Page 98: ...Manufacturer 2 05 Purchaser is responsible for any labor charges exceeding a reasonable amount as determined by Manufacturer and for returning the goods to the Dealer whether or not the claim is appr...

Page 99: ...iently to confine the employee to the protected area provided by the ROPS REQUIRED OF THE OPERATOR 1 Securely fasten seat belt if the tractor has a ROPS 2 Where possible avoid operating the tractor ne...

Page 100: ...2407TL SOM 01 11 P N F 4003C Printed U S A 2407TL LOADER...

Reviews: