background image


DTR_301-D3-XX-001_EN_a


5.1


ZAS10-L PoE application 

The ZAS10-L PoE device is designed to display time and date. Additionally the clock could be used as a time 
standard for other devices. For the proper operation of the device, it should be correctly configured. 

5.2


ZAS10-L PoE configuration 

The configuration process consists in personalising the device by a user. In standard the device is configured 
using LAN interface and optionally it could be done using IR remote sold separately. 

5.2.1


 Configuration of the device through the embedded website - Web panel  

To connect with the clock, first you should configure the network card of the computer to which it is connected. 
The proper configuration of the network card can be downloaded from http://rgbtechnology.pl/soft/. Having 
configured the network connection correctly, you can, through a Web browser, connect with the embedded 
website (Web panel), where you can personalise the device. On the embedded clock website, you may use the 
following tabs

:  


TIME 

->  tab allowing you to configure the parameters connected with time; 

DISPLAY 

->  tab allowing you to configure the parameters connected with the device display;  

ADVANCED  ->  tab allowing you to configure the advanced parameters of the device; 
STATUS 

->  tab allowing you to read the device status. 

The detailed description of the tabs is available in the device operation manual instr_hardware_037.  
 

5.2.2


Configuration of the device through the IR remote 

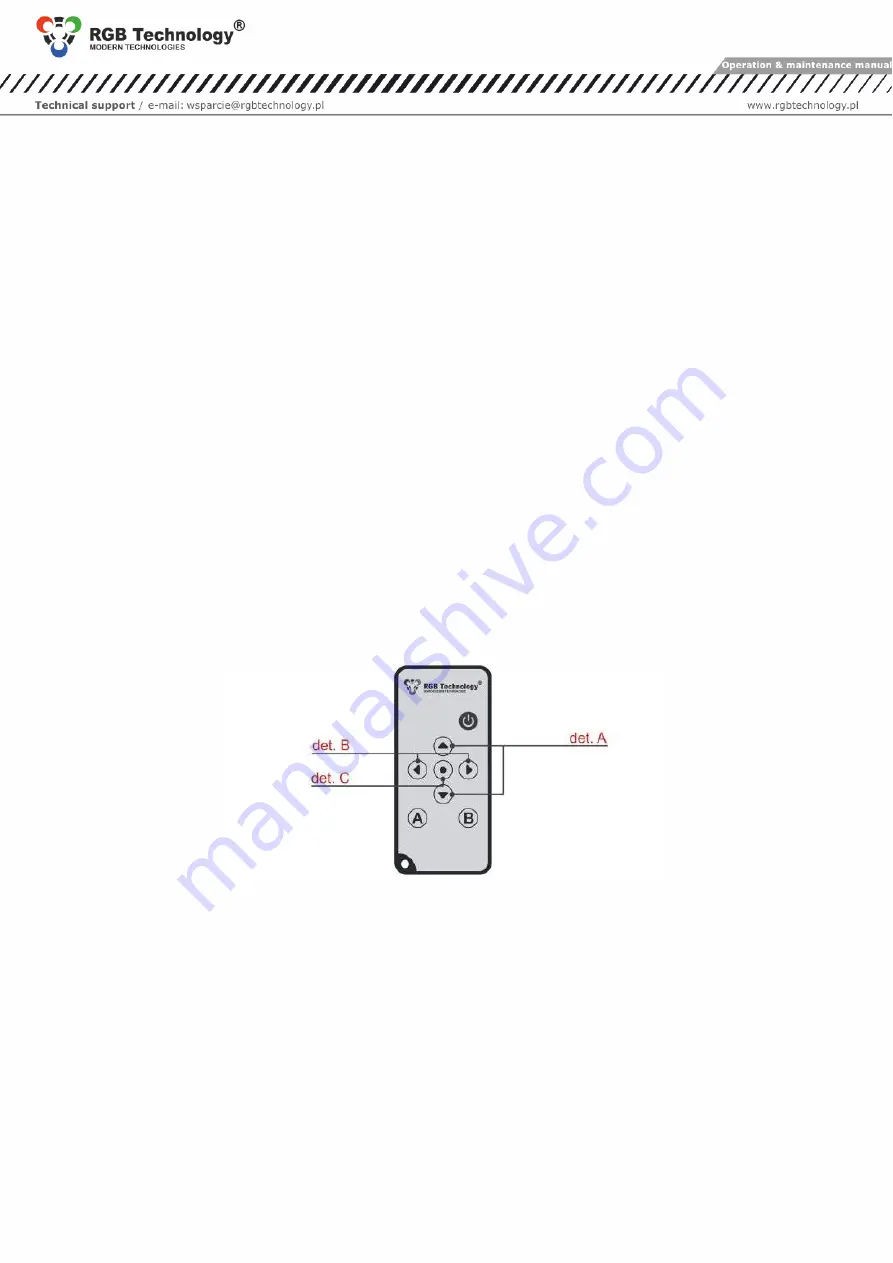
The basic configuration method is by means of the remote control through the user menu. fig. 4 shows the 
remote control, along with the explanation of the function of each button. You enter the user menu using the 

MENU 

button. You navigate and modify the respective parameters using the buttons 

 ,

,

 ←

 and 

 →


det. A

 – Change the parameter (VALUE PLUS/VALUE MINUS) 

det. B

 – move to the next position (PREVIOUS/NEXT); 

det. C

 –„MENU" button 

fig. 4 

Main menu structure: 
  

Menu position  

Function description  

F1 

Manual setting of the time and the date  

F2 

Configuration of the presented parameters  

F3 

Configuration of the time and date format, time colon behavior 

F4 

Configuration of the time synchronization 

F5 

Configuration of the display brightness  

F6 

Unavailable  

F7 

Configuration of the ECO mode  

F8 

Unavailable 

F9 

Restoring the default settings  

F10 

Unavailable 

F11 

Configuration of display synchronization 

F12 

Unavailable 

F13 

Regional settings, such as location, time zones, daylight saving time/standard time   

F14 

Stopwatch function / timer counting up / timer counting down 

Summary of Contents for ZAS10-L PoE

Page 1: ...OPERATION AND MAINTENANCE MANUAL ZAS10 L PoE CLOCKS Product code 301 D3 53 Explanatory figure ...

Page 2: ...PoE application 5 5 2 ZAS10 L PoE configuration 5 5 2 1 Configuration of the device through the embedded website Web panel 5 5 2 2 Configuration of the device through the IR remote 5 6 Accuracy 6 7 DHCP 6 8 Automatic brightness control of the device 6 9 Additional options 6 9 1 Cooperation between clocks 6 10 Initial start up 7 11 Disposal and recycling 7 11 1 Recycling of the package 7 11 2 Dispo...

Page 3: ...he devices so as to eliminate any damage during transport It is forbidden to transport the devices in a collective package without adequate amortisation each device must be packed separately and cannot have freedom of movement during transportation Due to the protective packing the module should be stored in the temperature not lower than 25 C and not higher than 60 C at the humidity below 99 RH 4...

Page 4: ...ingress and water impact Therefore avoid placing it the areas where there is a risk of flooding NOTICE Before any installation or maintenance operations refer to the manual supplied by the manufacturer Improper connection to the mains power supply incautious device installation or improper use may cause the property damage loss of health or death from electrical shock In addition any failure to fo...

Page 5: ... device display ADVANCED tab allowing you to configure the advanced parameters of the device STATUS tab allowing you to read the device status The detailed description of the tabs is available in the device operation manual instr_hardware_037 5 2 2 Configuration of the device through the IR remote The basic configuration method is by means of the remote control through the user menu fig 4 shows th...

Page 6: ...e e g after signal loss the device recovers full accuracy after 40 to 80s 7 DHCP The device has a DHCP client function Thanks to this it can automatically obtain configuration data such as IP address gateway IP address and subnet mask from a DHCP server e g router 8 Automatic brightness control of the device In the standard version a lighting sensor is included The device in response to the ambien...

Page 7: ...s for waste disposal regulations 11 2Disposal of the device The device can not be disposed with regular household waste According to Directive 2002 96 EC WEEE when repair is not economically reasonable user is obligated to hand over damaged or destroyed device to an appropriate disposal facility 12 Most common installation errors 1 Device installed contrary to the instructions 2 Drilling additiona...

Reviews: