


Copyright 2011-2012, RFXCOM
RFXtrx Version 2.12
page 9 / 20
7. Flash update of the RFXtrx433
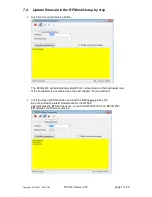
7.1.
Update firmware in the RFXtrx433
Firmware is flashed in the RFXtrx433 using this procedure:
1. Download the latest RFXtrx433_yy.hex firmware file.
2. Connect the RFXtrx to a Windows system or Linux under MONO
3. Stop any program that is connected to the RFXtrx433
4. Start the RFXflash program (version 3.0.0.0 or higher)
5. Select the USB RFXtrx COM port and click the CONNECT button,
(the red LED should switch on now)
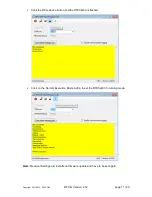
6. Load the correct .hex firmware file for your RFXtrx,
7. Click the WRITE button,
8. Click the Normal Execution mode button.
IMPORTANT:
1. Do not interrupt the flash procedure when started.
2. It can happen that the flash procedure ends with a pop-up screen indicating errors.
Just disconnect the RFXtrx and start again at step 5 until the flash procedure if finished
without errors.
If the red LED does not switch on if you click the CONNECT button:
1. Check if you have selected the correct USB COM port.
2. If you have flashed the RFXtrx before and interrupted the flash procedure it is possible
that the RFXtrx does not enter the flash state. Contact
for help.
Note: Receiver Settings are lost after a firmware update and have to be set again.


