Reznor AS3 Manual Download Page 15

15

OPT-AS3,4,5,8 (07-22) 160202-B

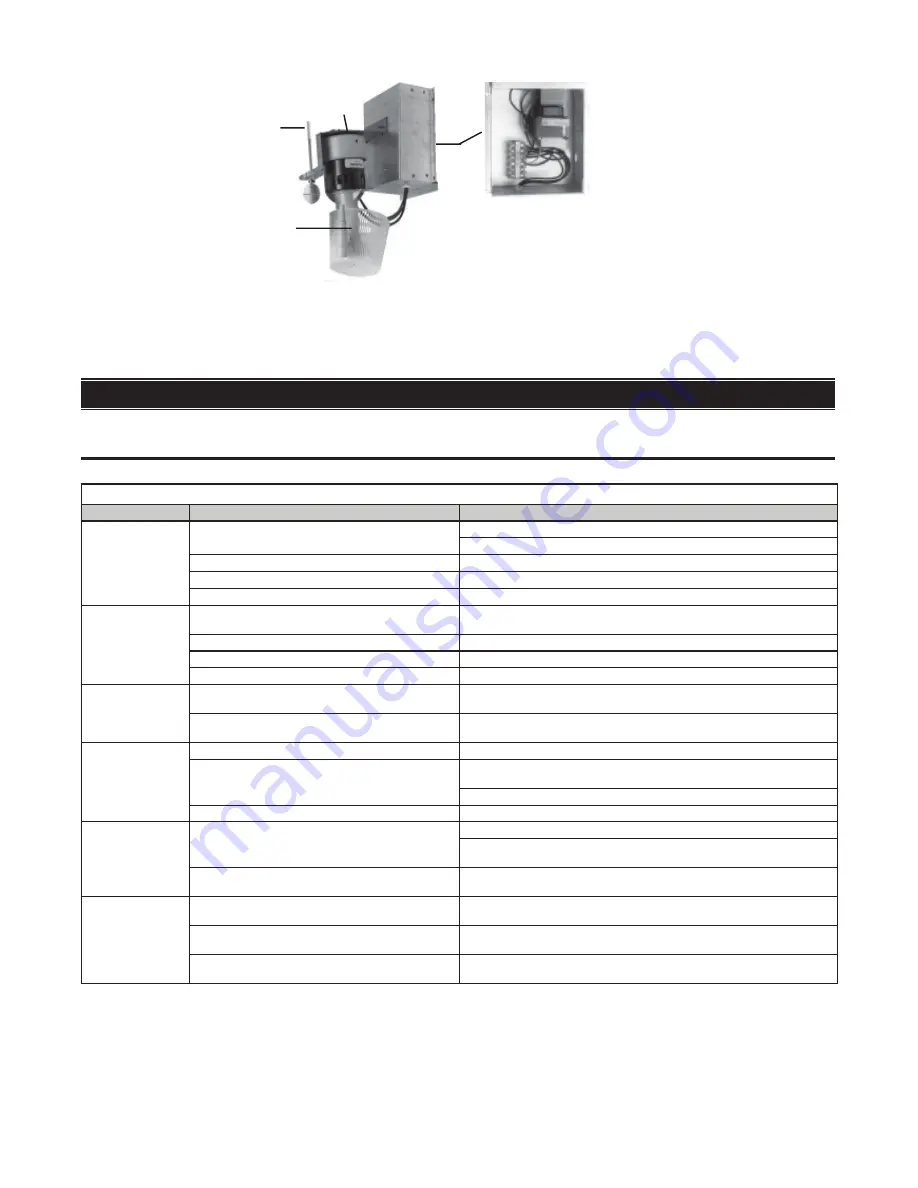
Figure 16.  Water Pump

TROUBLESHOOTING

⚠ DANGER ⚠

Disconnect the power before servicing the cooling module. Failure to do so can cause electrical 

shock, personal injury, or death.

Float

Switch

Pump
Motor

Pump

Junction Box

NOTE: Only 208V unit has
transformer in  junction box.

Table 5.  Troubleshooting

Symptom

Probable Cause

Remedy

A. Pump doesn’t 

run (pump and 

float system)—unit 

calling for cooling 

and reservoir

1.  Electrical connections (low voltage)

Verify all electrical connections
Verify correct voltage at pump terminal H

2.  Electric float switch

Check position of actuators on electric float switch

3.  Dirty pump

Clean pump (refer to 

Water Pump Maintenance

 section)

4.  Defective pump

Replace pump

B. Required water 

level (3 inches) not 

being maintained 

(pump and float 

control system)

1.  Float valve

Adjust float valve (refer to 

Filling and Adjusting Water Level in 

Reservoir

 section)

2.  Drain and fill valves not working properly

Check valves for proper operation

3.  Incorrect overflow pipe nipple

Replace pipe nipple with 3-1/2-inch nipple

4.  Drain leaking

Tighten drain fittings

C. Water running 

off media pads

1.  Excessive water flow

Adjust ball valve in distribution line (refer to 

Adjusting Water Flow


section)

2.  Dirty media pads

Clean or replace media pads (refer to 

Installation/Replacement of 

Media Pads

 section)

D. Water not 

distributing evenly

1.  Distribution line clogged

Flush distribution line (refer to 

Flushing Water Lines

 section)

2.  Holes in distribution line turned

Check position of distribution line—holes should be spraying upward 

toward diffuser
Adjust position of line if not positioned with holes toward top

3.  Pump not running on correct voltage

Check voltage at pump terminal in cooling module junction box

E. Media pads 

becoming clogged 

and discolored 

(scale and salt 

deposits) quickly

1.  Bleed line clogged or inadequate bleed-off 

   (pump and float control system)

Clean bleed line (refer to 

Flushing Water Lines

 section)

Uniform buildup of minerals on entering air face of media indicates 

insufficient bleed-off—increase rate until mineral deposits dissipate

2.  Excessive water flow

Adjust ball valve in distribution line (refer to 

Adjusting Water Flow


section)

F. Water blow-

off from media 

pads or water 

being pulled from 

reservoir

1.  Media pads installed incorrectly

Install media pads correctly (refer to 

Installation/Replacement of 

Media Pads

 section)

2.  Requires moisture elimination pad

Install moisture elimination (over 600 FPM) pad (refer to 

Installation/

Replacement of Media Pads

 section)

3.  Water level not 3 inches 

   (pump and float control system)

Refer to probable causes and remedies for symptom B above

Summary of Contents for AS3

Page 1: ...ling modules require outside air TABLE OF CONTENTS GENERAL INFORMATION 1 Dimensions 2 Weights 2 INSTALLATION 3 Pre Installation Checklist 3 Assemble Base 3 Install Evaporative Cooling Module on Base 4...

Page 2: ...1 Evaporative Cooling Module Installation Components Item No Component PN Quantity Application 1 End rail 107235 2 Base assembly 2 Side rail 107227 2 3 Two piece leg 107236 4 4 Front top cover 107228...

Page 3: ...drain and fill kit freeze protection kit moisture elimination pads and or water hammer arrestor check to ensure that these parts are available for installation Ensure that there is adequate clearance...

Page 4: ...odule with both ends supported and place it on base assembly Ensure that module is level and that all base assembly bolts are secure 2 Install top front cover 4 and secure using 13 screws 8 three per...

Page 5: ...oling module using screws 8 five per side 4 Secure transition duct flange to front top cover 4 using seven screws 8 5 With cooling module and transition duct properly positioned on blower cabinet tigh...

Page 6: ...ure 6 a Install two catch pad clamps to one side of cooling module s front legs and secure clamps through legs into clamp using four screws 8 b Assemble catch pads together using three screws 8 NOTE T...

Page 7: ...rection Through Media Pads Pump Junction Box Assembly Installation NOTE To avoid damage during shipping the pump junction box assembly is secured to the top of the side panel 1 Support pump junction b...

Page 8: ...mp Junction Box Assembly Electrical Connections PUMP JUNCTION BOX ASSEMBLY OPERATING LOCATION Figure 9 Evaporative Cooling Module Factory Installed Wiring BL MODELS WITH 115 230 1 60 OR 230 460 575 3...

Page 9: ...interfere with damper controls 5 Run wires up to electrical compartment remove plug from one bottom entrance hole and push tubing encased wires into electrical compartment Place other strain relief bu...

Page 10: ...iddle outlet to supply water to cooling module reservoir b For drain two way valve connections connect drain pipe from reservoir to A and connect outlet side to B and connect into drain lines from coo...

Page 11: ...dule All cooling modules are equipped with an overflow and drain fitting The fittings are in the cabinet bottom and come complete with a locknut and a sealing gasket Check these fittings for tightness...

Page 12: ...ailure to do so can cause electrical shock personal injury or death CAUTION Do not flood the media pads with extreme quantities of water for long periods as this will cause premature breakdown of the...

Page 13: ...iven temperature the media pads should completely wet from top to bottom dur ing the ON cycle The AquaSaver microprocessor has three preset timing settings based on media size The appropriate setting...

Page 14: ...on Remove the water feed line from the downstream side of the ball valve and unscrew the water bleed line barbed hose fitting Force a fresh water supply up through the water inlet hose and thoroughly...

Page 15: ...ow section 2 Dirty media pads Clean or replace media pads refer to Installation Replacement of Media Pads section D Water not distributing evenly 1 Distribution line clogged Flush distribution line re...

Page 16: ...ustrations subject to change without notice or incurring obligations Latest version of this manual is available at www reznorhvac com 2022 Nortek Global HVAC LLC O Fallon MO All rights reserved OPT AS...

Reviews: