background image


17 

used.    All  other  speakers  must  be  switched  off.    Any  Echo 
Cancellation provided on the Video Conferencing unit must be 
switched off. 
 
NOTE:  For  security  reasons,  Microphones  will  not  send  any 
audio signal to the AUX OUT connector when in the charger.  
To receive audio signal on the AUX OUT, microphones have to 
be taken out of the Charger Base. 


FLX Home Screen 

 
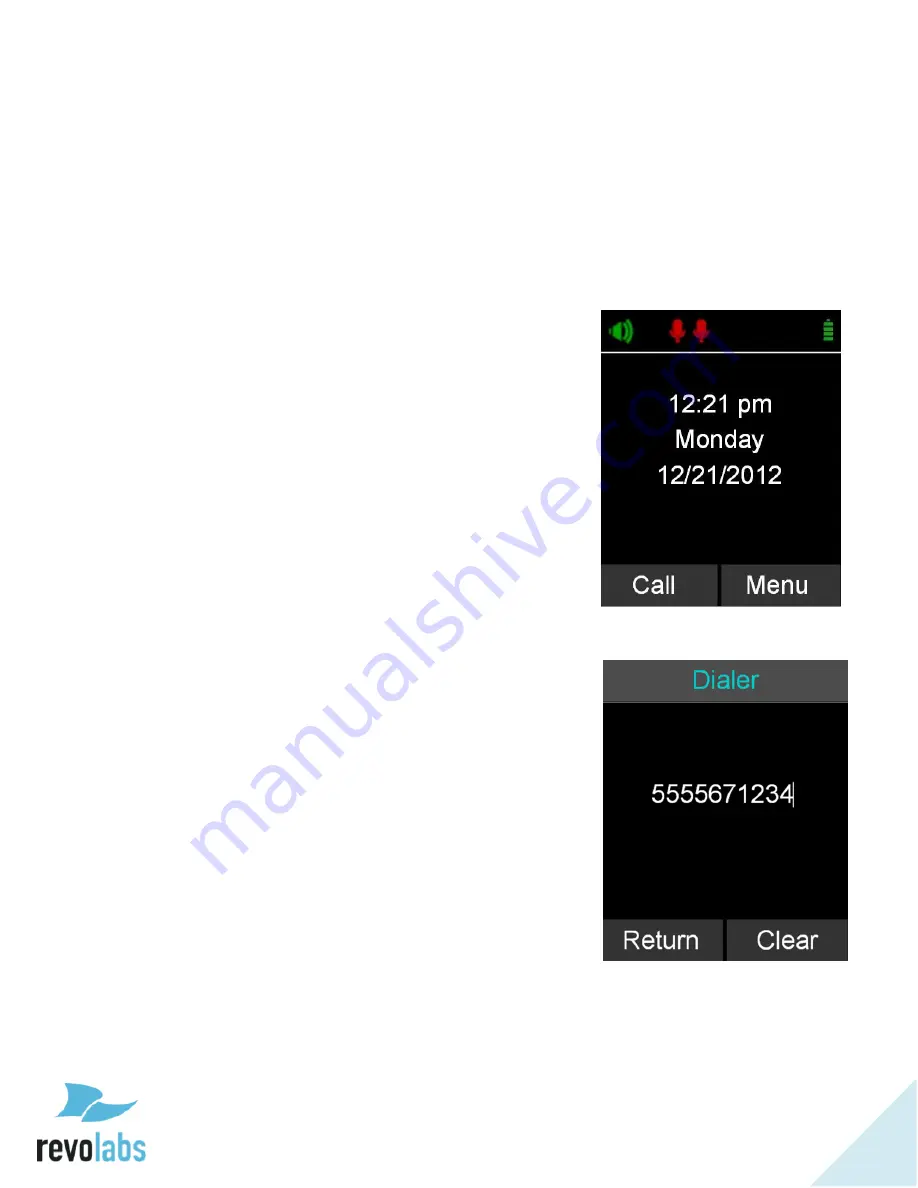
Whenever the FLX is not in a call, the FLX Dialer will 
show the FLX Home Screen.  If time and date have been 
set or received from the network, the screen will show this 
information.  Otherwise it will be blank. 
 
From the home screen a call can be started, or the system 
menu can be entered. 


Placing a Telephone Call 

1.


From the home screen on the FLX Dialer enter the 
phone number to be called.  

2.


Once the number is entered completely, press the 
green 

‘call’ button to initiate the phone call.  

3.


If any Microphones are out of the Charger Base and 
active, the call will default to ‘speaker mode’ and 
will be identified by the ring tone being played out of 
the Speaker.  

4.


If no Microphones are outside the Charger Base the 
call will default to ‘handset mode’ and the call will 
take place on the FLX Dialer. 


Summary of Contents for 10-FLX2-002-POTS

Page 1: ...REVOLABS FLX2TM Wireless Conference System for analog phone lines System Guide Models 10 FLX2 200 POTS 10 FLX2 020 POTS 10 FLX2 002 POTS 10 FLX2 101 POTS ...

Page 2: ...t of this document may be reproduced in any form or by any means without express written permission from Revolabs Inc Product specifications are subject to change without notice Revolabs FLX2 System Guide Analog 10 FLX2SYSGUIDE EN July 2011 Rev 1 2 ...

Page 3: ...the FLX2 components to water moisture or high humidity Do not expose any of the FLX2 components to extreme high or low temperatures Do not expose any of the FLX2 components to lit candles cigarettes cigars or to open flames etc Do not drop throw or try to bend any of the components as rough treatment could damage them Do not open the casings of any of the components of the FLX2 Conference Phone Do...

Page 4: ...g Telephone Call 18 Ignoring an Incoming Telephone Call 18 Ending a Telephone call 19 Calling a Directory Contact 19 Active Call Management 19 Charging Components during a Call 21 Bluetooth 23 Activating Bluetooth 23 Managing the Device Registry 23 Making a call via Bluetooth 25 Answering a call via Bluetooth 25 Video Conference Collaboration 26 Connecting a Video Conference System 26 Configuring ...

Page 5: ...e problems 46 Cannot dial numbers 46 Two phones using the same extension 46 LED Indicators 47 Reset to Factory Defaults 49 Technical Specifications 50 Models 50 Regulatory Information 52 FCC Notice to Users 52 Industry Canada Notice to Users 52 Restricted use with certain medical devices 53 Export Law Assurance 53 North American UPCS Usage Restriction 53 European Union Usage Restriction 53 WEEE No...

Page 6: ...e the Charge Base Speaker Microphones and Dialer handset In addition the Base Station receives the wireless signals from those components and connects into your telephone network for conference calls with your video conferencing unit to provide outstanding audio for your video calls or to your Bluetooth enabled device such as a cell phone or computer ...

Page 7: ... Use the 5 Volt power supply to connect the Base Station to the power outlet The Base Station will power up Connecting the Charger Base Place the Charger Base at a location where you can easily access the Microphones and the Speaker for your conference calls e g on a side board a desk or the conference table Connect the Charger Base to the power outlet using the provided 12 15V power supply Place ...

Page 8: ...d manually after establishing the call If any microphone is active outside of the charger bay microphones in the charger bay cannot be activated unmuted for the call To make a call using the Dialer as a handset make sure that all Microphones are in the Charger Base before starting to dial the number At this point only the Dialer will be used for the call To end the call press the red hang up butto...

Page 9: ...ss LANs 802 11b g without interference The Revolabs FLX2 Conference Phone includes digital encryption technology to ensure secure wireless communications between the Microphones Speaker and the Base Station Unpacking Your Revolabs FLX2 Conference Phone package contains the following items When unpacking the system be sure to take inventory of all parts to ensure that nothing is missing If parts ar...

Page 10: ...r wirelessly The Base Station is designed to optimize audio and video conferencing by providing consistent audio input from all participants The FLX2 Base Station is shown in rear panel view below It is equipped with a telephone connection to connect to an analog telephone output a DC power connection two mini USB ports for firmware updates and analog audio input output connections for video confe...

Page 11: ... and the Microphones by allowing them to charge in one simple and organized location The FLX2 Charger Base is not required while in a conference call however it can maintain the charge of the FLX Speaker and FLX Dialer while a call is in progress The Charger Base is equipped with a DC power connection and a mini USB connection for firmware updates to the Dialer ...

Page 12: ...he Dialer is not only used to make and answer conference calls but it is also used for configuring the system settings having a call using the handset and monitoring the system components The FLX Dialer shown below is composed of several parts such as a color LCD screen a compilation of buttons and a microphone and handset speaker ...

Page 13: ... and optimized specifically for use with the FLX Conferencing System The Speaker is equipped with a pairing button on the bottom and 4 LED indicators on the top to display the activity of the Speaker and the mute status of the system The Speaker can operate in or out of the Charger Base during conference calls ...

Page 14: ...ovide a flexible solution to meet all applications of conferencing spaces Microphone types include an omnidirectional tabletop Microphone a directional tabletop Microphone and a wearable lapel style Microphone Any combination of FLX Microphone can be used with a FLX System as they are mix and match FLX Microphones will operate in or out of the Charger Base It is recommended to always remove the mi...

Page 15: ...The FLX2 Wireless Conferencing system is equipped with a telephone interface that allows the system to make telephone conference calls The following are the basic operational instructions for making and receiving telephone conference calls Calling Configurations The FLX2 Wireless Conferencing system has the ability to make and receive calls in many different ways This provides the caller the abili...

Page 16: ...X2 System is equipped with a Bluetooth interface that supports the Hands Free Profile HFP This profile allows the user to make a call through a cell phone a computer or other device via a Bluetooth connection A Bluetooth call can be made using speaker mode only A Bluetooth call is controlled by the connected Bluetooth device A Bluetooth call can be made at the same time as a video call NOTE Revola...

Page 17: ...received from the network the screen will show this information Otherwise it will be blank From the home screen a call can be started or the system menu can be entered Placing a Telephone Call 1 From the home screen on the FLX Dialer enter the phone number to be called 2 Once the number is entered completely press the green call button to initiate the phone call 3 If any Microphones are out of the...

Page 18: ...ve or no Microphones outside the Charger Base when the incoming call is answered from the FLX Dialer the call will default to handset mode and will remain in handset mode The call can only be switched to speaker mode if the speaker is switched on If the call is switched to speaker mode while all microphones are in the charger base the microphones will have to be unmuted manually Ignoring an Incomi...

Page 19: ...ays a Browse to contact menu Menu Contacts Select the contact and press the green Call key b Browse to contact menu Menu Contacts Select the contact and press the Enter key or the View key From the contact view screen press the green Call key Active Call Management The FLX2 System has many call features that can be used when receiving or making phone calls These features can be controlled via the ...

Page 20: ...ton on the FLX Dialer and the mute buttons on the FLX Microphones work together Pressing either of these buttons will mute unmute all microphones out of the Charger Base or in the Charger Base if no microphone is outside Active Call Menu During a call pressing the Enter key will open the Active Call Menu This menu allows putting a caller on hold start a Conference call based on a dialed number a c...

Page 21: ... previous Active call screen again 5 When answering the second call the first call is put on hold Use the green Call button to resume the first call ending the second NOTE When using the red End Call button while another caller is on hold that caller will remain on hold in the telephone network The FLX2 Conference Phone will not be able to retrieve that call Charging Components during a Call Each ...

Page 22: ...ll activity will take place Microphones When a Microphone is placed into the charger during a call it will automatically reboot and then mute and enter its charging mode If all Microphones are placed into the charger during a speaker call all Microphones will mute and will need to be manually un muted It is not recommended to use the Microphones in the Charger Base for a speaker call If at least o...

Page 23: ...s the Speaker and Microphone for that application Please contact the provider of the application to find out which Bluetooth profile can be supported Activating Bluetooth 1 Go to the Menu Bluetooth Select Turn On to activate Bluetooth 2 Select Yes when prompted Enable Bluetooth Radio Managing the Device Registry The FLX2 Bluetooth interface has a device registry where it activates stores and recal...

Page 24: ...ystem and connect to it 5 If prompted for confirmation select yes If prompted for pin type 0000 default 6 Press the Stop key in order to abort pairing processes Removing a Device 1 Go to the Menu Bluetooth Select Device List 2 Select desired device and press the Options key 3 Select Unpair in the Device Options menu Viewing Device Details 1 Go to the Menu Bluetooth Select Device List 2 Select desi...

Page 25: ...ns 4 Choose either Auto Connect or Ask depending on the trust level you want to set for the Bluetooth Device Making a call via Bluetooth 1 With the Bluetooth connection enabled dial a number from the Bluetooth device The call will be conducted using the FLX Speaker and Microphones Answering a call via Bluetooth 1 You can answer a Bluetooth call directly from your FLX system If answering the call w...

Page 26: ...on of your video conferencing unit on how to disable the Echo Canceler Any audio device like external speaker or TV speaker attached to the video conferencing unit needs to be disabled The FLX Speaker and Microphones become your only audio devices for the Video Conferencing call Any other devices will affect the Echo Canceler and will cause negative impact on the audio of the call NOTE For securit...

Page 27: ... mixer settings based on the output medium The Speaker Mixer shown allows defining the mix between AUX IN and the Phone input to be played back on the Speaker It is a sliding scale from 8 to 8 Similar Mixers are offered for Phone Out mixing the signal between AUX IN and the microphones and AUX OUT mixing the phone input and the microphones The mix of audio can be changed during call time to ensure...

Page 28: ... navigation keys are used to scroll through the menu The Left navigation key will return to the previous menu 3 When setting levels such as Volume in the menus the Up and Down keys are used to change these values Device Status Recent Calls Home Setup Call Bluetooth System Info Audio Controls Contacts Call list Contact List Volume Ringer Equalizer Device Status About Device Versions Device IDs Syst...

Page 29: ...ccessed directly from the home screen by pressing green Call button in idle state 5 The recent call log is limited to 20 entries Call Recent Caller 1 Access the recent call log by browsing Menu Recent Calls or pressing the green Call button while no call is in progress 2 You can call an entry in the recent caller list in one of three fashions a In the recent call list select the entry you want to ...

Page 30: ...s in progress 2 In the recent call list select the entry you want to add to the contacts and press View This displays more information for the recent call you selected 3 Press the Save key to save the recent call as a Contact If a caller name was provided as part of the Caller ID it will be provided as the contact name Enter or edit the contact name when prompted and press Done Verify and edit if ...

Page 31: ...at allow managing the contact directory View Contact List 1 The contact list can be viewed in one of two fashions a Browse to the Contacts menu Menu Contacts or b From the home screen in idle ready state press the right arrow key Add a Contact 1 Browse to the Contacts menu Menu Contacts 2 Press the New key to create a new contact 3 Edit the name in alphanumeric mode Pressing Clear while editing th...

Page 32: ...er to the left of the cursor The key Done will finish editing the name and go on to the number editing screen 5 Edit the phone number The key Clear will clear delete the number to the left of the cursor When finished press the Done key to store the edited contact in memory 6 The contact list menu is shown once editing is completed Delete a Contact 1 Browse to the Contacts menu Menu Contacts and pr...

Page 33: ...ntered any contact name starting with C will be shown The user can scroll through the filtered list using the up and down buttons View Contact Information 1 Browse to the Contacts menu Menu Contacts 2 Select the contact by using the up and down keys 3 Press Enter or View when the contact is selected 4 Information for the selected contact is displayed Call Contact 1 Browse to the Contacts menu Menu...

Page 34: ...ing that the FLX is dialing the contact Pressing a number that has not yet been assigned to a contact has no affect Audio Control The following is a list of FLX Dialer menus that adjust the system attributes related to speaker audio Analog audio inputs outputs and telephony audio configurations Speaker Volume 1 Browse to the Speaker Volume menu Menu Audio Controls Volume Speaker Volume 2 The Speak...

Page 35: ...p and down buttons to select a ring tone and press enter to set the selected ring tone Equalizer EQ 1 Browse to the Equalizer Settings menu Menu Audio Controls EQ 2 Use the up and down buttons to select a preset EQ and press enter to set the selected EQ 3 The selected equalizer will be listed in upper case letters while the others are listed in lower case letters In the example to the right VOICE ...

Page 36: ...ation 3 Device Versions shows firmware version for the Speaker SPK and Microphones MIC1 MIC2 4 System Versions shows the firmware versions for the Application APP Baseband BB Bluetooth Base BTB and Bluetooth Dialer BTH software 5 Device IDs shows the ID of the Speaker S1 and the Microphones M1 M2 6 System ID shows the ID of the base Bluetooth The Bluetooth menu has been explained earlier in this m...

Page 37: ... the respective values Date Time 1 Browse to the Date Time menu Menu Setup Set Date Time 2 To set the date or time select either the Set Date or Set Time option and press either Enter or Select 3 Edit time and date month day year using the numeric keys and the left and right buttons The Done key will store the value 4 To change the use of the network time select the Netwrk Time ON OFF option You c...

Page 38: ...nes outside of the Charger Base Microphones in the Charger Base will not be affected and will stay muted at all times If all Microphones are in the Charger Base pressing the mute button will change the mute status of all Microphones in the Charger Base The factory default for All Mic Mute is OFF 2 The Start Unmute feature allows the Microphones to come out unmuted when taken out of charger The fac...

Page 39: ...the Aux In signal 3 Aux Out Level allows changing the level of the Aux Out signal 4 Aux Out MIC LINE allows setting the level of the Aux Out connectors to either Mic level or Line level AEC AEC allows controlling the Acoustic Echo Cancellation Level of the different Microphone types Omni Directional or Lapel RF Power 1 Browse to the RF Power menu Setup Advanced Setup RF Power 2 The user can adjust...

Page 40: ... this Set Password 1 Browse to the Set Password menu Menu Setup Advanced Setup Admin Settings Set Password 2 Set the password to an admin specified password Note that setting this password will override the default password so do not lose the new password Log Out Admin 1 Browse to Log Out Admin Menu Setup Advanced Setup Admin Settings Log Out Admin 2 Once logged out the user will have to retype th...

Page 41: ...asked whether to Scan for New Base select Yes 4 After some time scanning for available bases an overlay will appear asking Pair with System Name The system name is either the Factory preset name of Flx_xxxxxx with xxxxxx the last 6 digits of the BT number on the bottom of the Base station or the system name you previously selected in the Advanced Setup Select Yes 5 An overlay Pairing with base Sys...

Page 42: ...ring Mic 1 or Pairing Mic 2 depending on which Microphone you are pairing 6 Press the mute button on the Microphone and hold it until the LED turns solid red The Microphone is now in pairing mode 7 After a short time an overlay will appear on the Dialer Pairing Successful after that the screen should read MIC 1 Linked or MIC 2 Linked based on which one you were linking 9 If pairing was unsuccessfu...

Page 43: ... setting has to be set to OFF Power On Off the System Components During normal use and operation of the FLX2 System there is no need to turn off any part of the system However if the system is going to be stored without the Charger Base powered on then each component should be powered off until further use Dialer On Off To power off the FLX Dialer hold down the red end call soft key until the devi...

Page 44: ...the Microphone to an active Charger Base and it will power on automatically Troubleshooting Warning Messages Speaker Microphone Link Lost If a FLX Microphone or FLX Speaker loses connection to the FLX2 Base Station the LED indicator will begin flashing a sequence of red yellow green yellow and start emitting a beeping notification To reconnect the Microphone or Speaker move it back into range of t...

Page 45: ...g for the Base Station or lost the connection to the Base Station please follow these steps 1 Is the Base Station powered up the Status LED on the back of the Base Station should have green double flashes about every second If not please power up the Base Station All components should automatically connect to the Base Station after a few seconds 2 The Base Station is powered up but the Status LED ...

Page 46: ...change the Disconnect setting from OFF to ON see the section on Phone Settings on page 43 This should resolve this issue Cannot dial numbers When using FLX on a DSL analog telephone line the DSL filter needs to be installed If this is not the case calls might not go through Two phones using the same extension If a second phone is connected to the same extension a FLX Conference phone is connected ...

Page 47: ...ting Yellow Green flash On connected battery low un muted Alternating Yellow Double Red flash On connected battery low individually muted Alternating long Red Yellow flash On connected battery low Master Mute or All Mic Mute is ON microphones muted Flashing Yellow Red Yellow Green Searching for a connection to the base The microphone will try to re establish the link for 5 minutes then power off A...

Page 48: ...Yellow Red Yellow Green Searching for a connection to the Base Station Alternating slow Red Green flash Speaker is not paired to a Base Station Off Speaker is powered off o Speaker is not seated properly o Charger tray is powered off Speaker not in Charger Base Off Speaker is powered off Green flash every second o Connected no call in progress Microphones in Charger Base o Connected call in progre...

Page 49: ...ps of five rapid Red flashes Speaker is in a fault condition Device LED Indicator Status Base Station Long solid on then a long solid off Power On Boot Process Double flashes every second Operating Mode indicating that Base Station is functional Skip every fifth double flash Fault indication Continuous Fast Flashing Updating non volatile memory as part of software update Off No Power In some Speak...

Page 50: ... Class II 33 feet 10 meters Security DECT Bluetooth DECT 128 bit encryption Noise Cancelation Noise cancellation on the Microphone Echo Cancelation Acoustic echo canceller for Speaker Microphone Line echo canceller for analog telephone line RF Shield No cell phone interference due to RF ArmorTM technology Language versions System messages and menus in English Documentation in English Certification...

Page 51: ...ctions Telephone RJ11 USB 2 Mini USB connectors AUX IN AUX OUT Line level input 2 outputs line level or mic level Indicators LED 1 indicating system status Charger Base Power 15V 1A Dimensions Charger Base 170 diameter x 22mm Weight 252g Dialer Dimensions Dialer 125 x 48 x 11mm Weight 67 5g Microphone and Speaker bandwidth 300 3300Hz Battery life 8 hours Charge time 3 hours Display High resolution...

Page 52: ...ies with FCC radiation exposure limits for an uncontrolled environment Industry Canada Notice to Users Operation is subject to the following two conditions 1 This device may not cause interference and 2 This device must accept any interference including interference that may cause undesired operation of the device Model Number Industry Canada Identification 10 FLXBASE POTS 6455A 10FLX 10 FLXSPEAKE...

Page 53: ...e use of wireless devices and their accessories may be prohibited or restricted in certain areas Always obey the laws and regulations on the use of these products North American UPCS Usage Restriction This product is licensed for operation in the United States of America and Canada The radio has been found to be compliant to the requirements set forth in CFR 47 Sections 2 1091 and 15 247 b 4 addre...

Page 54: ...e RLAN Equipment EN 300 328 Electromagnetic compatibility and Radio spectrum Matters ERM Wideband transmission systems Data transmission equipment operating in the 2 4 GHz ISM band and using wide band modulation techniques Harmonized EN covering essential requirements under article 3 2 of the R TTE Directive EN 301 489 6 ElectroMagnetic Compatibility and Radio Spectrum Matters ERM ElectroMagnetic ...

Page 55: ...ntinuance of service may be required But if advance notice isn t practical the telephone company will notify the customer as soon as possible Also you will be advised of your right to file a complaint with the FCC if you believe it is necessary The telephone company may make changes in its facilities equipment operations or procedures that could affect the operation of the equipment If this happen...

Page 56: ...ipped to Customer via standard economy shipping methods and at Revolabs s expense not later than thirty 30 days after Revolabs receives the defective product and Revolabs will retain risk of loss or damage until the item is delivered to Customer Any customer request for expedited shipping will be considered on a case by case basis and will be at the sole expense of the customer Any product found t...

Page 57: ...mplied warranties or the limitation of incidental or consequential damages for certain products supplied to consumers or the limitation of liability for personal injury so the above limitations and exclusions may be limited in their application to you When the implied warranties are not allowed to be excluded in their entirety they will be limited to the duration of the applicable written warranty...

Reviews: