background image


- 11 - 

DIP Switch 5&6 

– Sharing Mode: 

To use two HD Venue Systems in the same area, both systems must have DIP Switch 5 set to ON.  
One of the HD Venue Systems must have DIP Switch 6 set to ON (A frequencies) and the other HD 
Venue System must have DIP Switch 6 set to OFF (B frequencies). 
 

DIP Switch 7&8 - Transmit Power: 

The  transmit  power  of  the  Base  Station  can  be  adjusted  to  help  reduce  the  operational  radius  of  a 
Revolabs HD Venue System in order to prevent interference from other Revolabs products, or from 
other devices operating in the same frequency.  


Note:


It is recommended that the lowest functioning Transmit Power be used for each system. 

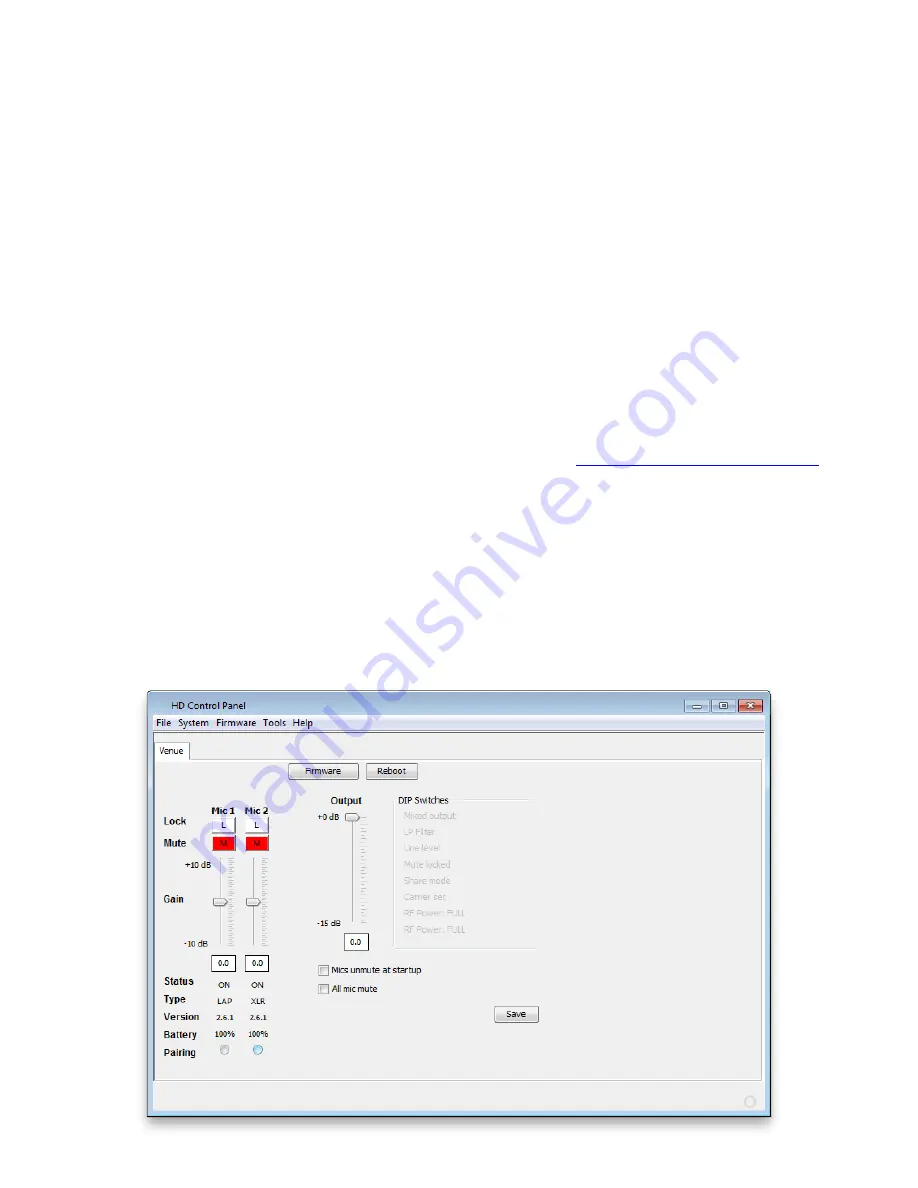
Using the Revolabs HD Control Panel Software 

A software program with graphical user interface is available for accessing control settings and real-
time  status  of  Revolabs  HD  Microphone  Systems.    A  detailed  description  of  how  to  use  this  tool  is 
described below. 

1.  Download the Revolabs HD Control Panel software from 

www.revolabs.com/downloads

 and 

install onto a PC running Windows 2000, NT, Vista or 7.  

2.  Connect the PC to the HD Venue system via USB.  
3.  Allow the PC to recognize the hardware and install the necessary drivers.  
4.  Launch the Revolabs HD Control Panel program. 

Configuration Settings 

The Revolabs HD Control Panel controls most of the HD Venue Base Station configuration settings. It 
also provides real time status of the microphones. Only one HD Venue system can be controlled and 
monitored from a single PC at any given time. 

Summary of Contents for 01-HDVENU

Page 1: ...Revolabs HD Venue Wireless Microphone System Models 01 HDVENU 03 HDVENUEU 03 HDVENUCN 03 HDVENUJP User and Set up Guide...

Page 2: ...ocument may be reproduced in any form or by any means without express written permission from Revolabs Inc Product specifications are subject to change without notice Revolabs HD Venue Wireless Microp...

Page 3: ...es and HD Microphone Adapters 13 Using the HD Wearable Wireless Microphones 13 Using the HD Omni Directional Tabletop Wireless Boundary Microphones 15 Using the HD Directional Tabletop Wireless Bounda...

Page 4: ...xposure Statement This equipment complies with FCC radiation exposure limits for an uncontrolled environment Professional Installation Recommended This product should be professionally installed Indus...

Page 5: ...be installed more than 20 cm 7 9 in from your body or nearby persons 03 HDVENUEU European Union Usage Restriction Due to the DECT frequencies used this product is licensed for operation only in the Eu...

Page 6: ...rrier Time Division Multiple Access and Time Division Duplex MC TDMA TDD radio transmissions both to and from the microphone This technology allows the microphones to co exist with other wireless prod...

Page 7: ...yption Automatic channel selection Full duplex audio The Charger Base charges the HD Wireless Microphones and stores them when not in use Installing the Revolabs HD Venue Base Station To Install the B...

Page 8: ...Connections 1 Channel LED indicators Displays microphone mute and pairing states 2 Pairing Push Buttons For pairing microphones to Base Station 3 Antennae 4 Female XLR and Balanced Combo Input Connec...

Page 9: ...ices to be incorporated into an application NOTE The USB port may exhibit static sensitivity If the Base Station audio shuts down after handling please power cycle the Base Station Note The HD Venue S...

Page 10: ...When DIP Switch 1 is switched on the audio outputs of the two HD microphones are mixed together and sent to both outputs DIP Switch 2 Low Pass Filter When DIP switch 2 is OFF default the microphone p...

Page 11: ...m Using the Revolabs HD Control Panel Software A software program with graphical user interface is available for accessing control settings and real time status of Revolabs HD Microphone Systems A det...

Page 12: ...en be locked as well The same goes for a locked microphone that is paired to an unlocked channel that microphone will then be unlocked Mute Each microphone has individual mute capabilities The HD Cont...

Page 13: ...es When a DIP switch is in the OFF position the DIP function will remain greyed out When a DIP switch is in the ON position the functionality of that DIP switch will change to BLACK to indicated that...

Page 14: ...2 inches 15 30cm from the mouth is recommended Make sure microphone is attached securely with the microphone LED indicator pointed up toward mouth 3 With the microphone in the wearing position un mute...

Page 15: ...Charging port docks to Revolabs HD Charger Bases 5 Rubber feet non slip vibration absorbing pads 6 Acoustic Cover protects delicate microphone element non removable To use the HD Omni Tabletop Microp...

Page 16: ...one closer to the Base Station and the connection will automatically be re established to its original state and the beeping will cease If not the microphone will continue beeping until it turns off i...

Page 17: ...ressing and releasing the Mute button confirm by a flashing GREEN LED 4 To turn microphone off return the microphone unit to the Charger Base or press and hold the Mute button for 10 seconds until the...

Page 18: ...turn the Adapter off return the microphone unit to the Charger Base or press and hold the Mute button for 10 seconds until the LED turns solid RED then release button Important Always remove the micro...

Page 19: ...onds until the LED turns solid RED then release button Important Always remove the microphone from the Adapter and separate the parts before returning the Adapter to the Charger Base If the Adapter is...

Page 20: ...and hold the Mute button for 10 seconds until the LED turns solid RED then release the button to turn the unit off do not release the button when you hear two beeps 2 Place the microphone unit into pa...

Page 21: ...rted properly in the Charger Base The microphones are not transmitting audio to the HD Base Station while in the Charger Base In normal use batteries should fully charge in about 2 hours but will quic...

Page 22: ...EN and RED Alternating slow GREEN and RED Microphone or channel not paired YELLOW flash alternating with GREEN flash GREEN Flashing Microphone low battery mic live YELLOW flash alternating with two RE...

Page 23: ...gence accident or Acts of God voids this warranty The Seller shall not be liable for any consequential damage resulting from the malfunction of this product Should the user experience unsatisfactory p...

Page 24: ...ts Maximum Output 15 7dBm 37 15mW Channel spacing 1 728 MHz Modulation GFSK Class ISM Connectors Base Station Audio and XLR Balanced 2 In 2 Out Firmware Port Mini USB Charger Base DC power input port...

Page 25: ...indicator 20 MC TDMA TDD 6 Microphone Charging port 14 Earpiece Jack 14 LED Display 14 Mute Button 14 Pocket Clip 14 Microphones 13 Pairing 19 Power Cord Receptacle 20 Power In Receptacle 8 Power Mod...

Page 26: ...26 Revolabs HD Venue Wireless Microphone System Manual 01 HDVNUMAN PAP 11 MARCH 2012 Rev 2 2 Note Microphones must be fully charged and paired to the Base Station prior to first use...

Reviews: