background image


Operating the machine


19 

.9  /0020 Ü berschrif ten/ 1. 1 Ü berschrif ten/ 1. 1 Ü bersc hrift en BD A/ 11 Ü bersic hts tabell e  der  Bedi enel ement e  und  der Anz eige  @ 0 \ mod_1228990697273_9. doc x  @  4978 @  2 @  1 


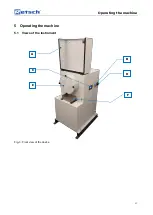
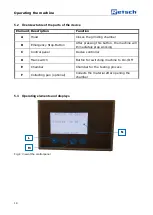
5.4  Overview Table of the Operating Elements and the Display  

Pos :  7. 10 /0005 RET SCH/ 0005 R ETSCH  Bedienungsanlei tungen  Kapit elsamml ung en/RS 300 XL/ 20 Bedienung R S  300  XL/2002 Modul  Übersichtst abelle der  Bedienelemente und  der  Anzeige @  8\ mod_1417785755940_9. doc x @  69088  @   @  1 


Element  Description


Function


Operating button  

control to operate the device settings 

Button to open the hood 

Unlocks the hood 

Display 

Displays the control functions and 
parameters 


os:  7. 11 / 0020 Ü bers chrift en/ 1. 1 Ü bersc hrift en/1.1 Übersc hrift en BD A/ 11 Öf fnen  des  G erätes  @  1\ mod_1241510397227_9. doc x @  8812 @  2  @  1 


5.5  Opening the device  

Pos :  7. 12 /0005 RET SCH/ 0005 R ETSCH  Bedienungsanlei tungen  Kapit elsamml ung en/RS 300 XL/ 20 Bedienung R S  300  XL/2005 Modul  Öf fnen des  G erät es  RS  300 XL  / PM 400 @  7\ mod_1390224848766_9. doc x @  54802  @   @  1 


The following steps are necessary in order to be able to use and clamp the grinding 
jar. 
• 

Connect the device to the mains. 

• 

Switch on the main switch at the right site of the device. 

• 

Press the button F3 (open lid). 

The safety lock opens and the lid can be lifted up 


Pos :  7. 13 /0020 Übersc hrift en/1.1 Ü bersc hriften/ 1. 1 Ü berschrif ten  BDA/11  Sc hließ en des  Ger ät es  @  7\ mod_1390224720831_9.doc x @  54791 @  2 @  1 


5.6  Closing the device  

Pos :  7. 14 /0005 RET SCH/ 0005 R ETSCH  Bedienungsanlei tungen  Kapit elsamml ung en/RS 300 XL/ 20 Bedienung R S  300  XL/2010 Modul  Sc hließ en  des  G erät es  RS 300 XL  / PM 400 @  7\ mod_1390224884117_9. doc x @  54814  @   @  1 


It is only possible to lock the grinding chamber if the device has been connected to 
the  power  supply  and  the  main  switch  at  the  right  site  of  the  device  has  been 
switched on. 
• 

Shut the housing lid. 

– 

A sensor detects the closing pin of the housing lid  

– 

Press the button F3 (close lid). 


5.7  Emergency unlocking  

Pos :  7. 16 /0025  War nhi nweis e/ V0009  VORSICHT N ot entriegel ung  @  1\ mod_1241612025489_9.doc x @  9471  @   @  1 


CAUTION


Emergency Unlocking 

Drive continuing to run 
– 

There is a substantial risk of injury if the drive and associated device parts 
run on a long time without being braked! 

• 

Activate the emergency unlocking only when the machine has come 
to a complete stop and is disconnected from the power supply.


Summary of Contents for AT 100 XL

Page 1: ...Retsch GmbH 42781 Haan Retsch Allee 1 5 Germany 07 12 2016 0005 Manual Abrasion Tester AT 100 XL Translation...

Page 2: ...2 COPYRIGHT Copyright by Retsch GmbH Haan Retsch Allee 1 5 D 42781 Haan Federal Republic of Germany...

Page 3: ...speed 15 4 5 Emissions 16 4 5 1 Noise levels AT 100 XL 16 4 6 Degree of protection 16 4 7 Protective equipment 16 4 8 Dimensions and weight 16 4 9 Required floor space 16 5 Operating the machine 17 5...

Page 4: ...4 6 3 Returning for service and maintenance 26 7 Disposal 27 8 Index 28 Appendix following page...

Page 5: ...device This operating manual does not contain any repair instructions If faults arise or repairs are necessary please contact your supplier or get in touch with Retsch GmbH directly Application techn...

Page 6: ...lt from failing to heed these safety warnings We give you the following warnings and corresponding content CAUTION Type of danger personal injury Source of danger Possible consequences if the dangers...

Page 7: ...ons regarding safety are familiar before starting work with all the operating instructions and specifications for the target group relevant for them have easy access always to the technical documentat...

Page 8: ...ir instructions For your own safety repairs may only be carried out by Retsch GmbH or an authorized representative or by Retsch service engineers In that case please inform The Retsch representative i...

Page 9: ...formation required for safe operation and is sufficiently familiar with the device As the owner managing operator you should for your own protection have your employees confirm that they have received...

Page 10: ...condensed water Pos 5 1 10 0025 War nhi nweise H 0016 H INWEIS Temperaturschwankungen 0 mod_1233564121287_9 docx 5570 1 NOTICE Temperature fluctuations The machine may be subject to strong temperatur...

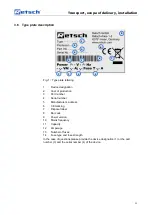
Page 11: ...enschild 3 mod_1280931092443_9 docx 22278 1 Fig 1 Type plate lettering 1 Device designation 2 Year of production 3 Part number 4 Serial number 5 Manufacturer s address 6 CE marking 7 Disposal label 8...

Page 12: ...o that on the type plate of the AT 100 XL The mains connection must be fused to at least 15A An electrical connection without protective earth PE is not permitted Pos 5 3 0020 berschriften 1 1 berschr...

Page 13: ...hrown during transport Pos 5 10 0020 berschriften 1 1 berschriften 1 1 berschriften BDA 11 Aufstellen des Ger tes Retsch 0 mod_1226498849756_9 docx 3464 2 1 3 9 Installation of the machine Pos 5 11 00...

Page 14: ...N Danger of personal injury Dangerous nature of the sample Depending on the dangerous nature of your sample take the necessary measures to rule out any danger to persons Observe the safety guidelines...

Page 15: ...34 2 1 4 3 Rated power Pos 6 15 0005 RETSCH 0005 R ETSCH Bedienungsanlei tungen Kapitelsamml ung en RS 300 XL 10 Technische Daten R S 300 XL 1025 Modul Nennleistung RS 300 XL 7 mod_1389863256398_9 doc...

Page 16: ...enungsanlei tungen Kapitelsamml ung en RS 300 XL 10 Technische Daten R S 300 XL 1040 Modul Schutzart R S 300 XL 7 mod_1389861008159_9 docx 54623 1 IP 55 Pos 6 24 0020 berschriften 1 1 berschriften 1 1...

Page 17: ...Ger tes R etsch 0 mod_1228990581782_9 docx 4966 2 1 5 1 Views of the Instrument Pos 7 3 0005 R ETSCH 0005 RETSCH Bedienungsanl eitung en Kapi telsammlungen R S 300 XL 20 Bedi enung R S 300 XL 2000 Mo...

Page 18: ...pressing this button the machine will immediately stop working C Control panel Device controller D Main switch Button for switching machine to On Off E Chamber Chamber for the testing process F Colle...

Page 19: ...d clamp the grinding jar Connect the device to the mains Switch on the main switch at the right site of the device Press the button F3 open lid The safety lock opens and the lid can be lifted up Pos 7...

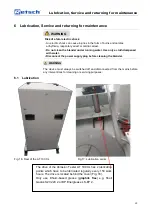
Page 20: ...5 Opening for emergency release A key is provided with device delivery This can be used to open the device manually in the case of a power failure Remove the cap AK Place the key in the device NR Fig...

Page 21: ...ei nsetzen 0 mod_1226569844414_9 docx 3555 2 1 5 8 Inserting the testing media 1 Open the lid by releasing the four screws s Fig 7 Lid 2 Remove insert the paddle p by loosening tightening the fixing s...

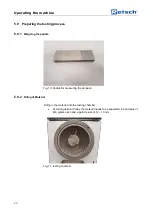
Page 22: ...tzen 7 mod_1390224890504_9 docx 54838 343 1 5 9 Preparing the testing process 5 9 1 Weighing the paddle Fig 10 Paddle for measuring the abrasion 5 9 2 Filling of Material Filling in the material into...

Page 23: ...can be started by pressing F1 The grinding process takes 15 minutes according to Bond Index and is therefore fixed Pos 7 21 0025 War nhi nweise V0024 VORSICHT Ver br hungen Ver brennungen H ei er M a...

Page 24: ...Pos 8 1 0020 berschriften 1 1 berschriften 1 1 berschriften BD A 11 Displ ayei nheit Bedienung des Ger tes 1 mod_1236677049299_9 docx 7890 2 1 5 11 Display unit operation of the device Pos 8 2 0020 be...

Page 25: ...t the power supply plug before cleaning the blender Pos 10 3 0025 War nhi nweise W0012 WARNUNG EMBEDD ED R einigung Netzt trennen PB100 3 mod_1282722752283_9 docx 22576 1 WARNING W0012 The device must...

Page 26: ...vice is open An electric shock can lead to burns and arrhythmia or to respiratory failure and heart failure After removing the mains lead wait 3 minutes before opening the device Pos 10 11 0005 R ETSC...

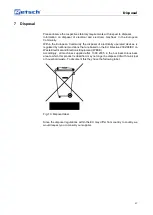
Page 27: ...devices is regulated by national provisions that are based on the EU Directive 2002 96 EC on Waste Electrical and Electronic Equipment WEEE Accordingly all machines supplied after 13 08 2005 in the bu...

Page 28: ...19 Fuse strength 11 Fuse type 11 G General safety instructions 7 H Height 16 open hood 16 I Installation height 10 Installation of the machine 10 13 L Lid 16 Lid closing automatic 16 LpAeq 16 LWA 16 M...

Page 29: ...Temperature fluctuation and condensed water 10 Transport 10 12 13 Transport screws mounting 13 Transport scope of delivery installation 9 Type plate 12 type plate description 11 Type plate lettering...

Page 30: ...In case of a modification to the machine not previously agreed with us as well as the use of not licensed spare parts and accessories this certificate will lose its validity Retsch GmbH Haan December...

Page 31: ......
Page 32: ...Copyright Copyright by Retsch GmbH Haan Retsch Allee 1 5 D 42781 Haan Federal Republic of Germany...

Reviews: