STEP 7:
REFLECTORS
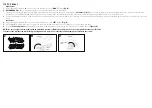
All reflectors - front, rear, and wheels - should already be installed from the factory.
Front Reflector (white): You may need to position the reflector forward and then tighten the bracket
(Fig.17).
STEP 6:
BRAKES
Coaster Brake - Rear
Koda 12 & Koda 16 are equipped with a foot operated rear coaster brake. No adjustment is required. Simply
push/pedal backwards on the pedals to activate the brake.
Sidepull Brake - Front
Koda 12 & Koda 16 are equipped with a front, hand-operated side-pull brake. This brake is installed and
adjusted from the factory. If adjustment is necessary please follow steps below:
FRONT BRAKE ADJUSTMENT
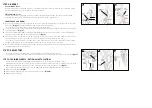
Be sure that the brake pads are aligned with the curve of the rim and that they contact the rim surface flat
and evenly
(Fig. 15)
. The brake pad angle and height can be adjusted by
loosening the hex nut that attaches the brake pad to the brake arm.
Loosen the brake cable anchor at the brake arm held by an hex bolt allowing the brake cable to freely glide
through its anchor
(Fig. 16)
.
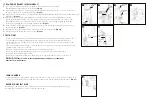
Squeeze the brake arms/pads together until the brake pads contact the rim surface. Pull the cable taught
through its anchor and tighten the cable anchor bolt
(Fig. 16)
.
Squeeze the brake lever firmly several times to take the stretch out of the cable and make sure that it does
not slip through its anchor. If the cable tension is too tight to allow the wheel to spin freely,
loosen the anchor bolt and give the cable some slack. If the cable has too much slack and you cannot apply
enough stopping force to the rim, repeat procedure #3 to take the slack out of the cable.
Be sure that the brake arms are evenly spaced from the wheel and there is some clearance between
the brake pads and the rim surface.
1.
2.
3.
4.
5.
STEP 8: TRAINING WHEELS (OPTIONAL INSTALLATION)
Your Koda 12 & Koda 16 are packaged with training wheels. The wheels are installed on the
mounting brackets from the factory. Install one side at a time. Use Multi-Wrench or 15mm open/box wrench.
Remove the outer 15mm axle nut, one each, left & right. Remove the outer nuts only
(Fig.18)
.
The second axle nuts secure the wheel to the frame and are installed & adjusted from the factory.
Install Locator Bracket
(Fig.19)
.
Install Training Wheel Assembly, reinstall axle nut to secure
(Fig.20)
.
Repeat for the other side.
1-
2-
3-
4-
15
16
17
19
20
Brake
Pad
Align
w/ Rim
brake arm
hex nut
cable anchor
bolt
stem center bolt
(adj. handlebar
direction)
front
reflector
locator
bracket
locator
bracket
outer
axle nut
training
wheel
assembly
second axle
nut (do not
remove)
forward
brake cable
pull taught
18


