2-2
REM
staR
M s
ERiEs
U
sER
M
anUal
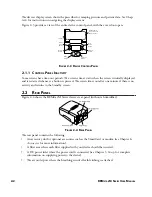
The device’s display screen shows the prescribed or ramping pressure and patient data. See Chap
-
ter 4 for instructions on navigating the display screens.
Figure 2–3 provides a view of the entire device control panel, with the cover door open.
Cover Door
Previous
Screen
Button
Next
Screen
Button
Decrease
Button
Increase
Button
Ramp
Button
Start/Stop
Button
Placement Area
for optional Quick
Reference Label
f
igURE
2–3 d
EviCE
C
ontRol
p
anEl
2.1.1 C
ontRol
p
anEl
i
naCtivity
Some screens have time-out periods. The screen’s timer starts when the screen is initially displayed
and is restarted whenever a button is pressed. The screen times out after one minute if there is no
activity and returns to the Standby screen.
2.2 R
EaR
p
anEl
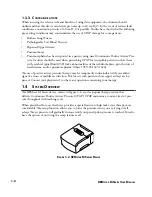
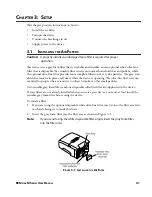
Figure 2–4 shows the REMstar M Series device’s rear panel (without a humidifier).
f
igURE
2–4 R
EaR
p
anEl
The rear panel contains the following:
• An accessory slot for optional accessories such as the SmartCard or modem (see Chapter 6,
Accessories
, for more information).
• A filter area where each filter supplied with your device should be inserted.
• A DC power inlet where the power cord is connected (see Chapter 3,
Setup
, for complete
information on supplying power to the device).
• The air outlet port where the breathing circuit’s flexible tubing is attached.


