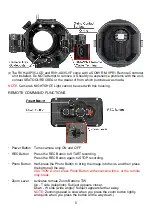
HOUSING MANUAL CONTROL FUNCTIONS
・
Manual Button
・
Manual Dial
Zoom
Focus
Exposure
IRIS
Shutter Speed
AE Shift
White Balance Shift
RESET
NOTE:
Desired camera manual functions must be assigned to prior to use with housing.
※
The housing Manual Dial is designed to turn the camera dial back and forth via friction
from the O-ring that come in contact with camera inside the housing. When installing or
removing camera pull Manual Dial out away from housing. After installing be sure to place
the Manual Dial into the proper position. Should the O-ring of the internal control wheel
of the housing begin to slip, use a soft dry cloth to wipe away any oil and other
contaminates that may cause the loss of friction from both the camera function and O-ring.
HANDLING PRECAUTIONS
※
When opening back cover after use in water, due to negative pressure there is the
possibility of water on the housing being sucked into the interior. Prior to opening back
cover it is strongly recommended to wipe all water off the housing using a soft, dry cloth.
In the unlikely event water sucked inside, please remove with a clean, dry cloth
※
When opening housing or conducting maintenance please do so in a clean place with low
humidity and dust.
※
To help prevent condensation within the housing, it is recommended to conduct installation
of camera and O-ring maintenance in an air conditioned room. Silica gel pack(s) may also
be use placing them in a way as not to interfere with camera our housing functions.
※
Please be careful not to damage when moving during packing and transport.
※
Remove O-ring or leave housing slightly open by placing a strip of paper between the
housing main body and back cover when transporting by plane. Pressurization of a sealed
housing during transport may cause damage or make it difficult to open.
INSTALLING CAMERA IN HOUSING
※
Please conduct the following operations in a clean place with low humidity and dust.
1.
Remove camera lens cap, check camera settings, battery is charged and media
storage capacity is sufficient.
2.
Using the camera's tripod mount screw socket, firmly attach Camera Tray to camera
as shown below making sure there are no gaps between the camera and the
Camera Tray.
6
Summary of Contents for RVH-AXP35-LCD
Page 4: ...RVH AXP35 LCD RVH AXP35 LCD RVH AXP35 LCD RVH AXP35 VF 3...
Page 17: ...MEMO...
Page 18: ...MEMO...
Page 19: ...MEMO...


