


Inserting and charging the battery
Before using the device, ensure the lithium-ion rechargeable battery is inserted and charged.
Open the battery compartment (15) and correctly insert the included lithium-ion rechargeable
battery into it. Note the polarity information inside the battery compartment and close it carefully.
-
+
Open the protective rubber cover on the side of the device and connect the included USB-C
TM
cable to the USB-C
TM
socket. Connect the USB-A plug to a computer or a USB charger.
Wait a few hours for the device to charge. When the device is on, the battery status is shown
in the top right corner of the display. All three battery status bars indicate that the battery is fully
charged. The device is ready for use.
Inserting the microSD memory card
A microSD memory card (not included) is inserted into the device and enables the storage of
image data. Class 10 memory cards with a capacity of up to 32 GB can be used.
Open the protective rubber cover on the side of the device and push the memory card into the
card slot until it locks in place. To remove the card, push it in slightly until ejected.
Use the power button
(3) to turn on the device. The warning message “Please format
card” occasionally appears during the initial startup. Use the setting menu of the device to
format the card.
With the device turned on, briefly press the power button
(3). The setting menu is
displayed. Press the arrow button
(1) four times to scroll up in the menu.
Press the OK button (4) to confirm the selection. Follow the on-screen instructions and press
the OK button to confirm your selection. Formatting will delete all data.
Operation
a) Turning on and off:
To turn the device on and off, press and hold the power button
(3) for approx. 3 seconds.
b) Setting modes:
There are three modes to choose from. Video mode, Photo mode, Playback mode. Press and
hold the MODE button
(6) for approx. 3 seconds to switch to the next mode.
c) Video and Photo mode:
To sharpen the picture, adjust the focus manually using the camera lens (10) based on the
distance. The advantage is that you will get the best focus even in poor lighting conditions or
in IR night vision mode.
d) Infrared (IR) night vision mode:
The IR night vision mode can be activated in poor lighting conditions or absolute darkness. The
display image is black and white for better contrast.
Briefly pressing the infrared button
(6) activates the infrared (IR) mode. Each brief press
of this button increases the IR emitter intensity up to Level 7 (display IR:1 – IR:7). After Level 7,
the colour image is displayed again.
e) Zoom function:
The Video and Photo mode enables digital zooming of the display in 8 levels. Press and hold
the UP arrow button
(1) to zoom in and the DOWN arrow button
(5) to zoom out. The
current zoom factor is displayed as “1X to 8X”.
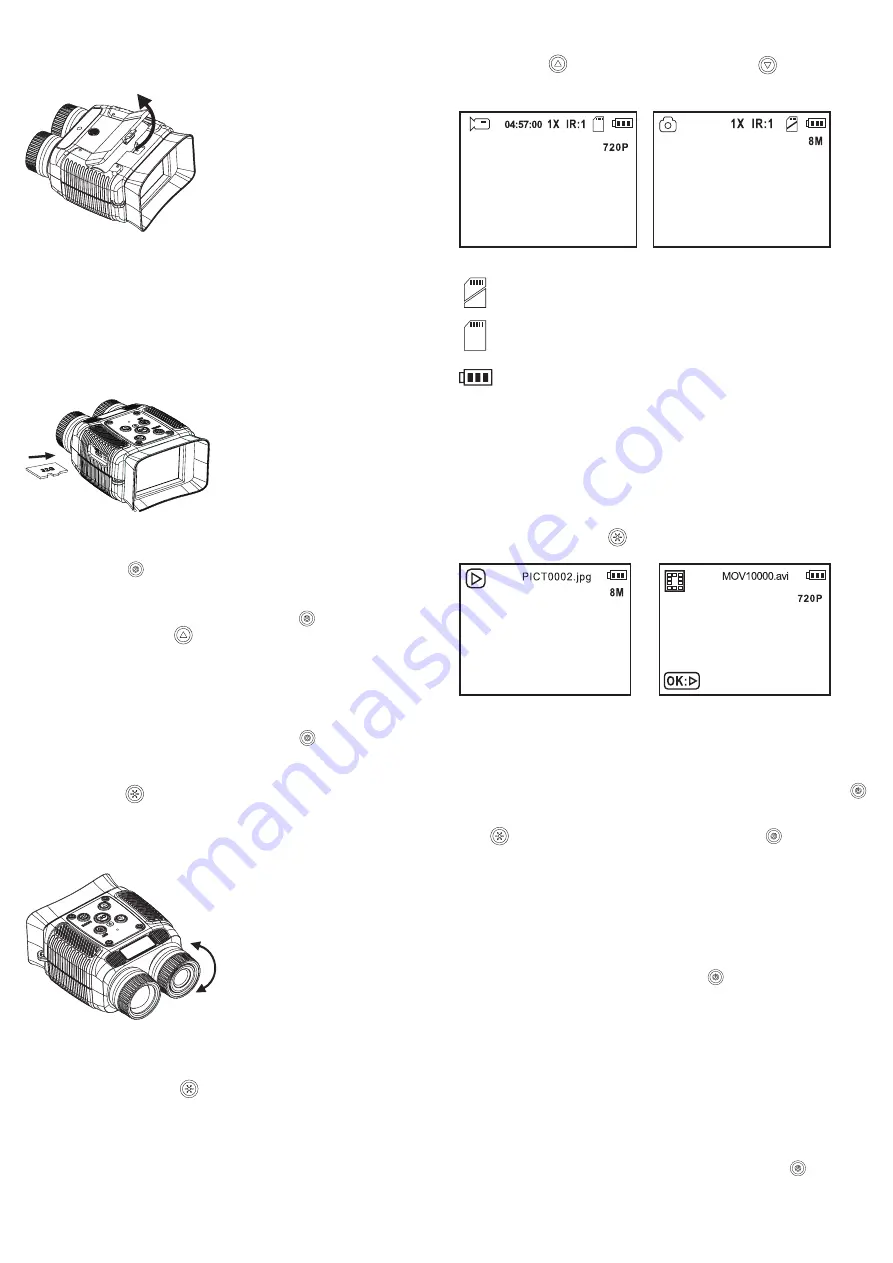
Video and Photo mode: display overview (example data for an overview)
2022/04/18 14:38:12
2022/04/18 14:38:12
1X: Zoom factor
IR:1: IR intensity
: No memory card inserted
: Memory card inserted
: Battery status indicator
8M: Photo resolution in pixels
720P: Video resolution in lines
04:57:00: Remaining, available recording time
f) Recording:
Pressing the OK button in Video mode starts or stops recording. Pressing this button in Photo
mode saves a photo.
g) Playback mode
Press and hold the MODE button
(6) for approx. 3 seconds to enter the Playback mode.
Repeat this action until the following displays appear:
2022/04/18 14:38:12
2022/04/18 14:38:12
22/04/18
14:38:12
22/04/18
14:38:12
Photo Video
Use both arrow buttons to call up the stored images and videos.
Use the OK button to play or stop the selected video file.
h) Delete files:
Use the arrow buttons to select the file you wish to delete. Briefly press the power button
(3). The delete menu will appear. Use the arrow buttons to select the delete function. This
function is highlighted with a bar. To cancel the delete function, press and hold the MODE
button
for approx. 3 seconds or briefly press the power button
(3). If you want to
confirm the deletion process, press the OK button. Another menu will appear. Use the arrow
buttons to select whether you wish to delete the current file or all files. Press the OK button to
confirm the selection. Another confirmation prompt will appear. Use the arrow buttons to select
the desired option and press the OK button to confirm the selection.
Setup menu
A setup menu enables you to adjust basic settings. This menu allows you to set the system
language, time format, and many other operating parameters.
With the device turned on, briefly press the power button
(3) to enter the setup menu. The
device has the following settings:
Video resolution
Loop recording (Loop)
Photo resolution
Exposure
Timestamp
Automatic power-off
Screen saver
Menu language
Date and time format
Memory card formatting
Factory settings
Version info
Use the arrow buttons to select the respective function. Press the OK button to confirm your
selection.
Use the arrow buttons to select the respective parameters. Press the OK button to confirm your
selection. You will return to the main menu. Briefly pressing the power button
in each menu
item switches back to the main setup menu.