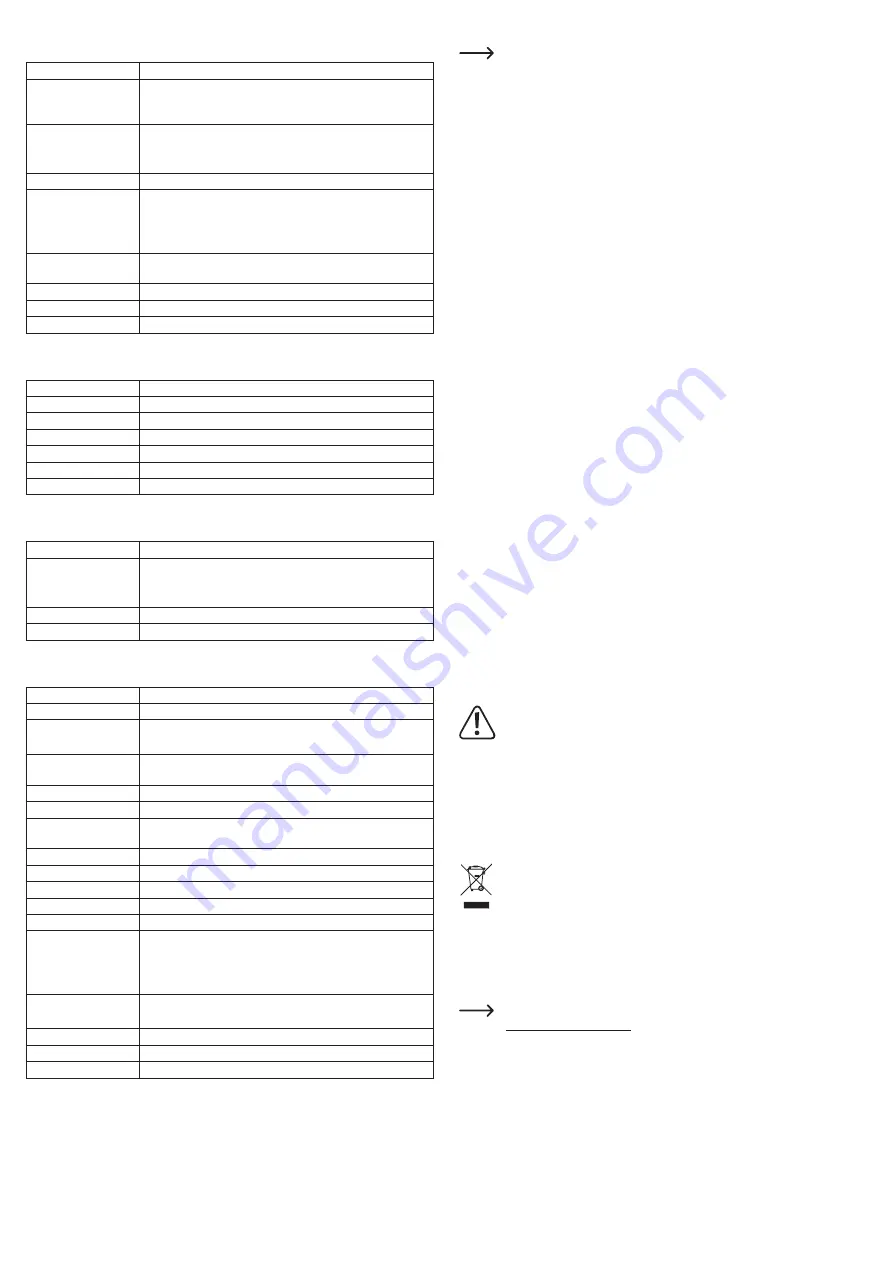
background image

Video menu

In the video menu, you can implement the following settings:

Resolution

Configures the video resolution and frame rate settings

Loop recording

Sets the length of recording sequences. The device records in re-

cording sequences. The oldest recording sequence is overwritten 

if the memory card is full.

WDR

Wide Dynamic Range 
Improves image quality when there are strong contrasts and 

challenging lighting conditions.

Exposure

Sets the exposure compensation

G sensor

Sets the sensitivity of the acceleration sensor.
When the acceleration sensor is activated, the current video 

sequence is saved and write-protected in the event of strong 

acceleration, shocks or vibrations (as might occur in an accident).

Motion detection

Automatic video recording for 15 seconds if movement is detec-

ted in front of the camera

Record audio

Switches audio recording on/off

Date Stamp

Switches embedding of the date and time in the video on/off

Return

Close menu

Photo menu

In the photo menu, you can implement the following settings:

Capture mode

Sets the recording mode 

Resolution

Sets the photo resolution

Quality

Sets the recording quality

ISO

ISO sensitivity settings

Anti-Shaking

Switches the image stabiliser on/off

Date Stamp

Switches embedding of the date and time in the photo on/off

Return

Close menu

Playback menu

In the playback menu, you can implement the following settings:

Delete

Delete function

Protect

Enables/disables write protection
Files cannot be deleted or overwritten when write-protection is 

enabled (if you wish to delete a file, disable write protection).

Slide Show

Sets the image display duration for slide shows

Return

Close menu

System menu

In the system menu, you can implement the following settings:

WiFi

Switches WiFi on/off

Date/Time

Sets the date and time

Screen Saver

The displays switches off when the camera is not being used.
Press any button to wake the display.

Delayed Power Off

Configures the automatic power-off settings for when the camera 

is disconnected from the power supply.

Beep Sound

Switches button sounds on/off

Language

Sets the menu language

Frequency

Set the mains frequency to avoid flickering in video recordings 

(Europe: 50 Hz/North America: 60 Hz)

Auto Power Off

Switch-off delay after disconnecting the power supply

GPS

Switches GPS tracking on/off

Time Zone

Sets the time zone

Speed unit

Selects the unit for speed display

Daylight Saving

Switch automatic time adjustment on/off

Parking monitor

Switches automatic park monitoring on/off
If park monitoring is activated, a 15-second video recording is 

automatically started if there is strong acceleration, shocks or 

vibrations when the vehicle is switched off.

Format

Formats the memory card
Warning – all data on the memory card will be deleted!

Default settings

Reset to factory settings

Version

Display firmware version

Return

Close menu

Connecting to a computer or mobile device

  When the camera is connected to a computer or mobile device, it switches on 

automatically and the battery starts to charge.

a) 

Transferring files

•  Connect a suitable USB cable to the Mini USB port 

(2)

.

•  Connect the other end of the USB cable to a USB port on your computer or mobile device.
• 

Use the file manager on your computer or mobile device to access the memory card and 

view, delete and save files.

•  Alternatively, you can remove the memory card from the camera and insert it into a card 

reader on your computer or mobile device.

b) Playing videos with GPS data

You need suitable software or an app to play and view videos with GPS data. There are 

numerous suitable products available on the market. For example, you can download the 

‘GPSPlayer’ software free of charge from http://www.gpsplayer.net/setupzj.html.
•  Download appropriate software from the internet or the app store of your mobile device.
•  Install the software on your computer or mobile device and follow the on-screen installation 

instructions.

• 

Connect the camera to your computer or mobile device (see „Transferring files“) or insert 

the memory card into a card reader.

•  Start the software/app.
• 

Open the desired file to play the video and display the GPS data on the map.

•  If you have any software or app-related questions, refer to the documentation provided by 

the developer.

c) Setting up WiFi access

You need suitable software or an app for WiFi access to the dashcam. There are numerous 

suitable products available on the market. As an example, the ‘Roadcam’ app can be 

downloaded free of charge from the Google Play Store or Apple App Store. 
•  Download appropriate software from the internet or the app store of your mobile device. 
•  Install the software on your computer or mobile device and follow the on-screen installation 

instructions.

•  Open the system menu and then the ‘WiFi’ menu item to view the network ID (SSID) of the 

dashcam and the associated password.

•  Connect your computer or mobile device to the network.
•  Open the software/app for WiFi access to the dashcam. Depending on the functionality 

of the software, you can now control the dashcam from your computer or mobile device, 

transfer files or implement settings.

•  If you have any software or app-related questions, refer to the documentation provided by 

the developer.

Care and cleaning

  Do not use any aggressive cleaning agents, rubbing alcohol or other chemical 

solutions, as these may damage the housing or impair the functioning of the device.

•  Disconnect the product from the mains before cleaning. Do not immerse the product in 

water.

•  Use a dry, lint-free cloth to clean the product.
•  To prevent scratch marks, do not press too hard on the surface of the enclosure, display or 

lens when cleaning.

Disposal

  Electronic devices are recyclable waste and must not be placed in household waste. 

At the end of its service life, dispose of the product according to the relevant statutory 

regulations. You thus fulfil your statutory obligations and contribute to environmental 

protection. The in-built rechargeable battery cannot can be removed and must be 

disposed of together with the product.

EU Declaration of Conformity

Conrad Electronic SE, Klaus-Conrad-Straße 1, D-92240 Hirschau, hereby declares that this 

product conforms to Directive 2014/53/EU. 

  Click on the following link to read the full text of the EU declaration of conformity: 

www.conrad.com/downloads


Enter the product’s item number in the search field; you can then download the EU 

Declaration of Conformity in the available languages. 

Summary of Contents for 2295592

Page 1: ...kt nicht umbauen und oder verändern Falls Sie das Produkt für andere Zwecke verwenden als zuvor beschrieben kann das Produkt beschädigt werden Außerdem kann eine unsachgemäße Verwendung Gefahren wie zum Beispiel Brand Überhitzung etc hervorrufen Lesen Sie sich die Bedienungsanleitung genau durch und bewahren Sie diese auf Reichen Sie das Produkt nur zusammen mit der Bedienungsanleitung an dritte P...

Page 2: ...ecken sie erneut ein Formatieren Sie die Speicherkarte vor der ersten Verwendung am Computer Stellen Sie dabei eine Clustergröße bzw Größe der Zuordnungseinheit von 32 kB ein Stecken Sie die Speicherkarte in den microSD Kartensteckplatz 4 Die Kontakte der Speicherkarte müssen hierbei in Richtung des Displays 3 zeigen Formatieren Sie die Speicherkarte im Gerät Siehe dazu den Abschnitt Systemmenü Um...

Page 3: ...ss Ihres Computers oder Mobilgerätes Über den Dateimanager Ihres Computers oder Mobilgerätes haben Sie nun Zugriff auf die eingesteckte Speicherkarte und können dort Dateien ansehen löschen speichern usw Alternativ können Sie die Speicherkarte aus der Kamera entnehmen und mit einem Kartenleser direkt am Computer bzw Mobilgerät auslesen b Videos mit GPS Daten wiedergeben Zur Wiedergabe und Anzeige ...

Page 4: ...gangsspannung 12 24 V DC über Bordsteckdose 5 V DC über Mini USB Akkukapazität 300 mAh Akkubetriebsdauer ca 10 12 min Videoaufnahme Akkuladedauer ca 1 h Objektiv 140 Weitwinkel Displaygröße 50 8 mm 2 Speichermedien microSD microSDHC Klasse 10 max 128 GB Videoauflösung max 3840 x 2160 bei 30 fps max 1920 x 1080 bei 60 fps Fotoauflösung max 12 Megapixel Funkfrequenzen W LAN 2412 2484 MHz Sendeleistu...

Page 5: ...d parties together with its operating instructions This product complies with statutory national and European regulations All company and product names contained herein are trademarks of their respective owners All rights reserved Delivery content Dashcam AHD rear view camera with red cable connection Secures via suction cup Car charger Operating instructions Up to date operating instructions Down...

Page 6: ...e supports MicroSD memory cards up to 128 GB with speed class 10 or above If the device does not recognise your memory card remove the memory card and insert it again Format the memory card on a computer before using it for the first time Set a cluster size or size of the allocation unit of 32 kB Insert the memory card into the Micro SD card slot 4 The memory card contacts must point towards the d...

Page 7: ...t the other end of the USB cable to a USB port on your computer or mobile device Use the file manager on your computer or mobile device to access the memory card and view delete and save files Alternatively you can remove the memory card from the camera and insert it into a card reader on your computer or mobile device b Playing videos with GPS data You need suitable software or an app to play and...

Page 8: ...C via on board socket 5 V DC via Mini USB Battery capacity 300 mAh Battery life Approx 10 12 minutes video recording Battery charge time Approx 1 h Lens 140 wide angle Display size 50 8 mm 2 Storage media Micro SD Micro SDHC class 10 max 128 GB Video resolution max 3840 x 2160 at 30 fps max 1920 x 1080 at 60 fps Photo resolution Max 12 megapixels WiFi frequencies 2412 2484 MHz Transmission power 1...

Page 9: ...oduit en service Pour des raisons de sécurité et d homologation toute transformation et ou modification du produit est interdite Si le produit est utilisé à d autres fins que celles décrites précédemment il risque d être endommagé Par ailleurs une utilisation incorrecte peut être source de dangers tels qu un incendie une surchauffe etc Lisez attentivement le mode d emploi et conservez le Ne donnez...

Page 10: ...e taille de cluster ou la taille de l unité d attribution de 32 Ko Insérez la carte mémoire dans l emplacement pour carte microSD 4 Les contacts de la carte mémoire doivent être orientés vers l écran 3 Formatez la carte mémoire dans l appareil Pour cela voir la section Menu système Pour retirer la carte mémoire enfoncez la puis relâchez la Elle ressort alors un peu de la fente de carte microSD 4 a...

Page 11: ...ndes est automatiquement lancé en cas d accélérations de chocs ou de vibrations importantes Format Formater la carte mémoire Attention toutes les données enregistrées sur la carte mémoire seront effacées Default Setting Régla ges de base Remettre tous les réglages sur le réglage d usine Version Affichage de la version du Firmware Return Arrière Fermer le menu Connexion à un ordinateur ou un appare...

Page 12: ...lare par la présente que ce produit est conforme à la directive 2014 53 UE Le texte intégral de la déclaration de conformité UE est disponible au lien suivant www conrad com downloads Saisissez le numéro de commande du produit dans le champ de recherche et vous pourrez ensuite télécharger la déclaration de conformité de l UE dans les langues disponibles Données techniques Tension d entrée 12 24 V ...

Page 13: ...taan Als u het product voor andere doeleinden gebruikt dan hiervoor beschreven kan het beschadigd raken Bovendien kan bij verkeerd gebruik een gevaarlijke situatie ontstaan met als gevolg bijvoorbeeld brand oververhitting etc Lees de gebruiksaanwijzing zorgvuldig door en bewaar deze goed Geef het product alleen samen met de gebruiksaanwijzing door aan derden Het product voldoet aan de nationale en...

Page 14: ... Formatteer de geheugenkaart voor het eerste gebruik met behulp van een computer Stel een clustergrootte of grootte van de allocatie eenheid in van 32 kB Steek de geheugenkaart in het microSD kaartsleuf 4 De contacten van de geheugenkaart dienen in de richting van het display 3 te wijzen Formatteer de geheugenkaart in het apparaat Zie hiervoor paragraaf Systeemmenu Om de geheugenkaart te verwijder...

Page 15: ...ame van 15 seconden in uitgeschakelde toestand gestart Format formaat Geheugenkaart formatteren Let op alle gegevens op de geheugenkaart worden gewist Default Setting stan daard instelling Zet alle instellingen terug naar de fabrieksinstellingen Version versie Weergave van de firmware versie Return terug Menu sluiten Aansluiten op een computer of mobiel apparaat Als de camera op een computer of mo...

Page 16: ...klaart Conrad Electronic SE Klaus Conrad Straße 1 D 92240 Hirschau dat het product voldoet aan richtlijn 2014 53 EU De volledige tekst van de EG conformiteitsverklaring is als download via het volgende internetadres beschikbaar www conrad com downloads Typ het bestelnummer van het product in het zoekveld Vervolgens kunt u de EU conformiteitsverklaring downloaden in de beschikbare talen Technische ...

Reviews: