51
9. Operation
a) First start of the projection radio alarm clock
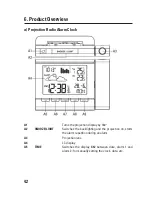
• The projection radio alarm clock first starts recognition of the available outdoor sen-
sors; the cars for the sensor signal display move at the top of the display (
C9
). This
reception attempt will take a few minutes.
To scan for the sensor anew later or to add a sensor, you can restart the sen-
sor scan by pushing the button “
SENSOR
” (
B4
). If you want to add a second or
third sensor, you need to set a different channel for each sensor.
Before starting the scan, push the button “
RESET
” (
E3
) at the sensor that was
already connected to the projection radio alarm clock.
• Subsequently, the projection alarm clock starts the reception attempt for the DCF
signal, as reflected by a flashing radio tower symbol (
C15
) to the right of the minute
display.
• Recognition of the DCF signal and its assessment will take between 6 and 16 minutes.
While the recognition is running, the backlighting will switch to green. Do not move
the projection radio alarm clock during this time. Do not push any buttons.
• When the projection alarm clock has evaluated the DCF signal properly, the current
time and date appear in the display and the radio tower symbol stops flashing. During
summer time, “
DST
” (
C14
) will appear above the radio tower symbol.
• The DCF signal is a signal that is sent by a transmitter in Mainflingen (near Frankfurt
on the Main). Its range is up to 1500 km, and under perfect reception conditions even
up to 2000 km. The DCF signal contains, among others, the precise time (deviation
theoretically 1 second in one million years!) and the date. Of course, the tedious
switching between summer and winter time manually can also be dispensed with.
• Synchronisation of the projection alarm clock with the DCF signal takes place every
day at 02:00, 08:00, 14:00 and 20:00 hours. A single successful reception per day will
keep the deviation of the display below one second.
Summary of Contents for 1423363
Page 130: ...130 ...
Page 131: ...131 ...

