Operating instructions
4-port USB 2.0 industrial hub with aluminium
housing
Item no. 1305500
7-port USB 2.0 industrial hub with aluminium
housing
Item no. 1305501
Intended use
This product is designed to connect four (item no. 1305500) or seven (item no.
1305501) additional USB devices. It is designed to be connected to a computer with a
USB interface. The product can be mounted on flat surfaces (e.g. walls, underneath
desks, with or without DIN mounting rails). Power is provided by the USB interface on
the computer, or by an external power adapter if the total current consumption of all
the connected USB devices exceeds 500 mA.
For safety and approval purposes (CE), you must not rebuild and/or modify this product.
If you use the product for purposes other than those described above, the product may
be damaged. In addition, improper use can cause hazards such as short circuiting,
fire, electric shock etc. Read the instructions carefully and keep them. Make this
product available to third parties only together with its operating instructions.
This product complies with the statutory national and European requirements. All
company names and product names are trademarks of their respective owners. All
rights reserved.
Delivery content
•
USB hub
•
USB 2.0 cable
•
Mounting kit (4 x screws, 2 x holder)
• Operating instructions
Safety instructions
Read the operating instructions carefully and especially observe the safety
information. If you do not follow the safety instructions and information on
proper handling in this manual, we assume no liability for any resulting
personal injury or damage to property. Such cases will invalidate the
warranty/guarantee.
•
The device is not a toy. Keep it out of the reach of children and pets.
•
Do not leave packaging material lying around carelessly. This may
become dangerous playing material for children.
•
Protect the product from extreme temperatures, direct sunlight, strong
jolts, high humidity, moisture, flammable gases, vapours and solvents.
•
Do not place the product under any mechanical stress.
•
This product is only designed for use in dry and enclosed indoor
environments.
•
If it is no longer possible to operate the product safely, take it out of
operation and protect it from any accidental use. Safe operation can no
longer be guaranteed if the product:
-
is visibly damaged,
-
is no longer working properly,
-
has been stored for extended periods in poor ambient conditions or
-
has been subjected to any serious transport-related stresses.
•
Please handle the product carefully. Jolts, impacts or a fall even from a
low height can damage the product.
•
Also observe the safety and operating instructions of any other devices
which are connected to the product.
•
Warning!
This is category A equipment. This equipment can cause
radio interference in the living area; the operator can be asked to take
appropriate measures in this case.
•
Consult an expert when in doubt about operation, safety or connection of
the device.
•
Maintenance, modifications and repairs are to be performed exclusively
by an expert or at a qualified shop.
•
If you have questions which remain unanswered by these operating
instructions, contact our technical support service or other technical
personnel.
Mounting
a)
Direct mounting on surfaces
•
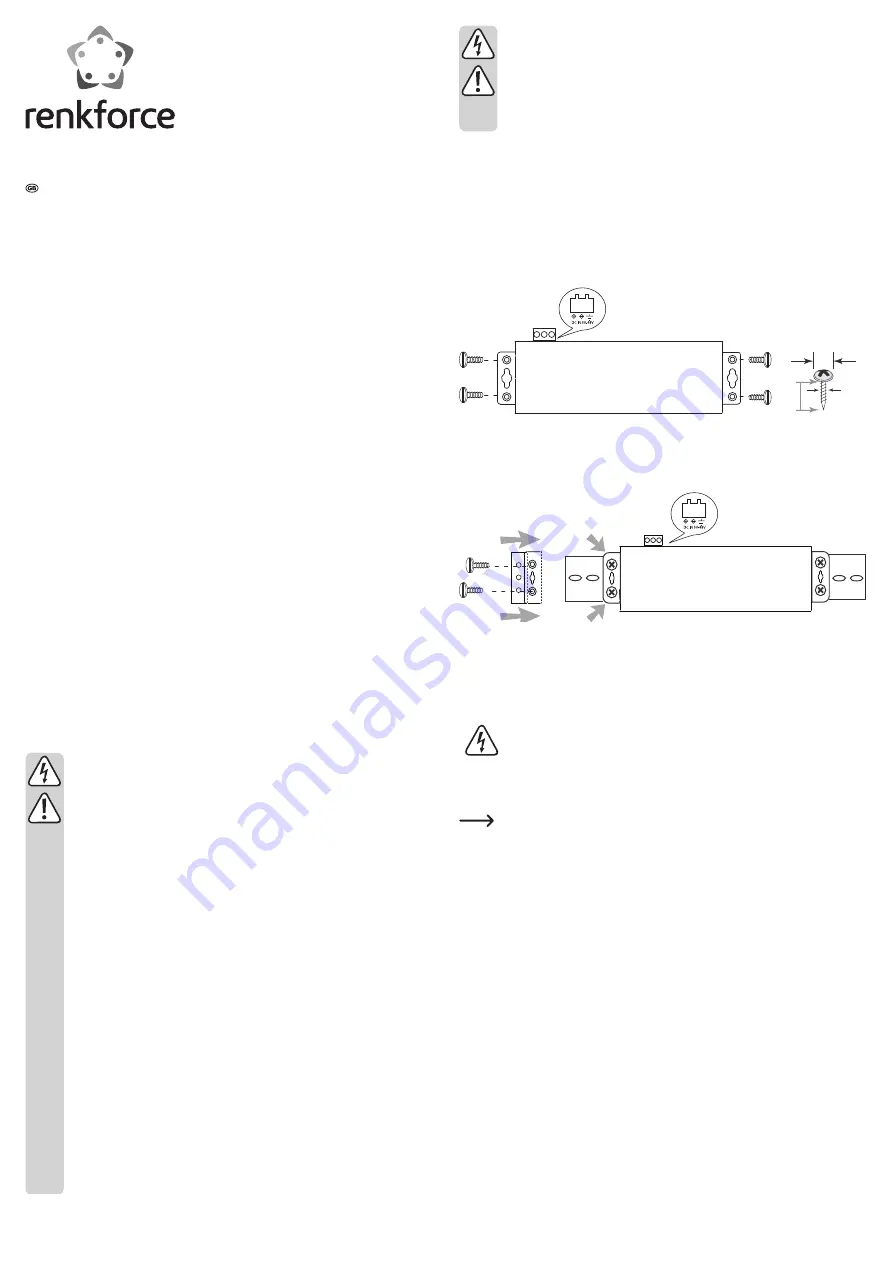
Place the hub on a flat, level surface or mount the hub on a suitably firm surface
with four appropriate screws and/or dowels (not included). The hub can be
mounted in any appropriate orientation (horizontal/vertical/overhead).
•
The screws can be used to mount the product on a normal surface (apart from
stone, bricks and iron). A special mounting kit is required if you wish to mount the
product on a special surface.
8 mm
7 mm
3 mm
b) Mounting with NS 35/15 & NS 35/7.5 rails
•
Use the mounting kit included if you wish to mount the product to a DIN mounting
rail (not included). Screw the plastic holders with the screws onto the hub. Then
click these into place on the pre-mounted rail.
c)
Electrical connection
•
If you are using an external power supply, connect the screw terminal of the hub
to a DC power supply with a permissible operating voltage, paying attention to the
polarity. The specified voltage and polarity are marked on the hub's power input;
compare the technical data.
Do not use an AC source to power the hub. This may destroy the product.
•
The USB 2.0 hub works with an external voltage of 5 - 48 V/DC. Depending on the
version of the USB hub (4 or 7 ports) and the connected devices, the power supply
must provide a sufficient current.
According to USB standards, USB 2.0 requires up to 500 mA per port. This
means that for the 4-port version (item no. 1305500), a total input current of
2 A should be available, whereas 3.5 A should be available for the 7-port
version (item no. 1305501). A smaller power supply may be chosen if not
all of the USB 2.0 ports are connected to a device with maximum current
consumption.
•
Connect the wires on the power supply output to the screw terminal, paying
attention to the polarity and earth wire.
•
Then insert the screw terminal into the
DC IN 5V-48V
hub input. The screw terminal
only fits into the input in the correct orientation.
Operation
•
Turn on the external voltage/power supply if necessary. The red LED on the USB hub
turns on. When an external power supply is not used, the red LED turns on when
the USB cable is connected to a computer. In both instances, the LED indicator
indicates that the hub is ready for use.
•
Connect the USB A plug to an available USB socket on your computer and then
insert the USB plug on the USB cable into the USB input port on the hub. You do not
need to turn the computer off. The operating system recognises new hardware and
automatically installs the necessary drivers; they are part of the operating system.


