background image


Note 2: No screws are provided for mounting to a wall. 
Note 3: Before mounting to a wall, be sure to fully read the precautions. 

 
1.


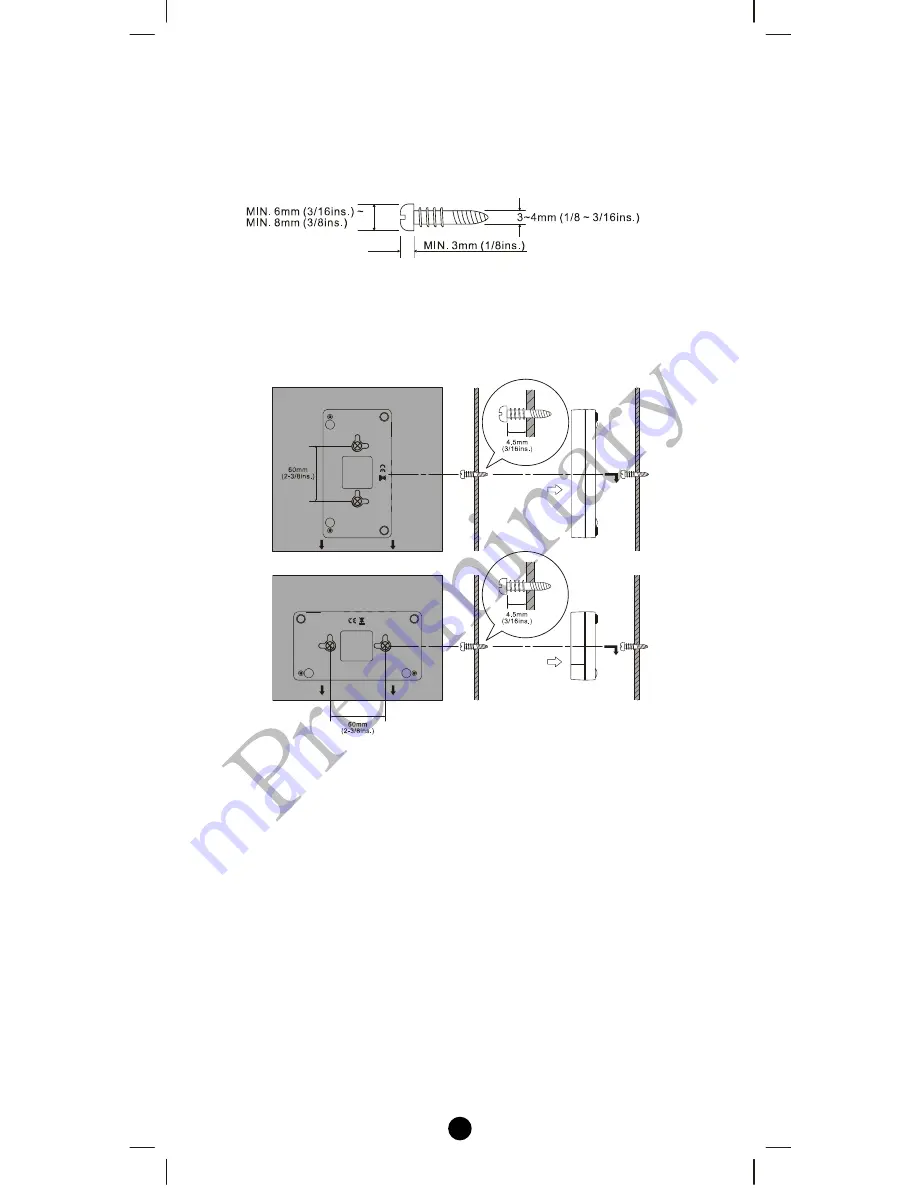
Obtain two screws suitable for the wall strength and material. The 
screw size is shown in the figure below. 


2.


The positional relationship between the ZXT-300 key holes and 
the screw mounting positions are shown in the figure below. 

Note 1: When mounting the screws to the wall, leave a space 

between the wall and screw cap as shown in the figure. 


3.


Insert the ZXT-300 key holes onto the two screws mounted to the 
wall, and then slide downward to secure in place. 

 
4.


After securing the ZXT-300 to the wall, connect the AC/DC 
adaptor and cables to the ZXT-300. 

Note 1: Check that the ZXT-300 is firmly secured to the wall. 
Note 2: Insert the AC/DC adaptor and IR emitter cable so that 

they are firmly connected to the ZXT-300. 


5.


When removing the ZXT-300 from the wall, lift up the ZXT-300, 
then pull it towards you. 


Summary of Contents for Z-Extender ZXT-300

Page 1: ...R control code User is able to set the IR code and using the larger code library of ZXT 300 It is capable to use the learning function of ZXT 300 through the simple UI on gateway or Z Wave remote controller It is allow to download the preset learnt commands from gateway or Z Wave remote controller to ZXT 300 User can enjoy the fully wireless control in anywhere at home Figure 1 ZXT 300 ...

Page 2: ...00 by the supplied AC DC adaptor L CAUTION Be sure to always use the supplied AC DC adaptor Do not try to power up other device with the supplied AC DC adaptor This could damage the AC DC adaptor or the connected device Configurations Figure 2 PROG Key and IR Ports of ZXT 300 IR Learning LED Indication IR Port 1 IR Port Output PROG button ...

Page 3: ...NIF Node Information Frame on ZXT 300 Step Setup Key LED Indication Status on ZXT 300 1 ZXT 300 switch to Z Wave to IR Channel EP1 LED flashes 1 times then keep on 2 Press the PROG button on the ZXT 300 EP1 will response NIF EP2 EP3 EP4 EP5 EP6 will response Multi channel capability report LED flashes 1 times then keep on ZXT 300 will report the supported command class Reset ZXT 300 to factory def...

Page 4: ...ays other than its intended use Doing so could cause the ZXT 300 to fall and result in an injury Be sure to fully check that there are no electrical wires or pipes inside the wall before mounting If any of the screws are loose the ZXT 300 can fall and cause an injury Do not mount the ZXT 300 with the screws still loose Check that the two screws mounted to the wall are fully inserted into the key h...

Page 5: ... 1 When mounting the screws to the wall leave a space between the wall and screw cap as shown in the figure 3 Insert the ZXT 300 key holes onto the two screws mounted to the wall and then slide downward to secure in place 4 After securing the ZXT 300 to the wall connect the AC DC adaptor and cables to the ZXT 300 Note 1 Check that the ZXT 300 is firmly secured to the wall Note 2 Insert the AC DC a...

Page 6: ...k less of the radio signal then concrete brick or tile walls which will have more of an effect on signal strength 3 Wall mounted Z Wave devices will also suffer a loss of range as they are housed in metal junction boxes which could reduce the range by up to 25 to 30 TECHNICAL SPECIFICATIONS Model no BW8370US ZXT 300US Model no BW8370EU ZXT 300EU RF Frequency 908 4MHz US ZXT 300US RF Frequency 868 ...

Page 7: ...e protection against harmful interference in a residential installation This equipment generates uses and can radiate radio frequency energy and if not installed and used in accordance with the instructions may cause harmful interference to radio communications However there is no guarantee that interference will not occur in a particular installation If this equipment does cause harmful interfere...

Page 8: ...could void the user s authority to operate the equipment RISK OF FIRE RISK OF ELECTRICAL SHOCK RISK OF BURNS The socket outlet shall be installed near the equipment and shall be easily accessible Use only power supplies listed in the user instructions F820 8370 000 Printed in China www remotec com hk ...

Reviews: