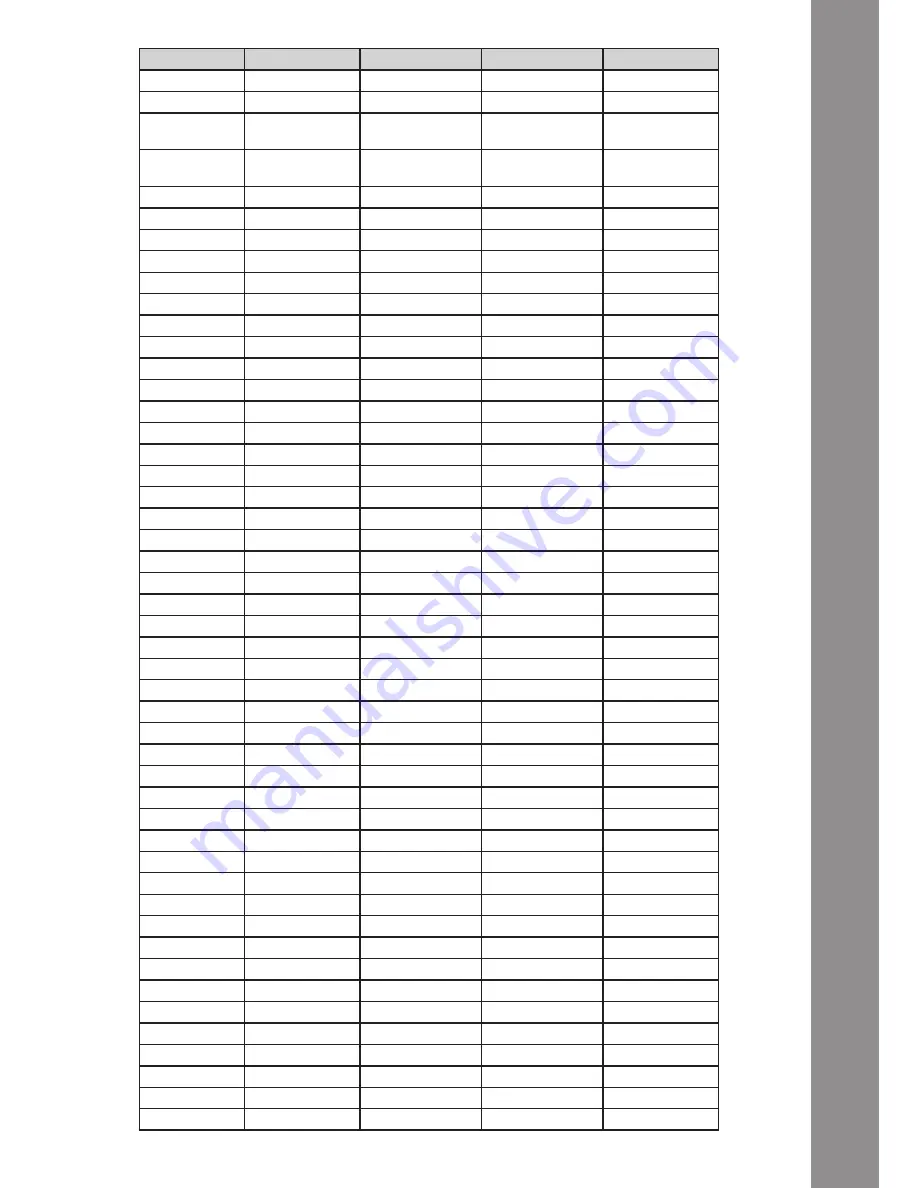
Reloop MIXAGE Instruction Manual Download Page 19

ENGLISH

41

SW name

Type

MIDI

MIDI 2 (Shift)

Remarks

CD1 SHIFT

SW

2A

CD2 SHIFT

SW

2B

CD1 PITCH

PitchBend

MIDI CH = 1 : CH1
MIDI CH = 2 : CH5

MIDI CH= 1 : CH3
MIDI CH= 2 : CH7

CD2 PITCH

PitchBend

MIDI CH = 1 : CH2
MIDI CH = 2 : CH6

MIDI CH= 1 : CH4
MIDI CH= 2 : CH8

CD1 GAIN

VR

33

72

CD1 FILTER

VR/CENTER

34/34

73/73

CD1 HIGH

VR

35

74

CD1 MID

VR

36

75

CD1 LOW

VR

37

76

CD1 CH FADER

VR

38

77

CD2 GAIN

VR

39

78

CD2 FILTER

VR/CENTER

3A/3A

79/79

CD2 HIGH

VR

3B

7A

CD2 MID

VR

3C

7B

CD2 LOW

VR

3D

7C

CD2 CH FADER

VR

3E

7D

CUEMIX

VR

32

--

CH1 Only

CROSSFADER

VR

31

--

CH1 Only

CD1 -

SW/LED

01/01

40/01

CD1 +

SW/LED

02/02

41/02

CD1 Search

SW/LED

03/03

42/03

CD1 Scratch

SW/LED

04/04

43/04

CD1 LOOP

SW/LED

05/05

44/05

CD1 RELOOP

SW/LED

06/06

45/06

CD1 FX SEL

SW/LED

07/07

46/07

CD1 FX ON

SW/LED

08/08

47/08

CD1 CUE1

SW/LED

09/09

48/09

CD1 CUE2 

SW/LED

0A/0A

49/0A

CD1 CUE3

SW/LED

0B/0B

4A/0B

CD1 CUE4

SW/LED

0C/0C

4B/0C

CD1 LOAD

SW/LED

0D/0D

4C/0D

CD1 HP

SW/LED

0E/0E

4D/0E

CD2 - 

SW/LED

0F/0F

4E/0F

CD2 +

SW/LED

10/10

4F/10

CD2 Search

SW/LED

11/11

50/11

CD2 Scratch

SW/LED

12/12

51/12

CD2 LOOP

SW/LED

13/13

52/13

CD2 RELOOP

SW/LED

14/14

53/14

CD2 FX SEL

SW/LED

15/15

54/15

CD2 FX ON

SW/LED

16/16

55/16

CD2 CUE1

SW/LED

17/17

56/17

CD2 CUE2

SW/LED

18/18

57/18

CD2 CUE3

SW/LED

19/19

58/19

CD2 CUE4

SW/LED

1A/1A

59/1A

CD2 LOAD

SW/LED

1B/1B

5A/1B

CD2 HP 

SW/LED

1C/1C

5B/1C

CH1 Level Meter LEVEL

1D

0~7

CH2 Level Meter LEVEL

1E

0~7

Summary of Contents for MIXAGE

Page 1: ...Toutes les personnes charg es de l installation de la mise en service de l utilisation de l entretien et la maintenance de cet appareil doivent poss der les qualifications n cessaires et respecter les...

Page 2: ...urchasing the Reloop Mixage Interface Edition Thank you for placing your trust in our disc jockey technology Before operating this equipment we ask you to carefully study and observe all instructions...

Page 3: ...vice is excluded from the warranty Do not operate the device under extremely hot in excess of 35 C or extremely cold below 5 C conditions Keep the device away from direct exposure to the sun and heat...

Page 4: ...disconnect the mains plug from the outlet It must be assumed that a safe operation is no longer feasible if the device bears visible defects if the device no longer functions following longer storage...

Page 5: ...lder Navigation T21 Track Load Button Shift Open Folder R Close Folder L T22 High Highs EQ Dial T23 Mid Mids EQ Dial T24 Low Bass EQ Dial T25 Cue Button Shift Track Pre Listen Play L Stop R T26 Linefa...

Page 6: ...tem Initial Operation Please especially observe the following explanations 3 1 ASIO DRIVER INSTALLATION Insert the included installation CD into your computer s drive Select the driver that best suits...

Page 7: ...B42 and a free USB port of your computer Also connect the included mains adapter to the corresponding connector B40 Now turn on the device via the On Off Button B41 4 The installation will be continue...

Page 8: ...3 2 1 INSTALLATION Besides the ASIO drivers on the included installation CD you can also find a directory named Trak tor Open this directory and select the setup file that best suits your system Foll...

Page 9: ...n the field Choose your manufacturer select the item Reloop The following menu item Choose your model has to be answered with Mixage Again confirm this selection with Yes 3 The following question rega...

Page 10: ...r setup combined with Mixage please observe the fol lowing items in detail 3 3 1 AUDIO SETUP 1 In Traktor open the setup dialogue by clicking the small cog wheel in the upper right corner 2 Open the c...

Page 11: ...ktor Pro NOTE You can find updated and extended mappings online Go to http www reloopdj com forum and open the category Mapping files in the field Downloads for all Reloop products Please proceed as f...

Page 12: ...ENGLISH 34 4 Now select the button Add followed by Import In the selection screen open the mapping file that is found on the CD or that was downloaded from the Reloop support site...

Page 13: ...2 Pitch Bend Button Allows the temporary acceleration clockwise of a track T3 Shift Button By pressing this button all the device s con trol elements receive a different function The current assignmen...

Page 14: ...ch bend function at the edge of the jog wheel T15 Jog Wheel Herewith various functions can be controlled T16 Sync Button The current deck s pitch will be synchronized to the master deck Cue 1 Button S...

Page 15: ...j com forum and open the category Mapping Files under Downloads for all Reloop products Element Function Function with activated Shift T3 T25 Cue Buttons By pressing one of the Cue Buttons the mo nito...

Page 16: ...e downloaded 6 1 FIRMWARE CHECK 1 Turn of the device via the On Off Button B41 2 Press and hold the right Shift Button T3 3 Turn on the device via the On Off Button B41 4 The current firmware version...

Page 17: ...T30 and MIDI Status LEDs T31 will flash si multaneously If the update failed the Status LEDs will start flashing alternatingly 9 After having carried out the update successfully close the frimware upd...

Page 18: ...XP latest Service Pack 32 bit or Windows Vista latest Service Pack 32 64 bit or Windows 7 latest Service Pack 32 64 bit Intel Pentium 4 2 4 GHz or Intel Core Duo or AMD Athlon 64 2 GB RAM Mac Mac OS...

Page 19: ...rch SW LED 03 03 42 03 CD1 Scratch SW LED 04 04 43 04 CD1 LOOP SW LED 05 05 44 05 CD1 RELOOP SW LED 06 06 45 06 CD1 FX SEL SW LED 07 07 46 07 CD1 FX ON SW LED 08 08 47 08 CD1 CUE1 SW LED 09 09 48 09 C...

Page 20: ...indicates a negative change of 15 SWITCH ON OFF SW CENTER CW CCW These messages are used for switches Control Change messages are sent with status 0x9n SWITCH On and Off value are 0x7F and 0x00 where...

Page 21: ...city Please make sure that the ASIO driver is installed and is also being used Please refer to the paragraph ASIO Driver Installation in the chapter Computer Configuration It is also possible that in...

Page 22: ...thout USB and RCA cable Input Output Impedance Sensitivity EQ Flat Maximum Gain Load 100K Ohm Frequency Range EQ Flat Maximum Gain Load 100K Ohm Line 7Hz 16KHz 0 5dB Mic 20Hz 20KHz 1 5dB THD N EQ Flat...

Page 23: ...ENGLISH 45...

Page 24: ...WWW RELOOPDJ COM Reloop Trademark Global Distribution GmbH Schuckertstr 28 48153 Muenster Germany Copyright 2009 Nachdruck Verboten...

Reviews: