background image

PCset Help jetStamp 990

46

ERNST REINER GmbH & Co. KG

Originalanleitung

6.3

Clean nozzles

Possible blindness due to eye contact with ink.

Do not point the 

jetStamp 

990 nozzles 

 against people's faces!

If there are streaks in the imprint or problems with the print quality, the ink may have dried on the

nozzles 

.

Manual nozzle cleaning

6.3.1

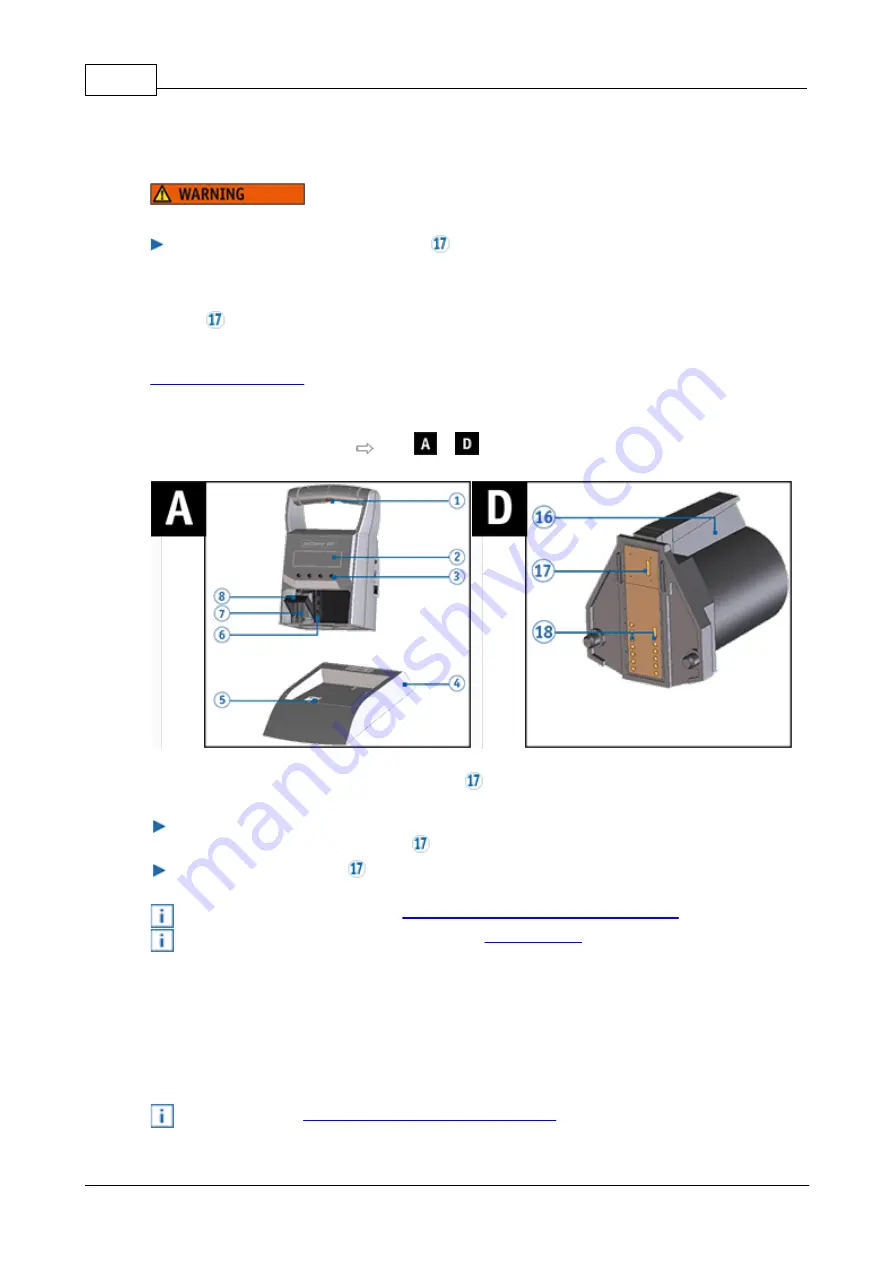
Manual nozzle cleaning

Manual nozzle cleaning   Fig. 

 + 

To ensure high print quality, the nozzles should 

 cleaned at regular intervals as follows:

To dissolve the dried ink, press a soft cloth slightly soaked in ethanol (spirit)

against the nozzles for about three 

 seconds.

Dab off dissolved ink and 

 wipe the nozzles dry.

 For further information (also see "

Cleaning the contacts of the print cartridge

").

For notes on temperatures and humidity, see "

Technical Data

" in the documents accompanying

the print cartridges.

6.4

Clean print carriage

Ink and dried-in ink residues at the print carriage are removed with a soft spirit-soaked cleaning rag.

On this, see also "

Cleaning contacts at the print cartridge

".

Summary of Contents for jetStamp 990

Page 1: ......

Page 2: ... Safe handling of print cartridges IV Preparation and commissioning 17 17 4 1 Commissioning 18 Inserting rechargeable batteries 4 1 1 18 Charge rechargeable batteries 4 1 2 19 4 2 Setting time and date 19 4 3 Setting summertime 20 4 4 Inserting the print cartridge 21 4 5 Saved print images 22 4 6 Activating Bluetooth 22 4 7 Selecting print image 22 4 8 Overview of stored print images 23 4 9 Printi...

Page 3: ...ings 5 6 2 1 37 Tab File Settings Date Clock time 5 6 2 1 1 38 Context menu date time object 5 6 2 2 39 Numbering machine 5 6 3 39 Presettings 5 6 3 1 40 Tab File Settings Date time numbering machine 5 6 3 1 1 42 Context menu numbering machine object 5 6 3 2 VI Maintenance 43 44 6 1 Changing the print cartridge 45 6 2 Cleaning the contacts of the print cartridge 46 6 3 Clean nozzles 46 Manual nozz...

Page 4: ...PCset Help jetStamp 990 4 ERNST REINER GmbH Co KG Index 54 ...

Page 5: ...Your jetStamp 5 ERNST REINER GmbH Co KG Originalanleitung 1 Your jetStamp ...

Page 6: ...PCset Help jetStamp 990 6 ERNST REINER GmbH Co KG Originalanleitung 1 1 Operating elements ...

Page 7: ...Your jetStamp 7 ERNST REINER GmbH Co KG Originalanleitung ...

Page 8: ...tor Ink cleaning station Micro USB socket Print carriage Jack socket for external triggering Print cartridge Grip strip print cartridge Locking bracket Nozzles print cartridge Battery compartment Print cartridge contacts 1 2 Display and button function The display depends on the respective menu context The start screen of the main menu is shown The display is structured according to the following ...

Page 9: ... or menu MENU SELECT Access to the main menu and menu selection Confirms entries and completes function settings RETURN Back Returns to the previous display submenu main menu exit from main menu OK Confirms entries and completes function settings D Four push buttons Each button is always assigned to the menu item or command displayed in the display menu bar above it 1 3 Main menu The menu selectio...

Page 10: ...his means that a password must be entered Select the button MENU Use the buttons t u to browse until the display shows Device Lock Selecting SELECT enables or disables the device lock The symbol in the status indicator in the REINER PCset switches from to Selecting RETURN leaves the menu Also see Settings Password change 1 3 3 Bluetooth Only the 990 001 model is bluetooth capable Bluetooth cannot ...

Page 11: ... 4 numbering machine 1 4 The numbering machine serves sequential numbering Up to 4 different numbering machines can be specified A numbering machine used in the selected print image is marked with an appended here The specified Numb machine 1 for example is displayed as Numb machine 1 See Software application 990 PCset Settings Objects Numbering Machine 1 3 6 Settings Cartridge type Select the but...

Page 12: ...ssword The print images can however be selected and printed out on the device Password change Select the button MENU Use the buttons t u to browse until the display shows Settings and then Password change After selecting SELECT you will be asked to assign a new password Confirm your selection with OK or undo it with RETURN Factory settings Select SELECT to reset the jetStamp 990 to the delivery co...

Page 13: ...harging of the batteries is electronically controlled This ensures that the battery cells are charged optimally and gently Recharging Fully charge rechargeable batteries before first application Duration approx three hours After the first full charge the batteries do not yet reach full capacity You must expect that the normal service times will be undercut Reaching full capacity Full capacity is a...

Page 14: ... that lead to death or severe injury directly if not observed Warnings of dangers that may lead to death or severe injury if not observed Warnings of dangers that may lead to injury if not observed Warnings of dangers that may lead to property damage if not observed Observe the operating instructions You are asked to perform actions here Notes and advice to make handling your jetStamp 990 even eas...

Page 15: ...ng from destruction of the battery when using unsuitable rechargeable batteries or non rechargeable batteries Only use the batteries intended for the device Type usage Use only the enclosed mains adapter to charge the rechargeable batteries Only use rechargeable batteries two each type nickel metal hydride NiMH REINER item number 946 192 000 of build AA Always replace all flat rechargeable batteri...

Page 16: ...ging that provides protection from impact and shock for the device Damage to the device by dewing Before commissioning wait until the device has reached room temperature and is completely dry Only trained specialists should perform repairs 3 4 Safe handling of print cartridges Possible blindness due to eye contact with ink Do not point the jetStamp 990 nozzles against people s faces Damage to heal...

Page 17: ...er the REINER PCset software has been installed see Installing the REINER PCset With the installation of the REINER PCset software the required USB drivers are installed If a connection is established between the PC and the device the USB drivers are automatically detected and loaded If the device is connected without installing the REINER PCset software the installation of the device drivers fail...

Page 18: ...once When the batteries are removed the date time and counter reading of the numbering machines are maintained Open the battery compartment flap at the rear of the marking device Ensure correct polarity and insert the batteries Close the battery compartment flap 4 1 2 Charge rechargeable batteries Connect the mains adapter of the device to the connection socket provided for the mains adapter and c...

Page 19: ...set the minutes Push OK Change clock appears again Push RETURN Date Time appears In order to get right to the next menu item push t u OR In order to save the settings and leave the menu Push RETURN twice The selected print image appears 4 3 Setting summertime Push MENU and browse t u until the display shows Date Time Push SELECT and browse t u until the display shows Summertime Push SELECT The dis...

Page 20: ...eep the print cartridge out of the reach of children Inserting the print cartridge Fig Take the jetStamp 990 from the basis station Push MENU Cartridge change Start appears on the display Push SELECT Print carriage moves to the device centre Cartridge change end appears on the display Push the locking bracket into the rear most position Unpack the new print cartridge and remove the protective film...

Page 21: ...to the next menu item push t u OR To leave the main menu push RETURN The selected print image appears 4 5 Saved print images Up to 25 print images P01 to P25 can be stored in the device P01 to P05 are print images pre set in the factory see Overview of stored print images They contain individually print fields such as Text Numbering machine Date time They can also be set anew or changed The active...

Page 22: ...tooth Selecting SELECT activates Bluetooth To establish the Bluetooth connection with the device follow the instructions Establishing Bluetooth connection Bluetooth Verbindung herstell2 4 7 Selecting print image In order to make settings at the print images they need to be selected or activated first Browse t u until the desired print image appears on the jetStamp 990 4 8 Overview of stored print ...

Page 23: ...ng the print image Possible blindness due to eye contact with ink Do not point the jetStamp 990 nozzles against people s faces Printing the print image Fig Setting the desired print image see Selecting the print image Place the device on a surface to be printed Push the trigger button The selected print image is printed ...

Page 24: ...d disk space 1 free USB interface Supported operating systems Windows 7 Windows 7 64 Bit Windows 8 Windows 8 64 Bit Windows 10 Windows 10 64 Bit 4 10 2 Installing the software Administrator rights on the PC are required for the installation Insert installation medium USB stick or CD in the PC If the installation program does not start automatically start the file Setup_PCset exe Follow the instruc...

Page 25: ...pdate is being installed the jetStamp 990 must not be switched off or removed from the supply voltage Connect the mains socket to the supply voltage via the mains adapter Connect the micro USB socket to the PC via the USB cable Unpack Firmware update and start jetStamp990_Firmware_xxxx exe The firmware is installed automatically After a successful firmware update the REINER PCset can be opened aga...

Page 26: ...t Preparing the jetStamp 990 for REINER PCset Fig The PC can only recognise the device correctly if the REINER PCset is installed first Find more on this under Installing the software Double click the REINER PCset icon The REINER PCset software is started Connect the Micro USB socket to the PC via the USB Bluetooth cable The PC recognises the jetStamp 990 as a new USB device The device driver soft...

Page 27: ...Toolbar Register 1 25 print image P01 P25 2 lines for design of the print images Status indicators 5 3 1 Menu bar In addition to th4e functions in the tool bar you can find a menu bar in the REINER PCset application In the menu bar you will find both common self explanatory standard commands as well as REINER PCset specific menu commands File Edit View Presettings Help ...

Page 28: ...to the device Upload print images The print images are uploaded onto the PC Find REINER Bluetooth devices Searches for REINER Bluetooth devices Last opened Displays the most recently opened print images Exit Ends the REINER PCset 5 3 1 2 Edit Function Description Delete Deletes selected objects Copy Load selected content to the clipboard Insert Paste content from the clipboard Cut Delete selected ...

Page 29: ...mation on REINER PCset and connected jetStamp 990 5 3 2 Toolbar Objects can be pulled into the line by drag drop An imprint may have up to two lines and up to 20 characters per line Toolbar Command Description New Reset the display Delete the displayed draft Device settings date time numbering machine Configure the date time and numbering machine Open File selection menu for loading previously sav...

Page 30: ...r settings Toolbar Command Description Text The text in the text input field is inserted into the lines of the print image by drag drop of the text object Date Time A date time object can be placed either in the first or the second line One date time object per line is permitted The calendar data of the different date objects can be set deviating from each other Numbering machine A numbering machi...

Page 31: ...rted with the Search again button Note that Bluetooth must be activated on the device for this The status line in the device must show BT for this To establish the Bluetooth connection select the corresponding device in the list and click Connect A pop up menu Connection via Bluetooth device opens in the Windows status bar After a short time the jetStamp 990 is connected to the REINER PCset The co...

Page 32: ... a text object left click on the text symbol in the tool bar drag it to the desired line and position and drop it there Write the desired text into the text field and accept with OK OR In order to create a date time object left click the date time symbol in the tool bar drag it to the desired line and position and drop it there OR To create a numbering machine object left click on the numbering ma...

Page 33: ...printed 5 5 3 Printing the print image Possible blindness due to eye contact with ink Do not point the jetStamp 990 nozzles against people s faces Print the print image Fig Browse t u until the desired print image appears on the Jetstamp 990 Place the device on the surface to be printed Push the trigger button The selected print image is printed ...

Page 34: ...esettings tab or via the context menu Text Date Time Numbering machine 5 6 1 Text Creates text fields When a text object is inserted the configuration corresponds to the presettings Each one can be changed individually via the context menu text object Click the symbol for the text hold the mouse button down drag it to the desired line position and release the mouse button The configuration window ...

Page 35: ...u text object To open the context menu right click the desired text object The context menu opens as in the following figure Function Description Edit Object becomes active and can be edited Copy Copies the object Cut Cuts out the object Insert If there is a text in the clipboard it will be pasted Delete Deletes the object Enter or double click fixes the object which then can no longer be edited ...

Page 36: ...enu Click the symbol for the date time hold the mouse button down drag it to the desired line position and release the mouse button The configuration window for Date time opens see Presettings Presettings Context menu date time object 5 6 2 1 Presettings Changed presettings apply to all future date time objects In the menu bar select the Presettings tab and click Date time The configuration window...

Page 37: ...ection option narrow medium bold Format abbreviation Function Description dd Day of the month with two digits 01 to 31 ddd Calendar day with three digits 001 to 365 Example 28 May 2019 148 2019 MM Month of the year with two digits 01 to 12 MMM Abbreviation for the month up to 3 characters yy The last two digits of the year 00 to 99 yyyy Complete year 0000 to 9999 HH Hour with two digits 00 to 23 h...

Page 38: ... are added to the current system date Up to 4 offsets can be set up Date time number 1 to Date time number 4 Text for the month abbreviations Abbreviation for the month abbreviations 3 digits 5 6 2 2 Context menu date time object When a date time object is inserted the configuration corresponds to the presettings Each date time object can be changed individually via the context menu To open the co...

Page 39: ...figuration corresponds to the presettings Each one can be changed individually via the Context menu numbering machine The minimum length is 1 character the maximum length is 8 characters Click the symbol for the numbering machine hold the mouse button down drag it to the desired line position and release the mouse button The configuration window for Numbering machine opens see Presettings Presetti...

Page 40: ...5 The number of printed digits depends on the maximums value set at number circle Font Selection option narrow medium bold Tab File Settings Date Clock time 5 6 3 1 1 Tab File Settings Date time numbering machine Click the tab File to open the dialogue Settings Date time numbering machine and then clock Numbering machine A dialogue opens as in the following figure ...

Page 41: ...n The repeat factor can be set from 0 to 99 The numbering machine switches on at the value 0 Counting direction backwards The numbering machine can count up e g 10 11 12 or down e g 10 9 8 Number circle The number circle defines the value range in which a numbering machine counts When the maximum or minimum value is reached for upwards or downwards counting numbering machine the count is continued...

Page 42: ...ed the configuration corresponds to the presettings Each numbering machine object can be changed individually via the context menu To open the context menu right click the desired numbering machine object The context menu opens as in the following figure Function Description Edit Opens the configuration window for the selected numbering machine object Copy Copies the object Cut Cuts out the object...

Page 43: ...Maintenance 43 ERNST REINER GmbH Co KG Originalanleitung 6 Maintenance Changing the print cartridge Cleaning the contacts of the print cartridge Clean nozzles Clean print carriage Clean housing ...

Page 44: ...until the display shows Cartridge change start Push SELECT Print carriage moves to the device centre Push the locking bracket into the rear most position Take the print cartridge from the print carriage Unpack the new print cartridge and remove the protective film or clip see operating instructions for the print cartridge P1 Insert the print cartridge into the print carriage at the grip strip Pull...

Page 45: ...til the display shows Cartridge change start Push SELECT Print carriage moves to the device centre Push the locking bracket into the rear most position Remove the print cartridge from the device Clean the contacts of the print cartridge at the print cartridge and at the print carriage with a soft cloth slightly soaked in ethanol spirit if necessary Hold the print cartridge by the grip strip and in...

Page 46: ...ality the nozzles should cleaned at regular intervals as follows To dissolve the dried ink press a soft cloth slightly soaked in ethanol spirit against the nozzles for about three seconds Dab off dissolved ink and wipe the nozzles dry For further information also see Cleaning the contacts of the print cartridge For notes on temperatures and humidity see Technical Data in the documents accompanying...

Page 47: ...om the outlet Inform a specialist vendor or the REINER service Cleaning agents that are too aggressive may damage the housing surface Do not use any abrasives and plastic dissolving cleaning agents for cleaning Clean the top cover of the device with a soft cloth if required For stronger contamination slightly moisten the cloth with water and mild detergent ...

Page 48: ...ost empty Rechargeable battery almost empty Plug in power supply or USB and charge the batteries Bluetooth init failed Bluetooth init failed Try again Print carriage movement blocked Print carriage movement blocked Movement of print carriage stopped Try again Bluetooth receive failed Bluetooth receive failed Try again Device is locked Device is locked Unlock the 990 in menu Recharg battery empty R...

Page 49: ...rmation Mod Model No Item number GEPR Test date jetStamp 990 has the CE mark according to the currently valid low voltage and EMC directive jetStamp 990 is in accordance with the following standards or standardised documents FCC 47 CFR Ch 1 Part 15 Bluetooth FCC R7TAMB2300 do not point the jetStamp 990 nozzles against people s faces Waste electrical and electronic devices Old devices must not be d...

Page 50: ...C Humidity for operation 10 80 relative humidity Temperature for storage With standard print cartridges With MP print cartridges 10 C 40 C 10 C 20 C Storage humidity With print cartridges 10 80 relative humidity Ambience temperature for transport 20 C 40 C up to 24 hours Humidity for transport 10 90 relative humidity Data transfer USB Bluetooth optional Power supply 2 x AA NiMH rechargeable batter...

Page 51: ...ld waste but in a specified acceptance point for recycling of electrical and electronic devices 8 4 Accessories Inkjet print cartridge l Order no 801 307 000 P1 S BK 51604A B for paper and cardboard black l Order no 801 307 050 P1 S RD 51605R R for paper and cardboard red l Order no 791 050 000 P1 EF AUB for chicken eggs aubergine l Order no 791 050 001 P1 EF RD for chicken eggs red Inkjet print c...

Page 52: ...ww reiner de repair Technical Service Support Phone 49 7723 657 388 Email service reiner de Sales Phone 49 7723 657 0 Email customerservice reiner de 2020 Ernst Reiner GmbH Co KG All rights reserved Translation reprint and other reproduction of these operating instructions even in parts and no matter the form shall require our express written consent We reserve the right to make content changes to...

Page 53: ...Operating instructions 53 ERNST REINER GmbH Co KG Originalanleitung 10 Operating instructions ...

Page 54: ...age 32 Printing the print image 33 Transfer print image 32 F Factory settings 11 File 28 Find REINER Bluetooth devices 28 Firmware update 24 H Help 29 I Info 29 Inserting rechargeable batteries 18 Inserting the print cartridge 20 Installing the REINER PCset software 24 Installing the software 24 M Maintenance 43 Clean housing 47 Clean nozzles 46 Clean print carriage 46 Cleaning the contacts of the...

Page 55: ...handling of print cartridges 16 Safety notes 16 Safety notes on rechargeable batteries 15 Safety description 14 Saved print images 21 Selecting print image 22 Setting Date Clock Time 19 Setting summertime 19 Settings 11 Software version 12 Summertime 10 T Technical data 50 Technical data and accessories 49 Text 34 Toolbar 29 Transfer print image 32 Transferring print images 28 Transport and dispos...

Page 56: ...w w w reiner de REINER 990088 101 A V02 00 Build 0001 I 09 2020 ...

Reviews: