background image

9

Acuity Speech

EN

Once the desired reading aid is selected, tap this icon to set the desired setting of the 
reading aid.
To change the setting value you can tap this icon to go to the next level or you can swipe 
from left to right.
To change to a different reading aid then swipe up or down over this icon and then tap to 
set the desired level of the reading aid selected.
To exit from the advanced reading aids menu press and hold this icon for 2 seconds. The 
reading aid will now disappear from the screen.

Brightness, contrast and white balance can’t be adjusted when reading aids are in use.

External input

press the on/off switch once to toggle between the available inputs until the image of the 
external input is displayed on the screen of the Acuity.

Adjust display modes, brightness, contrast, white balance and advanced reading aides as 
described above.

Tap or press and hold the minus or plus icon to zoom out or in. When zoomed in, it is 
possble to pan through the image by press and holding on the magnifi er icon and sliding 
your fi nger in the direction you want to pan the image. Always start from the magnifi er 
icon to start panning.

7 Acuity Basic mode - Advanced menu

The Acuity Speech contains an advanced menu with which you can (de)activate certain 
functions of the Acuity Basic mode. You can access the advanced menu by ensuring the 
device is switched off, then  turning on the device using the on/off button and holding it 
pressed until you hear a beep after the start up tone. 
By tapping the brightness icon you can cycle through multiple screens of selectable 
options. Tap the plus icon of the zoom button to highlight which mode you wish to 
change. You can recognize the highlighted function by the white rounded rectangle 
around it. Tap the magnifi er icon to activate/deactivate your selection.
To save any changes, or to exit without making changes power off the device and power 
it on again.

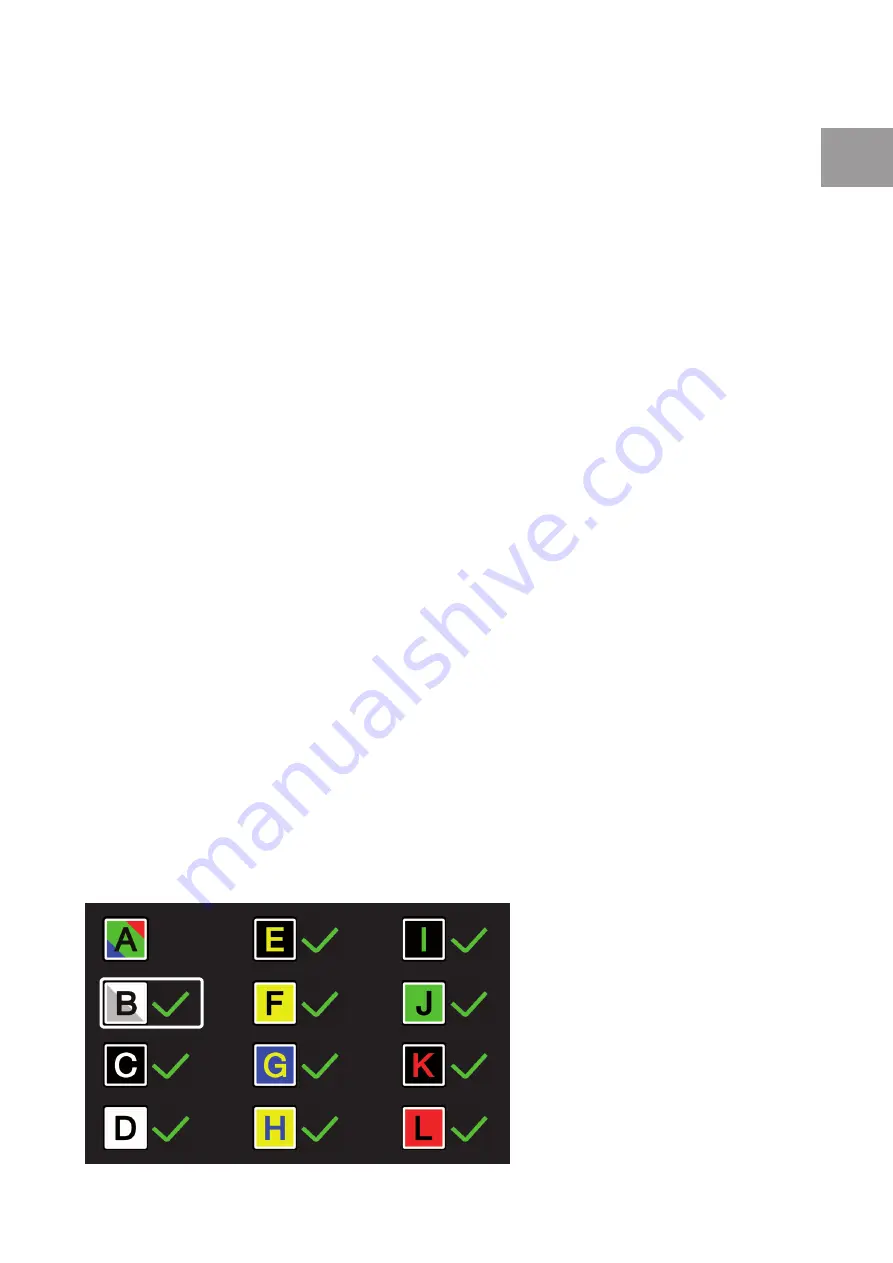
Display modes

On the fi rst screen you can select 
whether you want the photo mode 
to have realistic or high saturation 
colors by activating the photo 
mode (A) and select which high 
contrast mode you want available 
in your Acuity Basic mode by 
activating the high contast mode 
you want activated/deactivated.

The second screen shows 
advanced functions: 

Summary of Contents for ACUITY SPEECH

Page 1: ...Acuity Speech USER MANUAL MANUEL D UTILISATION ISTRUZIONI D USO MANUAL DE INTRUCCIONES ...

Page 2: ......

Page 3: ...EN IT ES FR RC English 4 Français 26 Italiano 48 Español 71 Remote Control 94 AcuitySpeech_UserManual_INT_V2 1 10 2021 ...

Page 4: ...mode Original view 13 Image viewer 14 Zone selection 14 11 Acuity Speech mode Digital view 14 Text flow 14 Autocue 15 12 Acuity Speech mode Menu 15 Documents 20 Saving documents 21 13 Remote control 21 14 Troubleshooting 22 15 Recycling 22 16 Warranty 23 17 Technical specifications 24 18 Supplier information 96 19 Manufacturer information 96 This document concerns the original general user manual ...

Page 5: ...ed in black outlined areas such as this one 1 Introduction The Acuity Speech is a desktop video magnifier of high quality that is user friendly with its touch sensitive input method It is designed as a desktop appliance that can be used in a home or in an office setting The Acuity Speech is used to read documents up to A4 or letter format The appearance of these documents can be altered to accomod...

Page 6: ... electromagnetic emissions or decreased electromagnetic immunity and result in improper operation Portable RF communications equipment including peripherals such as antenna cables and external antennas should be used no closer than 30 cm 12 inches to any part of the Acuity including cables specified by the manufacturer Otherwise degradation of the performance of this equipment could result Use pre...

Page 7: ...ilable when an HDMI cable is connected to one of the HDMI ports at the back of the Acuity Speech and to an external device Tableau The Acuity Speech contains a tableau on which you can place your reading material The tableau can move from left to right and from front to back Brake handle In front of the tableau of the Acuity Speech you will find a single brake handle with which you can control the...

Page 8: ...ft side of the rounded rectangle to gradually increase or decrease the contrast Contrast can t be adjusted when reading aids are in use and can only be adjusted in high contrast modes not in photo modes White balance In photo mode swipe over this icon from left to right and hold your finger on the right side of the rounded rectangle or right to left and hold your finger on the left side of the rou...

Page 9: ...iding your finger in the direction you want to pan the image Always start from the magnifier icon to start panning 7 Acuity Basic mode Advanced menu The Acuity Speech contains an advanced menu with which you can de activate certain functions of the Acuity Basic mode You can access the advanced menu by ensuring the device is switched off then turning on the device using the on off button and holdin...

Page 10: ... off individually This function is turned on by default Refresh rate frequency Depending on your location the mains power frequency will be 50 or 60 Hertz By selecting the right setting you will suppress flickering caused by surrounding light This function is set to 50Hz default Contrast With this function you can turn the manual contrast adjustment on or off This function is turned on by default ...

Page 11: ...o Original view See Chapter 10 Original view for more information Tap and hold to go to Digital view See Chapter 11 Digital view for more information Play button Tap this button to go to Original view See Chapter 10 Original view for more information Tap and hold to go to Digital view See Chapter 11 Digital view for more information Menu Tap this button to open the menu The menu allows you to set ...

Page 12: ...uses 6 Previous next sentence tap the left side to go to the previous sentence or the right side to go to the next sentence After tapping this button the reading pauses 7 Stop Tap this button to go back to the Start screen Preset 2 Auto hide interface For advanced users who want a maximum viewing area of the captured page it is possible to have the default interface hide automatically by selecting...

Page 13: ...ode In Original view the display mode of text boxes can be shown as captured original view or can be displayed in high contrast text original view digital text Tap this icon to go to the next available display mode Swipe over this icon from left to right or right to left to go to the next or previous available display mode Press and hold this icon to switch to Digital view a high contrast view of ...

Page 14: ...ter 12 Acuity Speech mode Menu for more information When zone selection is turned off the text boxes won t show zone markers Start read aloud by tapping on the word from where you want start and the device will read until the end of the document 11 Acuity Speech mode Digital view Digital view only shows digitized text without the captured images It can be more comfortable when reading books magazi...

Page 15: ...n read off the screen without the need of pushing any button There is no word marker and no reading voice The text will be displayed on the middle half of the screen or on a single line depending on the Digital view setting Autocue can be started by double tapping the touchscreen The speed can be modified by the speed icon on the button bar Autocue is not available when the device is set to Interf...

Page 16: ...essing this button Available colors yellow blue green red grey and white yellow by default Zone selection color The color of zones can change when selected The color of the selected zone markers can be adjusted by pressing this button Available colors red grey white yellow blue and green red by default Word marker The current word is marked by a marker The following options allow the user to custo...

Page 17: ...ght of every row Selected languages voices A checkmark in front of the languages turns the recognition of a language and voice on or off You can have up to 5 rows active or deactive some This can be used if a document has multiple languages and you want to force the device to use a specific one or select a language multiple times and have different voices It is impossible to deselect all rows at l...

Page 18: ...an be set by pressing the magnifier icon while in Digital view Reading size is set to 5 by default Audio feedback The audio feedback has 3 options Voice feedback the device reads the function of pressed buttons aloud Tone feedback when you tap or press and hold a button you will hear a single beep No feedback you will hear no sound from the device except for the read aloud voice System settings pa...

Page 19: ...t the device to your previously set User preset Tap the Reset button to open a dialog to set all the Acuity Speech Mode menu settings to your user preset settings Tap the checkmark button to accept or the stop button to cancel Factory reset When the device is reset to factory settings the following settings will be set User preferences Original view Full color Digital view Fullscreen Zone On Zone ...

Page 20: ... the file menu The file menu has the following options Delete delete the selected file This is a permanent option and can not be undone Rename A virtual keyboard will appear to change the name of the document Export If a USB stick is connected and this option is selected a dialog will open to let the user choose to export the document as an Acuity document complete with layout processed text and i...

Page 21: ...e internal memory A dialog will open with the following option Tap the document name to rename the file A virtual keyboard will appear to change the name of the document Tap the middle button to add pages to the document file A screen with capture area will open Tap the button in the lower right of the screen to add that page to the file Do this as many times as needed Tap the checkmark button in ...

Page 22: ... before cleaning the Acuity Follow the instructions below to help prevent the product exterior from deteriorating or colouration Wipe with a soft dry cloth Do not use solvents or other chemicals Do not wipe with a chemically treated cleaning cloth Use a soft dry cloth to clean all other accessories 15 Recycling The Acuity Speech contains electrical and electronic equipment WEEE and should not be m...

Page 23: ...cted operation of incidents Please note the serial number of the device when contacting the manufacturer Manufacturer address production date Catalog reference number Serial number UDI number Device input power Complies with Part 15 of the FCC Rules WEEE recycling Medical device purpose and name Read the instructions for use Product conform E U standards IP rating Avoid listening to high volume le...

Page 24: ...ance Mono 61mm speaker 4W Magnetic field 0 5mT at 10cm distance Stereo on ear headphone 32ohm 3 5mm Jack Magnetic field 0 5mT at 3cm distance Preferred external HDMI input setting 1920x1080 Sound controls Adjustable audio volume and reading speed Supported languages Belgian Dutch Chilean Spanish Czech Belgian French Argentinian Spanish Polish Danish Colombian Spanish Russian Dutch Mexican Spanish ...

Page 25: ...that may cause undesired operation Federal Communications Commission Statement EMI The Acuity Speech complies to harmonised standards according to medical devices and with the limits for a Class B digital device pursuant to Part 15 of the FCC Rules These limits are designed to provide reasonable protection against harmful interference in a residential installation This equipment generates uses and...

Reviews: