background image

User’s Guide

Getting to know the Features

35

Regency™ Series 500 Single Line Caller ID Telephone

User’s Guide

LCD Display Information

Regency™ Series 500 Single Line Caller ID Telephone

2

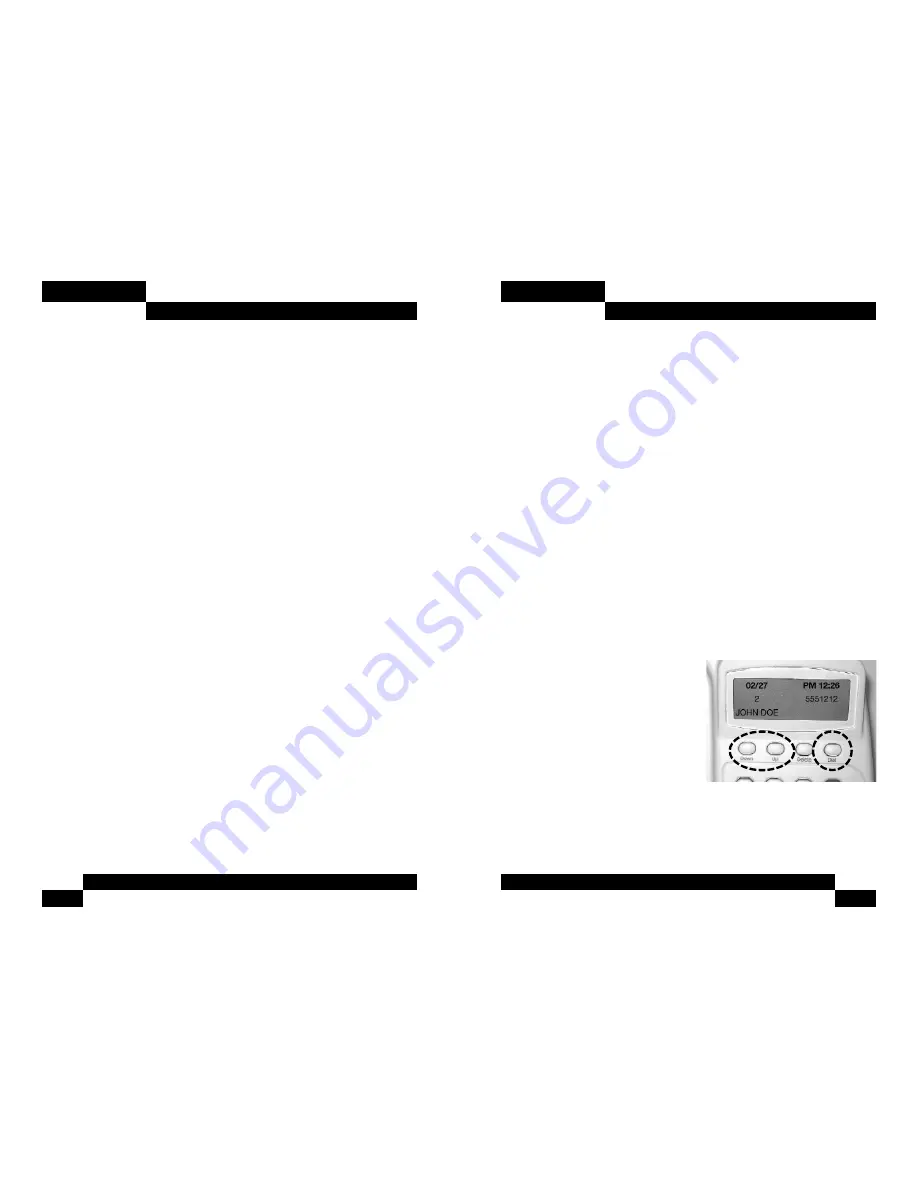
Caller Log Call Back Dialing Feature:

Adding or Deleting Characters on the LCD Display

Numbers in the caller log can be edited before dialing. When

editing a number to be dialed, the caller log will not remove the

information already stored. To delete one or more digits from the

caller log, you must first press a digit or add a character from the

keypad to activate delete.

To add digits to the displayed number:

1

Press the 

UP

or 

DOWN

key to activate the display for scrolling.

2

Scroll the 

UP

or 

DOWN

key to find the number to be dialed.

3

If you need to add a number prior to the numeric string on

the display, press the keypad number you require and it will

be placed on the display for dialing.

4

If using the handset, lift handset, then press the 

DIAL

key to

dial the number.

5

If using speakerphone, simply press the 

DIAL

key.

Note:

The number can only be inserted prior to the displayed

digits. See Delete Characters for

improperly inserted characters.

To delete digits from the displayed

number:

Press the 

UP

or 

DOWN

key to

activate the display for scrolling.

1

Scroll the 

UP

or 

DOWN

key to find the number to be dialed.

Caller ID/LCD DIsplay continued on next page

• Handset volume control (ADA compliant)

• Last number redial key

• Flash Key 

• Pause key

• Desk or wall mountable

• Fully modular, easy to install

* Caller ID, Message Manager (voice mail) and Visual Call

Waiting are features that require subscription to your local

Telephone Company provided services. These telephone features

will not work unless you are a subscriber.

Summary of Contents for Regency 500 Series

Page 1: ...4666 500 2003 04 C User s Guide Regency Series 500 Single Line Caller ID Telephone ...

Page 2: ... as shown on page 6 Install wall mount clip provided in the package as shown on page 9 Also IT IS IMPORTANT when you place the receiver into the cradle do so by placing the top of the receiver into place first All phones should be used ONLY with the power adapter supplied with that telephone Using another power adapter will cause internal damage to the set User s Guide Trouble Shooting Tips for Re...

Page 3: ... wider than the other It will fit into the power outlet only one way This is a safety feature If you are unable to insert the plug fully into the outlet try reversing the plug If the plug does not fit contact an electrician to replace your obsolete outlet 12 Do not allow anything to rest on the power cord Do not locate this product where the cord will be walked on 13 Do not overload wall outlets a...

Page 4: ...The current activity is TALK As soon as the line connects the Timer Display activates This tracks the current calls length in time of minutes and seconds bottom line c If the product has been exposed to rain or water d If the product does not operate according to the operating instructions e If the product has been dropped or the cabinet has been damaged f If the product exhibits a distinct change...

Page 5: ...ons on the purchase of your Regency Series single line caller ID telephone This high precision electronic device includes advanced features suitable for use in today s environment and requires minimal maintenance It is simple to install and easy to use especially with your Telephone Company operating features Read this user s guide to become familiar with all aspects of your new telephone Getting ...

Page 6: ...and press the DELETE key again Direct Entry from Caller Log 21 Reviewing Information in Memory 22 Changing Information in Memory 23 Ringer Volume and Ring Tone Selection 24 Using the Features and Options Page 25 Retrieving Messages 25 Using the Speakerphone 26 Using the Mute Button 26 Turning Message Waiting Light On or Off Manually 27 Placing a Call from Speed Dial Memory Location 28 Data Port 29...

Page 7: ...2 way speakerphone Half Duplex Speaker volume control Microphone mute feature with illuminated status indicator Large backlit contrast adjustable LCD display shows Caller ID information Date and Time Dialing Verification Elapsed Call Timer Functional Icons Caller ID feature Type II with 60 memory up down scroll and direct call back 10 Speed Dial memory locations with directory display and dial out...

Page 8: ...mber prior to the numeric string on the display press the keypad number you require and it will be placed on the display for dialing 4 If using the handset lift handset then press the DIAL key to dial the number 5 If using speakerphone simply press the DIAL key Note The number can only be inserted prior to the displayed digits See Delete Characters for improperly inserted characters To delete digi...

Page 9: ...e caller ID information number of new calls recieved and total with date and time and caller log Up Down Scroll Key s Displays the calls received in sequential order and searches storage locations Delete Key Used to edit Caller Log characters for storage and deletes Caller Log information Dial Key Used to dial numbers from the Caller Log and memory storage locations Directory Storage Key Used to l...

Page 10: ... the following information The date and time of the incoming call and a CW symbol The location number of the call in storage and the incoming caller s telephone number The incoming caller s name Note When the call goes to voicemail the Caller ID information can be retrieved from the call log Contrast Adjustment 5 Step When the phone is on hook the VOLUME key is used for the 5 step LCD contrast adj...

Page 11: ... DIAL that help manage stored information Information available on the screen when in idle mode on hook is Date time and an envelope on the first line The envelope will appear only when a message has been received in voicemail or Message Manager NEW The number of new messages awaiting retrieval TOTAL Total messages received and stored into memory up to 60 messages When the memory is full the oldes...

Page 12: ...med line break of 600 milli seconds like hanging up momentarily that is used for accessing line features provided by your telephone company or by your telephone system For example many times a flash is used for accessing features such as Call Waiting When used in a Centrex application it can be used to access other features like Call Pick Up Call Transfer etc Contact your telephone system coordina...

Page 13: ... If the telephone is to be desk mounted plug one end of the 7 line cord into the modular jack at the rear of the telephone 2 The remaining end of the line cord plugs into the jack located on the wall 3 If the telephone is to be wall mounted use the 8 line cord supplied instead See also page 8 for more information on wall mounting your telephone Connecting the power adapter The power adapter provid...

Page 14: ...serted into the data jack which must be removed using a small tool such as tweezers BE SURE TO UNPLUG BOTH THE TELEPHONE LINE CORD AND THE POWER SUPPLY FROM THE REAR OF THE TELEPHONE PRIOR TO REMOVING THIS SAFETY PLUG Hold Key To use press the HOLD key The key will illuminate indicating that the line is on hold When placing a caller on hold the handset can be returned to its on hook position The l...

Page 15: ...number by pressing the dialing keypad or the delete key respectively 5 Press the DIAL key and the number will be dialed Wall Mounting the Telephone 1 First remove the clip provided in the set by sliding it straight up Figure 1 and replace with the Wall Mount Clip found in the packaging as shown Figures 2 3 2 Replace the desk mount wedge with the wall mount wedge To remove the desk mount wedge pres...

Page 16: ...state and the light is OFF press the key for three seconds and the TouchLite will light To turn OFF While in on hook state and the light is ON press the key for three seconds and the TouchLite will turn off Note When turning light off the Mail Icon on the LCD display will also turn off Features and options are programmed by utilizing the DIRECTORY STORE key Language option Used to change the LCD s...

Page 17: ...en display AM 1 PM 2 3 Press 1 for AM or 2 for PM 4 Press the DIRECTORY STORE key again until the LCD displays SET UP HOUR 01 then enter the current hour 01 12 5 Press the DIRECTORY STORE key to store the hour The LCD screen will then display SET UP MINUTE 00 6 Enter the two digit number of the current minutes s 00 59 press the DIRECTORY STORE key to store the minute Using The Speakerphone The spe...

Page 18: ...am a 3 second delay into memory A speed dial number may need to pause during its dialing sequence prior to entering the next set of digits to ensure proper connections Note The PAUSE function counts as 1 digit when stored into a speed dial memory location You may also adjust the ringer volume while the telephone is ringing due to an incoming call by simply pressing the VOLUME key up or down The ri...

Page 19: ...ain and the screen will go back to its normal position after a 15 second delay Ringer Volume and Ring Tone Selection There are two versions of the Regency 500 1 Version One The switch used to adjust the ringer volume is located on the right side of the telephone base To adjust the loudness of the ringing slide the switch to the desired position of HI LOW OFF The factory sets the ringer volume to t...

Page 20: ...at is already programmed into a speed dial location 1 To select a memory location press the DIRECTORY STORE key The LCD will display as follows MEM1 NAME Figure 1 Use the UP DOWN key to find the desired memory location MEM1 MEM2 MEM10 2 Press the DIRECTORY STORE key again and the LCD will display OVERWRITE Figure 2 To proceed press the DIRECTORY STORE key again and the LCD will display MEM 1 ENTER...

Page 21: ...y inserts a 3 second pause after the access code number is dialed To delete the access code 1 Press the DIRECTORY STORE key until the display screen reads ENTER ACCESS CODE 2 Press the DELETE key 3 Press the DIRECTORY STORE key again and the screen will go back to its normal position after a 15 second delay 4 Press the DIRECTORY STORE key The LCD will display a number along with a memory location ...

Page 22: ... an example to wait prior to dialing your password Allow enough time for your voicemail or Message Manager to answer 3 Press the DIRECTORY STORE key until the LCD displays ENTER PIN A personal Identification Number PIN or password can be programmed into the TouchLite memory and will be dialed after the voicemail number Press DIRECTORY STORE to retain the number or the DELETE key to change the numb...

Page 23: ...ress the UP DOWN key to change the memory location to the desired memory location MEM 1 MEM2 MEM10 See Figure 2 then 3 4 Enter the name by pressing the alphabetic characters repeatedly on the keypad see keypad guide on next page 5 Use delete key to delete an incorrect entry 6 When the name is complete press the DIRECTORY STORE key once to store the information 7 The LCD will request NUMBER Figure ...

Page 24: ...number Note When editing the voicemail PIN number or password the display will not show the last 4 characters A dash will be displayed in the characters position on the LCD Speed Dial There are 10 speed dial name and number memory locations Each location can store up to 32 digits Read these notes before beginning the programming process Note 1 Speed Dial programming must be done with the line cord...

Reviews: