12
|
Regency CI1150 Wood Cast Insert
installation
920-162
10/21/19
2
CI1150
8)
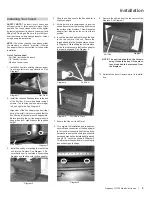
Slide the upper cast surround keyhole brackets over the loosened
screws from Step 7.
9)
Slide the upper cast surround down over the screws until it is level
and in line with the side cast pieces.
10)
Tighten both screws once all three cast pieces are level.
11)
Remove the two (2) bolts from the lower part of the brackets on the
unit - see diagram below.
12)
Move the damper control lever to the right so it is out of the way.
Note:
If the fan power cord needs to be re-routed to the right side of the
unit - go to step 16, before installing the lower cast surround piece.
13)
Line up the brackets on the lower cast surround piece with the lower
holes in the bracket on the unit. Replace the two (2) bolts - removed
in step 11.
14)
Before tightening the bolts, adjust the position of the lower cast sur-
round until it is level by sliding the brackets up or down. When in final
and level position, tighten both bolts.
7)
Loosen the two (2) top screws (with 3/16" allen key) on the left and
right brackets on the unit as shown below.
6)
Repeat Steps 3 and 5 to install right cast surround.


