30
k) "TRIM" function: Trimming
In addition to the "SUB-TR" function for setting the servo middle position, the trimming function is used , for example,
to set the straight-line stability of the vehicle.
The trimming for channel 1 (steering) and channel 2 (throttle/brake servo or speed controller) can also be
set with the rocker buttons (5 + 3) on the right-hand side of the transmitter. However, this trimming is only
temporary and will be lost after switching the transmitter off and on again. To set the trimming permanently,
do so via the setup menu.
Proceed as follows:
• If you press the knob (14) briefly, the
MODEL
function will be greyed out.
•
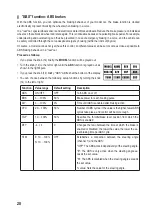
Turn the knob (14) to the left or right until the
TRIM
function is greyed out on
the display, as shown in the right figure.
• If you press the knob (14) briefly, the channel number 1 will flash at the bottom
of the display.
"ST" (= "steering") also flashes for channel 1.
"TH" (= "throttle") also flashes for channel 2.
"AUX" (= "auxiliary" = auxiliary channels) also flashes for channels 3 – 4.
The trimming cannot be changed for channels 5 and 6.
• If you press the knob (14) briefly, the setting value for the trimming travel will flash at the bottom right of the display.
•
You can change the setting by turning the knob (14) to the left or right.
The trimming can be changed to the left/right, front/back and up/down depending on the channel.
These directions typically depend on the specific model and the servo function. However, the respective
letters are displayed for the trimming.
Channel 1: (L = "Left", R = "Right")
L120....R00.....R120 = left 120.....middle.....right 120
Channel 2: (B = "Back", F = "Front")
B120.....F00.....F120 = back 120.....middle.....front 120
Channels 3 + 4: (D = "Down", U = "Up")
D120....U00.....U120 = down 120.....middle.....up 120
• If you press the knob (14) briefly, the setting value for the trimming will stop flashing. The current setting is saved.
If no indication is flashing, you can select another function to be changed by turning the knob (14).
To exit the setup menu instead, briefly press the "BACK" button (13). The transmitter will emit a short beep,
and the greyed out field will disappear from functions at the top of the display. The transmitter is back in its
normal mode.


