background image

18

Specifications

■ 

BC2601DL

Overall size(LxWxH) ····················································· 71.7x12.4x13.2(in) / 1821x315x335(mm)
Dry weight w/o acc. ····························································································· 9.6(lbs) / 4.8(kg)
Engine Type······················································································ Air-cooled 2-stroke gasoline

Model ·········································································································· Zenoah G26L
Displacement ······································································································· 25.4(cc)
Max. output ························································································· 1.2(HP)at 7500rpm
Fuel ························································································· Mixture(Gasoline 32:Oil 1)
Carburetor ··················································································· Walbro Diaphragm type
Spark plug ···························································································· Champion RCJ6Y

Fuel tank capacity ···························································································· 25.0(fl.oz) / 0.7( )
Transmission············································································ Centrifugal clutch,Rigid driveshaft
Reduction ratio ····················································································································· 1.357
Cutting head rotating direction ················································ Counter-clockwise(Operator view)
Standard Accessories

4 in. 2-line Head ········································································································ 1 pc.
Shoulder Strap ·········································································································· 1 pc.
Goggle ······················································································································· 1 pc.
Tool Kit ······················································································································ 1 pc.

Specifications are subject to change without notice.

Summary of Contents for BC2601DL

Page 1: ... or other reproductive harm WARNING OWNER OPERATOR MANUAL BRUSHCUTTERS T1077 93110 910 BC2601DL Thank you for purchasing a RedMax product Before using our brushcutters please read this manual carefully to understand the proper use of your unit DRIVE UNIT 900101 and up ENGINE UNIT 900101 and up APPLICABLE SERIAL NUMBERS ...

Page 2: ...to mechanical failure breakdown or damage Used to label supplementary instructions designed to provide hints or directions useful in the use of the product WARNING IMPORTANT NOTE SAFETY FIRST Instructions contained in warnings within this manual marked with a symbol concern critical points which must be taken into consideration to prevent possible serious bodily injury and for this reason you are ...

Page 3: ...RUSHCUTTER NOTES ON CARE AND MAINTENANCE OF YOUR BRUSHCUTTER SET UP 9 MOUNTING ENGINE INSTALLING HANDLE INSTALLING DEBRIS GUARD CONNECTING THROTTLE WIRE CONNECTING SWITCH WIRES PUTTING ON WAIST PAD INSTALLING CUTTING HEAD FUEL 10 HOW TO MIX FUEL FUELING THE UNIT OPERATION 11 STARTING ENGINE STOPPING ENGINE ADJUSTING IDLING SPEED LINE HEAD USAGE METAL BLADE USAGE MAINTENANCE 15 REFILLING TRIMMING L...

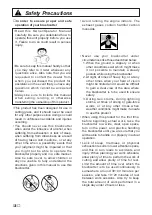
Page 4: ...brushcutter Safety Precautions Avoid running the engine indoors The exhaust gases contain harmful carbon monoxide Never use your brushcutter under circumstances like those described below 1 When the ground is slippery or when other conditions exist which might make it not possible to maintain a steady posture while using the brushcutter 2 At night at times of heavy fog or at any other times when y...

Page 5: ...n a mixed fuel which contains highly flammable gasoline This fuel is highly flammable and you should never store cans of fuel or refill the tank of the brushcutter in any place where there is a boiler stove wood fire electrical sparks welding sparks or any other source of heat or fire which might ignite the fuel Smoking while operating the brushcutter or refilling its fuel tank is extremely danger...

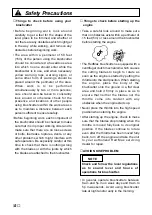
Page 6: ...t there is nothing wrong with the blades or with the joints by which the blades are attached to the brushcutter Things to check before starting up the engine Take a careful look around to make sure that no obstacles exist within a perimeter of 15 feet 5m or less around the brushcutter before starting the engine The RedMax brushcutter is equipped with a centrifugal clutch mechanism which causes the...

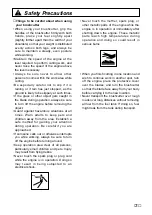
Page 7: ...sh a safe method for gaining your attention during operation Be careful if you are approached If someone calls out or otherwise interrupts you while working always be sure to turn off the engine before turning around Keep operation area clear of all persons particularly small children and pets Injury may result from flying debris Never touch the spark plug or plug cord while the engine is in opera...

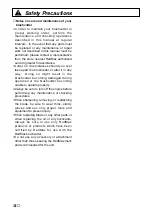
Page 8: ...hcutter or alter it in any way Doing so might result in the brushcutter becoming damaged during operation or the brushcutter becoming unable to operate properly Always be sure to turn off the engine before performing any maintenance or checking procedures When sharpening removing or reattaching the blade be sure to wear thick sturdy gloves and use only proper tools and equipment to prevent injury ...

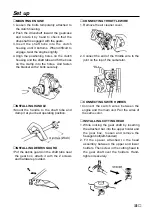
Page 9: ...erating position INSTALLING DEBRIS GUARD Put the debris guard on the shaft tube near the gear box attach it with the 2 screws and hardware provided CONNECTING THROTTLE WIRE 1 Remove the air cleaner cover 2 Connect the end of the throttle wire to the joint on the top of the carburetor CONNECTING SWITCH WIRES Connect the switch wires between the engine and the main unit Pair the wires of the same co...

Page 10: ... be mixed 2 Put some of the gasoline into a clean approved fuel container 3 Pour in all of the oil and agitate well 4 Pour in the rest of gasoline and agitate again for at least one minute 5 Put a clear indication on the outside of the container to avoid mixing up with gasoline or other containers 6 Indicate the contents on outside of container for easy identification FUELING THE UNIT 1 Untwist an...

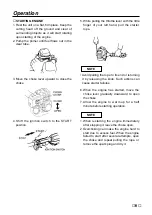
Page 11: ... your left hand pull the starter rope Avoid pulling the rope to its end or returning it by releasing the knob Such actions can cause starter failures 6 When the engine has started move the choke lever gradually downward to open the choke 7 Allow the engine to warm up for a half minute before starting operation 1 When restarting the engine immediately after stopping it leave the choke open 2 Overch...

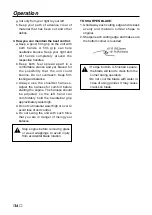
Page 12: ...d and is tilted about 20 degrees toward the sweep direction 2 Use full throttle when cutting 3 You can avoid thrown debris by sweeping from your left to the right 4 Use a slow deliberate action to cut heavy growth The rate of cutting motion will depend on the material being cut Heavy growth will require slower action than will light growth 5 Never swing the unit so hard as you are in danger of los...

Page 13: ...lade bounce can cause serious personal injury Carefully study this section It is important that you understand what causes bounce how you can reduce the chance of bounce and how you can remain in control of the unit if bounce does occur 1 What causes blade bounce Bounce can occur when the moving blade contacts an object that it cannot cut This contact causes the blade to stop for an instant and th...

Page 14: ...mfort before starting the engine The harness should be adjusted so the left hand can comfortably hold the handlebar grip approximately waist high d Do not cut material waist high or over to avoid loss of unit control e Do not swing the unit with such force that you are in danger of losing your balance Stop engine before removing grass or weed wrappings to avoid injury from accidental blade rotatio...

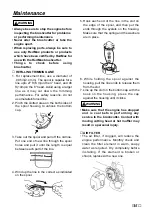
Page 15: ...e end of new line through the spool holes and pull it until the length is equal between each part of the line 4 Wind up the line in the correct as indicated on the spool WARNING 5 Hook each end of the line in the slot on the edge of the spool and then put the ends through the eyelets on the housing Make sure that the spring and the washers are in place 6 While holding the spool against the housing...

Page 16: ...supply check the fuel cap and the fuel filter for blockage SPARK PLUG Starting failure and mis firing are often caused by a fouled spark plug Periodically clean the spark plug and check that the spark gap is in the correct range For a replacement plug use the correct type specified by RedMax See SPECIFI CATIONS on the page 18 REPLACEMENT PLUG IS A CHAMPION RCJ6Y OR THE EQUIVALENT SUCH AS BOSCH WSR...

Page 17: ...severe burns When checking the brushcutter to make sure that it is okay before using it check the area around the muffler and remove any wood chips or leaves which have attached themselves to the brushcutter Note that failing to do so could cause the muffler to become overheated and that this in turn could cause the brushcutter to catch on fire Always make sure that the muffler is clean and free o...

Page 18: ...P at 7500rpm Fuel Mixture Gasoline 32 Oil 1 Carburetor Walbro Diaphragm type Spark plug Champion RCJ6Y Fuel tank capacity 25 0 fl oz 0 7 Transmission Centrifugal clutch Rigid driveshaft Reduction ratio 1 357 Cutting head rotating direction Counter clockwise Operator view Standard Accessories 4 in 2 line Head 1 pc Shoulder Strap 1 pc Goggle 1 pc Tool Kit 1 pc Specifications are subject to change wi...

Page 19: ...arts list then use parts number described in the parts list 4 The contents described in the parts list may change due to improvement 5 The parts for the machine shall be supplied seven 7 years after the machine is discontinued It is possible that some specific parts may be subject to change of their delivery term and list price within the limit of ten 7 years after the machine is discontinued It i...

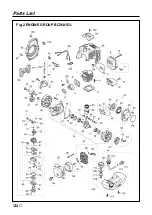
Page 20: ...Parts List 20 Fig 1 TRIMMER GROUP BC2601DL ...

Page 21: ...REW 00263 90525 1 36 PLATE NAME T3051 12510 1 37 PLATE 6425 12552 1 38 HANDLE ASS Y 6420 14100 1 39 HANDLE 6420 14311 1 40 CLAMP 6420 14320 1 41 SCREW 00263 90535 4 42 GUARD ASS Y T3002 24001 1 43 GUARD COMP T3002 24101 1 44 BLADE T3002 24121 1 45 SCREW 00263 90516 1 46 NUT 3320 15310 1 47 PLATE 6489 24120 1 48 BOLT 01252 30514 4 49 STRAP ASS Y T3002 17200 1 50 TOOL SET T3051 91000 1 Key Descripti...

Page 22: ...Fig 2 ENGINE GROUP BC2601DL 22 Parts List ...

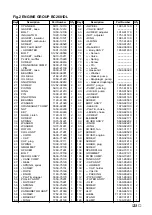
Page 23: ...5201 1 54 RATCHET 1850 75221 1 55 SPRING 1850 75230 1 56 SCREW 0263 90416 4 57 CARBURETOR ASS Y 5911 81000 1 58 SCREW 1752 81110 2 59 BRACKET 5500 81120 1 60 RING 1751 81130 1 Key Description Part Number Q ty 61 SWIVEL 1881 81140 1 62 VALVE ASS Y 1 63 SCREW adjuster 1918 81170 1 64 NUT adjuster 1751 81180 1 65 RING 1881 81130 1 66 O RING 1751 81240 1 67 JET 5500 81251 1 68 Rebuilt Kit 5602 06030 1...

Page 24: ...SION RELATED PART ON YOUR ENGINE IS DEFECTIVE THE PART WILL BE REPAIRED OR REPLACED BY KOMATSU ZENOAH Co OWNER S WARRANTY RESPONSIBILITIES AS THE LAWN AND GARDEN EQUIPMENT ENGINE OWNER YOU ARE RESPONSIBLE FOR THE PERFORMANCE OF THE REQUIRED MAINTENANCE LISTED IN YOUR OWNER S MANUAL KOMATSU ZENOAH Co RECOMMENDS THAT YOU RETAIN ALL RECEIPTS COVERING MAINTENANCE ON YOUR LAWN AND GARDEN ENGINE BUT KOM...

Page 25: ...TY MAY BE USED IN NON WARRANTY MAINTENANCE OR REPAIRS AND SHALL NOT REDUCE THE WARRANTY OBLIGATION OF THE COMPANY THE COMPANY IS LIABLE FOR DAMAGES TO OTHER ENGINE COMPONENTS CAUSED BY THE FAIRURE OF A WARRANTED PARTS STILL UNDER WARRANTY THE WARRANTY DOES NOT APPLY TO THOSE UNITS WHICH HAVE BEEN DAMAGED BY NEGLIGENCE OF INSTRUCTION LISTED IN THE OWNER OPERATOR MANUAL FOR PROPER USE AND MAINTENANC...

Page 26: ...KOMATSU ZENOAH AMERICA INC 4344 Shackleford Road Suite 500 Norcross Georgia 30093 Printed in Japan ...

Reviews: