


50
Chapter 4. Red Hat Network Website
Note
If you are using
up2date
version 3.1 or higher, any dependency-related errors generated by the
attempted package removal are displayed on the page.
•
Upgrade
— Displays a list of packages that have a new version available based on the package
versions in the channel for the system. Click on the latest package name to view its
Package
Details
page. To upgrade packages immediately, select them and click the
Upgrade Packages
button. To download the packages as .tar files, select them and click the
Download Packages
button. Refer to Section 4.6.5.2
Package Download
for details.
•
Install
— Enables you to install new packages on the system from the available channels. Click
on the package name to view its
Package Details
page. To install packages, select them and click
the
Install Selected Packages
button.
•
Profiles
— Gives you the ability to compare the packages on this system with the packages of
stored profiles and other Enterprise systems. To make the comparison with a stored profile, select
that profile from the pulldown menu and click the
Compare
button. To make the comparison with
another system, select it from the associated pulldown menu and click the
Compare
button. To
create a stored profile based upon the existing system, click the
Create System Profile
button,
enter any additional information you desire, and click the
Create Profile
button.
•
Channels
— Provides a predetermined method for systems to obtain regular updates, based upon
their operating systems, packages and, functionality. Click a channel name to view its
Channel
Details
page. To modify the child channels associated with this system, use the checkboxes next
to the channels and click the
Change Subscriptions
button. You will receive a success message
or be notified of any errors. To change the system’s base channel, select the new one from the
pulldown menu and click the
Modify Base Channel
button. Refer to Section 4.6.1
Channels
for
more information.
•
Groups
— Lists the system’s associated groups and enables you to change these associations. This
tab appears only for systems with Enterprise entitlement. To modify the system’s groups, select
or unselect them and click the
Update Membership
button. Click on a group’s name to go to its
System Group Details
page. Refer to Section 4.4.3.3
System Group Details
for more information.
•
Notes
— Provides you with a place to create notes about the system. To add a new note, click the
create new note
button, type a subject and details, and click the
Create
button. To modify a note,
click on its subject in the list of notes, make your changes, and click the
Update
button. To remove
a note, click on its subject in the list of notes and then click the
delete note
button.
•
Events
— Displays past, current, and scheduled actions on the system. You may cancel pending
events here.
•
History
— The default display of the
Events
tab lists the type and status of events that have
failed, occurred or are occurring. This list is automatically generated. To view details of an event,
click its summary in the
System History
table.
•
Pending
— Lists events that are scheduled but have not begun. To unschedule a pending event,
select the event and click the
Cancel Events
button at the bottom of the page.
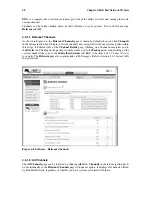
4.4.3. System Groups
The
System Groups
page allows all RHN Enterprise users to view the
System Groups
list. Only
Organization Administrators may perform the following additional tasks:
Summary of Contents for ENTERPRISE LINUX
Page 1: ...Red Hat Network Enterprise User Reference Guide 2 1 ...
Page 14: ...6 Chapter 1 What is Red Hat Network ...
Page 42: ...34 Chapter 2 Red Hat Update Agent ...
Page 46: ...38 Chapter 3 Red Hat Network Alert Notification Tool ...
Page 78: ...70 Chapter 5 Red Hat Network Daemon ...
Page 80: ...72 Chapter 6 Using Red Hat Network with Red Hat Linux 6 2 ...
Page 94: ...86 Chapter 7 Red Hat Network Registration Client ...
Page 100: ...92 Glossary ...
Page 104: ......


