REBOTEC / BA No.: 02.07.147/2017-01
GB
- 2 -
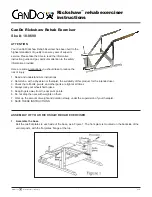
Product description
Dia 1
Seat - PS
Seat PU (2-parts)
Dia. 2
Dia. 3
Chair diagram shows:
A
Rotation adjustment for PUR headrest
B
Backrest
C
Armrest (foldable)
D
Latching pins for armrest
E
Chair frame with incline adjustment
F
Castors with locking brakes
G
PUR headrest (replaceable)
H
PUR back upholstery (removable)
I
PUR seat upholstery (removable)
J
PUR seat, care opening, pan holder
K
PUR leg rest (removable)
L
Foot support with footrest (adjustable)
M
Locking lever for inclination setting
N
Toilet pan with lid (removable)
O
PUR transport seat (removable) (Dia. 2)
P
PUR seat, care opening with pad (Dia. 3)
Q
Lifting unit for seat height adjustment
R
Linear actuator
S
Control unit with hand switch
Z
Product nameplate
Table of contents
1.
General advisories
3
1.1
Introduction
3
1.2
Note LINAK mounting instructions
3
1.3
Intended proper use
3
1.4
Symbols used
3
1.5
Use and storage
3
1.6
Equipment
3
2.
Warranty
4
3.
Nameplate, ordering spare parts
4
4.
Re-use, product lifetime
4
5.
Disposal
4
6.
Safety advisories for use
4
7.
Product specifications
5
7.1
Delivery scope
5
7.2
Technical specifications
5
8.
Spare parts, accessories
6
9.
Setting up the chair for use
6
9.1
Position of the footrests
7
9.2
Adjusting the foot plate height
7
9.3
Installing, adjusting the headrest
7
9.4
Setting the inclination
7
9.5
Setting the headrest angle
8
9.6
Adjusting the seat height
8
9.7
Installing/removing the safety belt
8
10.
Electronic components
8
10.1
Battery
8
10.2
External battery charger
9
10.3
Control unit
10
10.4
EMERGENCY STOP function
10
10.5
Hand switch
10
10.6
Linear drive
11
11.
Using the chair
11
11.1
Sitting down
11
11.2
Standing up
11
11.3
Sitting and laying / low position
12
11.4
Sitting and laying while lifting
12
11.5
Using the castor locking brakes
12
11.6
Removing the seat pad
12
11.7
Folding away the footrests
12
11.8
Swiveling away the armrests
12
11.9
Removing the footrests
13
11.10
Using the commode pan
13
12.
Troubleshooting
13
13.
Care
13
14
.
Maintenance and upkeep
14
14.1
Maintaining the chair
14
14.2
Maintaining electronic components
14
14.3
Upkeep
14
O
P
K
Z
B
D
J
H
L
I
F
E
A
C
Z
M
N
S
Q R