background image

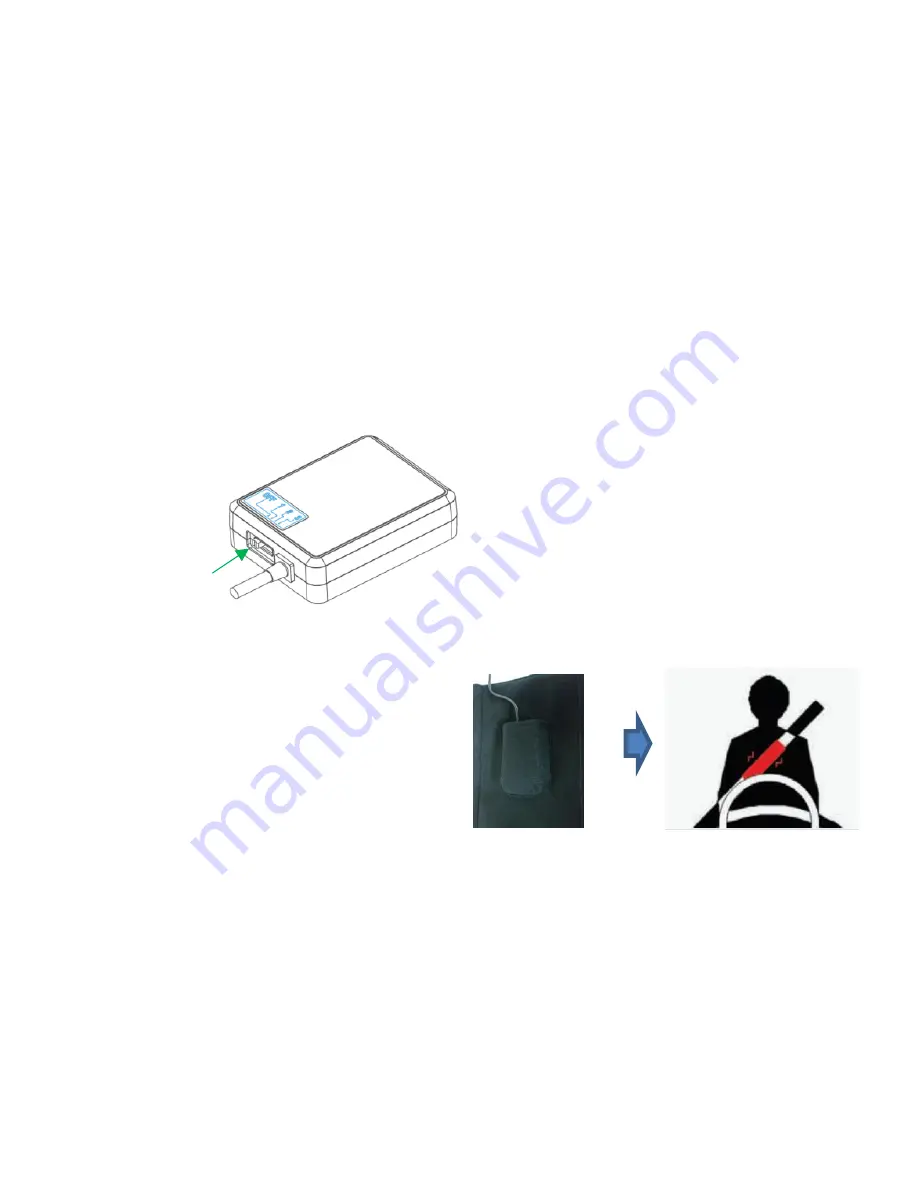
[Vibrator] 

Strength 

Adjustment 

Lever 

Warnings can be effectively sensed by the driver through the instant vibratory warning method. 
The vibration strength can be adjusted from level 1 to level 3 or can be turned off.


* How to apply vibratory device

Place the vibrator inside the pocket of cover and wrap around the seat belt 

(Sold Separately)

Summary of Contents for RVS-OP7

Page 1: ...User Manual RVS OP7 Optian 7 Driver Assist System with DVR ...

Page 2: ... assist system that can help a driver to avoid or mitigate any accidental collisions by utilizing vision sensor ADAS functions are designed to assist the driver however it is not a substitute for careful driving and we take no responsibility for any damage caused by careless driving This manual is under the protection of copyright law and all the rights are legally protected Except in some legally...

Page 3: ...Vehicle s Turn Signal Connection Low speed Front Collision Warning Easy But Professional Installation Mode Full HD Crystal Clear Image Quality Overheating Prevention System Driving DIT data Collection and Management Specialized B2B Fleet Management Tool Main Features of ADAS CAM ...

Page 4: ...Display Module RS232 U ART Communication Vibrator Security Lock Cover Key Optional Features ...

Page 5: ...tents 1 Safety Caution Warning Caution 2 Accessories Functions 3 Product Installation 4 Main Functions Check Accessories Main Body Functions Pin Map Guide Secondary extra Camera Precautions Basic Installation FCW LDW FCDA Installation Mode Camera Settings PD DVR DIT Digital Image Tachometer Video Playback Configurations Vehicle Type Settings Voice Settings 9 Optional Devices Display Vibrator Cover...

Page 6: ...fire User is responsible for the damage in this case Do not install the product in a location where it interferes with driver s vision Do not change settings while driving on the road as it may cause traffic accident Do not remove or insert the power cable with wet hands as it may cause electric shock Keep product accessories away from children to prevent children from swallowing small accessories...

Page 7: ...ications Do not use other SD cards manufactured for normal consumer electronics Do not remove SD card when the product is operating as it may cause product damage Only remove the Micro SD card when the product is powered off completely Remove and Keep Micro SD card with care after accidents being recorded Incident video files may be overwritten by new video files if not removed from the product Mi...

Page 8: ...mproperly When the horizon line calibration is incorrect The ADAS functions only work when the speed rate received from GPS signal is above the set operating speed threshold If the speed data cannot be received properly it may cause ADAS malfunctions Tinted windscreens will affect the brightness and clarity of recorded videos Windscreen metallic films may cause GPS signal loss Keep the camera lens...

Page 9: ...of the above accessories are subject to change according to the components supply Above images are just to help user s understanding actual components may look a little different Security Cover Lock Display Module Optional Accessories Vibrator Accessories Functions Dual HUB Secondary Camera 6p mount ...

Page 10: ... Full HD Internal GPS Security LED Volume Adjustment Button Menu Button Touch LCD Manual Recording Button REC Camera Angle Adjuster MIC DC power port 3 5 pi Micro SD card socket Power Supply Connection Extra Secondary Camera Connection ...

Page 11: ...ted via HUB Dual HUB to Vehicle Wire Pin Map to deactivate Parking CCTV Mode connect twisted RED and VIOLET wires to ACC IG to activate Parking CCTV Mode connect corresponding RED and VIOLET wires to ACC IG and B B Speed and Brake wire connections are optional Main Body Vehicle Display Vibrator Comm No Signal Cable Color 1 ACC IG RED 2 B VIOLET 3 BRAKE BROWN 4 WIPER GREEN 7 TURN_R YELLOW 8 TURN_L ...

Page 12: ... R Button DC Power Port Indicating LED Normal N Rear images are shown in an opposite direction to those shown in the room mirror but the number plate of the car in the rear appears normal Reverse R Mirror Screen Rear images are shown in the same direction as those shown in the room mirror but the number plate of rear side car is in an opposite direction ...

Page 13: ...een in Bus or Truck Sedan RV Bus Truck Reflections of objects may affect the video quality and ADAS performance avoid placing or installing reflective objects on the dashboard Metallic films or tinted windshield may affect GPS receiving avoid installing closer to the metallic films or tinted areas When using speed wire connection instead of GPS speed reading please change GPS to Pulse in PC manage...

Page 14: ...mera angle is wrongly adjusted Guide line is below the horizon Bad If the calibration is not done on flat ground ADAS functions may not perform properly Ensure to calibrate camera on flat ground After the calibration if the view angle is different with Correct Angle Adjustment in the image above please rotate the camera adjuster to recalibrate correctly ...

Page 15: ...stall the main body and basic components Please read carefully before installation Place the bracket as shown in the image hang the bracket on the GPS module Press the bracket and slide it upwards until it is fixed with a click sound How to tighten the bracket ...

Page 16: ...tor to Dual HUB at the finish connect the vehicle cable If the product and optional devices are connected when turned on vehicle power is applied to Dual HUB it may cause internal product damages It is recommended to change settings when vehicle power is switched to IG status If Camera Reset is done in an unstable shaking condition ADAS functions may not perform properly 4 Connect power cable to v...

Page 17: ... side When attaching the secondary camera to the rear window avoid installing directly on heat wires Caution Ensure to connect the secondary camera after turning off the power of the main body The secondary camera may not be sensed if the camera is connected with the power of the main body on After mounting the camera check through a monitoring screen if the direction of the image is in a correct ...

Page 18: ...ss OK to continue Check whether power is connected properly Switch to ACC On status and press OK Choose the desired connection method Vehicle Power wire Connection Press OK Cigar Jack Connection Press No The notice screen will appear if the connection is correct Check whether power is properly connected Turn off engine completely and press OK The error message will appear if connection is incorrec...

Page 19: ...t and check if the left arrow in the display is On Press YES if the left arrow light turns on YES The vehicle signal is incompatible with product signal Change the signal by changing High Low LOW HIGH HIGH LOW NO If only 1 arrow is on check the cable connection again If both arrows are off return to the turn signal check screen YES Turn on Right indicator light and check if the right arrow in the ...

Page 20: ...n upward turn downward Input the exterior width of vehicle by pressing the arrow button Press OK after inputting the value OK button will be ON with the acoustic alarm when calibration is done correctly Press OK to continue From the driver s point of view select the installation position Press OK to continue Setup has been completed Input the distance from the center of windshield to the installed...

Page 21: ...udible Alarm Timing Indication ex 0 7 0 9 in monitoring display mode FCW Relative Speed Warning To alert the driver to an impending crash while driving on the road The variables are the relative speed and the distance to a preceding vehicle Warning Consecutive Series of Audible Alarms Vehicle Icon blinks in monitoring display mode Warning Sensitivity can be adjusted in manager program 3 FCW functi...

Page 22: ...ion only works when the driving speed is over the set operating start speed Default Operating Start Speed 60km h Operating Start Speed can be adjusted from 40 80 km h in ADAS CAM menu 3 Continuous lane changing within 2 seconds will not activate the alarm For cigar jack connection notice that the LDW function will generate a warning signal every time the driver changes the driving lane even with t...

Page 23: ...1st FCDA alarm the 2nd FCDA alarm can only be generated after 5 seconds 4 FCDA works as a helpful driver assist function while waiting at traffic lights or in traffic congestion ADAS functions are designed to assist the driver in avoiding or mitigating accidental collisions ADAS functions are not a substitute for careful driving and we take no responsibility for any damage caused by careless drivi...

Page 24: ...to forward looking while driving driver attention should remain focused on the road at all times Driver is solely responsible for careful driving 4 PD function works in following conditions When the pedestrian has an average adult height approximately 160 180cm tall When the full body of pedestrian is visible When the pedestrian is within the range of 15m in front 5 PD may not work in following co...

Page 25: ...Parking Event Recording Parking event can be continuously recorded If an impact is detected it will record data into Event folder 3 Parking Mode Parking Mode can be activated when the vehicle is turned off and will be deactivated when the ignition is turned on If an impact is detected in parking mode it will record the event into the Event folder If a motion is sensed in parking mode it will recor...

Page 26: ...a for around 60 days if over 60 days the oldest files will be overwritten by the newly recorded files Dependent on the recorded image file size the recorded data of 60 days may not be stored properly 60 days based on 8 hrs of recording per day 2 DIT Function Settings Turn ON DIT in Special tab of manager program 3 DIT Check Press in the manager program to switch to DIT mode to check date and time ...

Page 27: ...en will appear followed by a voice message Hi have a nice and safe trip today Logo Image Loading Image The Logo Loading images can be replaced upon request Even power is connected to B the product will automatically restart when starting vehicle engine Start ...

Page 28: ...ber Shows the vehicle speed 80 as shown in the image The horizon guide line shows the lane lines are being detected When it generates LDW signal the lane lines will turn red Home Button Switches to the main menu Camera Button will change between Front and Rear camera views FCW Button turns ON OFF FCW function LDW Button turns ON OFF LDW function FCDA Function turns ON OFF FCDA function Screen Type...

Page 29: ... a warning signal Collision Warning The red vehicle icon will blink twice FCDA The Green Vehicle icon will blink twice HMW Time to collision indicating at the center of screen PD A pedestrian icon will blink in Red Vehicle Speed indicated on the left side of screen as a number Press ADAS display screen a second time to enter into power saving mode and press again to switch to the Live Monitoring m...

Page 30: ... CAM Turn ADAS functions ON OFF and configure operations 2 DVR Change settings relevant to recording monitoring and resolution 3 Playback Play recorded videos 4 Configurations Change settings of system volume voice alarm operation environment and SD card data format 5 Vehicle Type Setting Choose the vehicle type and change the installation position 6 Exit Return to the front monitoring mode and st...

Page 31: ...Default value 20km h adjustable from 20 80 km h HMW The warning function is to keep a safe distance between vehicles Warning Sensitivity sensitivity can be set from Sensitive Normal and Insensitive 3 LDW Operating Speed press the Left Right arrow to change Default value 60km h adjustable from 40 80 km h Warning Sensitivity can be adjustable from 1 9 The higher warning level can lead to a more resp...

Page 32: ...ve level 2 Resolution Setting The recording resolution can be changed Stored data has limited allocated capacity inside Micro SD card Resolution Continuous Event Parking Remark Full HD 200 min 60min 120min 1CH Based on 32GB HD 320min 100min 120min The number of recorded files vary according to the capacity of Micro SD card Oldest files will be overwritten when the capacity of SD card is fully occu...

Page 33: ... checked instantly 1 Continuous Event Parking Continuous Select and check recorded files Event Select and check the event files recorded during driving and parking Parking Select and check recorded files in parking mode Select the file and press the play button to check When pressing stop button it will return to the file list page scroll upward downward to change play the selected video file User...

Page 34: ... message be careful of Left Right lane will be generated FCDA The voice message Check ahead will be generated Even when voices are turned off warning alarms still be generated FCW only generates the alarming sound without the voice guide 3 SD Card Data Format Delete all the data stored in Micro SD to maintain the file system Critical event files should be stored separately prior to SD card data fo...

Page 35: ...f the rear camera of the main body PIP It displays front and rear images simultaneously Rear PIP screens are supported only when the secondary camera is connected Screen Save sets up LCD display status Even in Always On state different modes can be switchable in between Front monitoring ADAS display Screen OFF by touching the LCD 4 2 LCD Display Speed When ON is selected it displays the speed valu...

Page 36: ...English 4 4 System Info User can check S W H W Version information When Reset Setup button is pressed the values stored in the system will be initialized and the system will enter into Install Mode return to the previous menu Configuration ...

Page 37: ...all OPTIAN installation settings If values entered through Install mode are arbitrarily modified it may cause ADAS function errors 1 Vehicle Type Choose vehicle type 2 Position Choose installation position of ADAS CAM Attached position is based on the driver s view inside the vehicle If the product is attached to the right or left side of the windscreen please select the applicable position and in...

Page 38: ...dth Blinker Active If the display arrow light blinks continuously even when turn indicators are off change High Low settings of Blinker Active in the Dimensions menu Measure the height from the ground to the main body of camera 4 Reset Camera Reset the camera values Press Reset Camera button to activate install guide Vehicle Type Setting ...

Page 39: ...he manager program Recommended PC Specification OS Window7 8 10 32 64bit H W Dual Core 3 4GHz or above 2G RAM or above Internet Brower Microsoft Internet Explorer 11 or above Direct X version Direct X 9 0 or above DATA MANAGER 1 Release the provided zip file 2 If setup exe is launched user can install by following Visual C 2010 Runtime Libraries x86 guide 3 Install OPTIAN 7 Viewer program 4 A desk...

Page 40: ...ar 6 Video Play Bar 7 Video Play Time 8 Video Volume 9 Speed Indication 10 Compass 11 Recording Date GPS co ordinates 12 Acceleration sensor data impact level speed graph 13 Play DIT Mode Change 14 File list window Open Close button 15 File list sort out button 16 Classification of Normal Event Parking modes 16 ...

Page 41: ...4 ADAS display screen 5 Manager Menu bar 11 Recording Date GPS co ordinates 12 Acceleration sensor data impact level speed graph 13 DIT mode exclusive buttons Screen Composition DIT Mode 6 Video Play Bar 7 Video Play Time 8 Video Volume 9 Speed Indication 10 Compass ...

Page 42: ...Play x 2 Print the main screen image Switch to DIT mode View Acceleration Impact Speed graph in detail Switch to Player mode Switching between acceleration and G sensor button Indicate vehicle tracking mark Press the G sensor button to view the speed Over speed time setup Press the speed button to view the acceleration Continuous file list Download the playing video to a selected folder Automatic ...

Page 43: ... to set up the starting speed of LDW operation and the warning sensitivity of left and right lane changes A Higher value can enable a more responsive warning min 1 max 9 4 FCDA to change the standby time after the first alarm is triggered 5 PD PD function ON OFF ADAS CAM Press the configuration button to set up ADAS DVR and B2B special functions Set Up Main Function ...

Page 44: ...revention 4 Motion Level to adjust the motion detection sensitivity during parking hrs 5 Resolution to set up the resolution of recorded images The higher the resolution of the image is the shorter the time of recording cycle becomes 6 Impact Level for G sensor to adjust the sensitivity of event recording in detail A smaller value can enable a more sensitive impact detection setting DVR X Front Y ...

Page 45: ... for each function 3 LCD Setting to set up main body external device and PIP screen output on LCD to set up the Screen Save mode 4 LCD Display to turn ON OFF icons of speed ADAS graphic and display of horizontal line on LCD screen to set up the speed unit type 5 Language to change the language of the Manager program SETUP ...

Page 46: ...n setup is not properly done 3 Other Settings Brake Activation Signal When brake wire is connected choose HIGH LOW type which is indicating on LCD display by pressing the brake Turn Active Signal when blinker wires are connected choose HIGH LOW type which is indicating on LCD display when turning on the blinker Vehicle Pulse When a speed signal cable is connected input the pulse value of the vehic...

Page 47: ...1 Time Zone GMT can be set Press Apply Current PC Time zone to sync with the GMT setting of your PC 2 Function On Off to turn ON OFF B2B special function Special ...

Page 48: ...r Check When video is recorded properly a blinking REC sign will appear on the video monitor or ADAS display mode If REC sign does not appear there is an error in Micro SD card and user will need to replace or format the Micro SD card Data Backup The recorded data may be deleted as time passes It s necessary to save important data separately or keep the SD card separately SD Card Format Method Ple...

Page 49: ...Q ADAS warning function does not operate Check if the function is set to OFF Check if the volume is set to 0 Check if GPS is being received and if ADAS function setting speed is normal Check if the model of the car and the adjustment of horizontal line are correctly set up Q lane departure warning is too slow or too fast Check if the adjustment of horizontal line the model of the car and the mount...

Page 50: ...ent Angle Adjustment Screw UI UI Meaning Number HMW Time to Collision Recording Activated Vehicle Detection Warning Lane Detection Warning Pedestrian Detection Warning Turn Signal Activation Brake Signal Activation when brake wire is connected Error or Functions OFF Sold Separately ...

Page 51: ...sed by the driver through the instant vibratory warning method The vibration strength can be adjusted from level 1 to level 3 or can be turned off How to apply vibratory device Place the vibrator inside the pocket of cover and wrap around the seat belt Sold Separately ...

Page 52: ... Cover Lock Top Head Tape Bottom Keyhole Open OPTIAN Cable Lock Position The Cover Lock is designed to prevent theft and unauthorized setting changes Key OPTIONAL DEVICES ...

Page 53: ...ecording Mode CCTV Event Manual Parking Maximum Electric Consumption 5 6W SD card type Micro SDHC card Class10 Default 32GB Storage Temperature 40 85 Recording Frame Front 27fps Rear 30fps Operating Temperature 20 70 Video H 264 extension AVI Minimum Operating Illumination 1lux Voice Recording Sensitive internal condenser MIC Weight 155g 54 The specification of ADAS CAM is subject to change withou...

Reviews: