P a g e
| 6
Bee9 User's Manual
Reach/BTX
6.
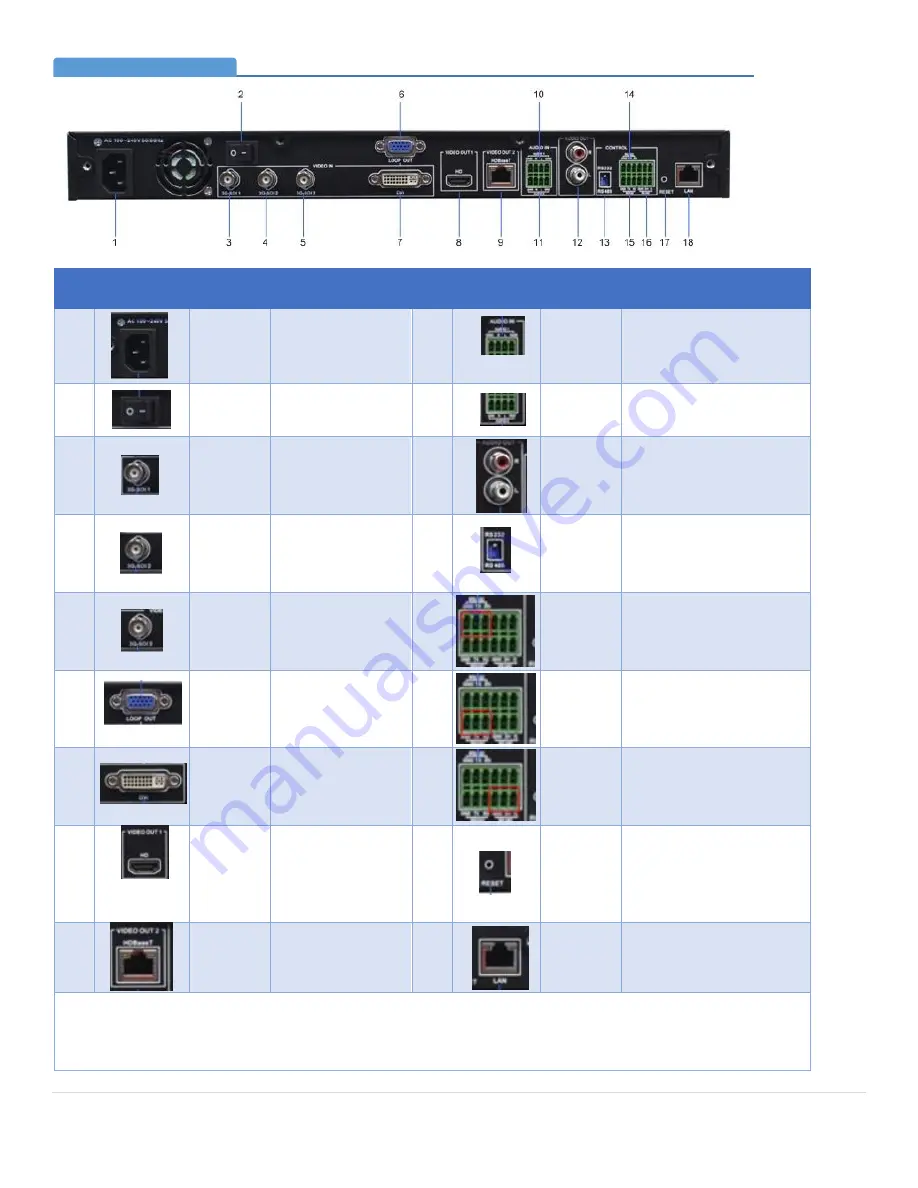
Rear Panel
No.
Image
Item
Description
No.
Image
Item
Description
1
Power
Input
AC 100~240V input 10
Audio 1
Reserved for future use
2
Power
Switch
Power on/off
11
Audio 0
2 channel unbalanced
audio input
3
3G-SDI 1
1
st
HD video SDI
input port,
Presenter close-up
camera input
12
LINE OUT
Audio loop out port
4
3G-SDI 2
2
nd
HD video SDI
input port,
Classroom wide
camera input
13
RS232/RS
485
Control protocol switching
5
3G-SDI 3
3
rd
HD video SDI
input port,
Presenter wide
camera input
14
RS232
Control
Interface
Reserved for future use
6
LOOP
OUT
Reserved for future
use
15
RS232
Control
Interface
RS232 for Presenter close-
up camera PTZ control,
the protocol switch should
set to the RS232 position
7
DVI
Digital, analog VGA
signal input port
16
RS485
Control
Interface
RS485 for Presenter close-
up camera PTZ control,
the protocol switch should
switching to RS485 side
8
HDMI
HD video output
port, with output
of movie mode
video
17
RESET
Reset button, which
provides access to backup
system for main system
upgrading in case that the
main system is damaged*.
9
HDBase-T Reserved for future
use.
18
LAN
Network connection
*Turn off power to the Bee9, press and hold RESET switch with a straightened paper clip, power-up the unit
while continuing to hold the reset switch for 5 seconds then release. After Bee9 is restarted, enter the IP address
indicated on the LCD display in a browser. Log into the backup system page and perform a system reload. Details
of the reload procedure are included in the appendix.
Bee9 Connectivity Detail (Rear Panel)
Section 4


