background image

APOLLO FYM - SPREADER CONTROLLER

14

5.

Spreader Setup

5.1

Working Width

5.1.1 Set current Working Width

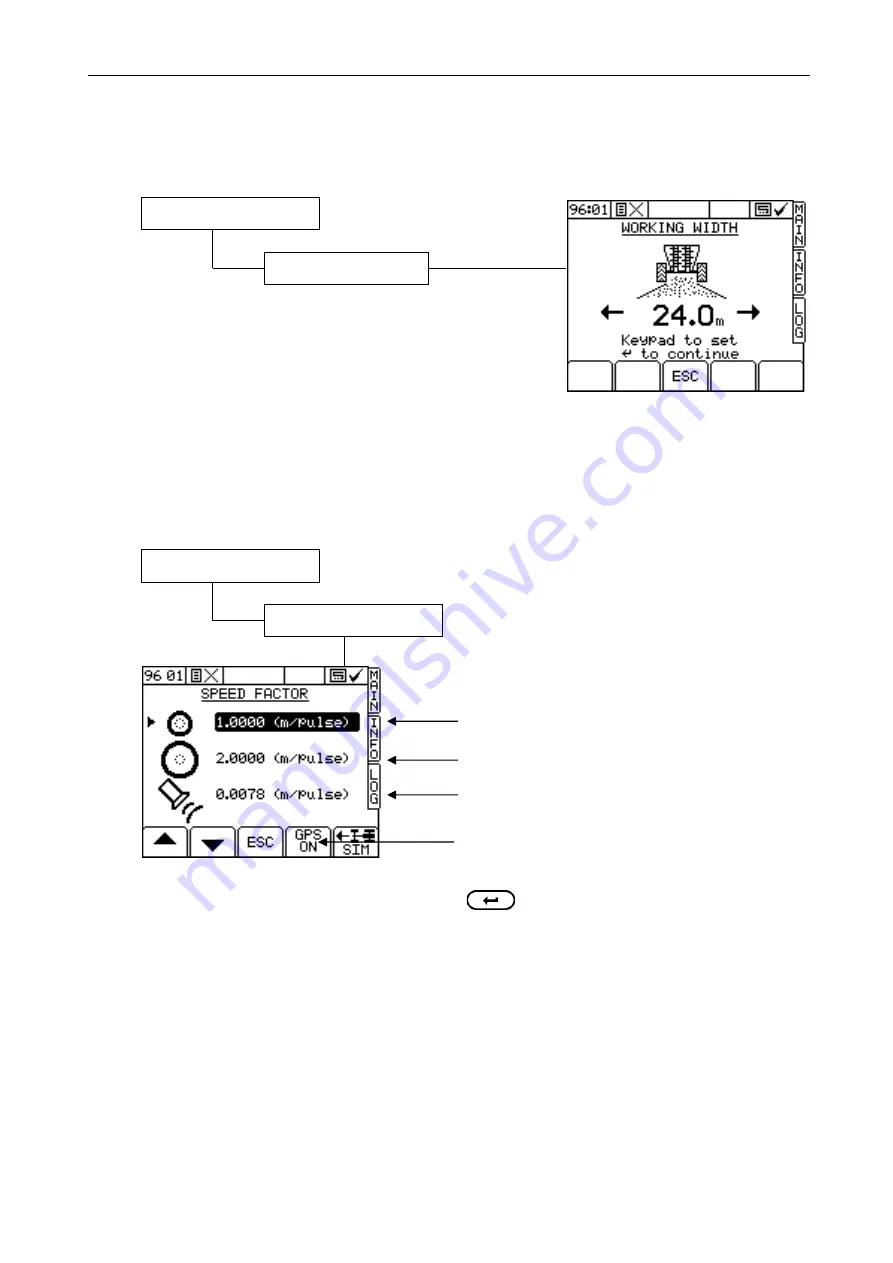
Using the numeric keypad, type in the current working width and

use the ENTER button to confirm,

5.2

Forward Speed Sensor

5.2.1 Select Sensor Option

2. Move the arrow cursor to select the option and press                  to confirm.

5.2.2 Wheel sensor calibration – ‘Autocal’

If the Spreader has a standard wheel sensor and magnets installed, you can programme the instrument with

two  speed  sensor  factors - for  flotation  tyres  and  for  row  crop  wheels.  Remember  to  select  the  appropriate

factor after changing wheels.
The Speed Sensor Factor ("SSF") is the distance travelled  forward in the time between two pulses from the

forward speed sensor. This could be calculated based on the nominal tyre diameter or rolling distance and

then entered manually (ref. section 1.1.3), however this does not take into account wheel slip, compaction, or

tyre deformation under practical operating conditions.
The best method is to do an "Auto Cal".
Mark  a  set  distance  of  100  metres  (or  100  yards  depending  on  the  units  set  on  the  instrument)  by  suitable

means.  The  surface  should  be  representative  of  the  average  field  conditions  (i.e.  not  a  paved  surface).

Position the vehicle with the first marker level with a suitable reference point on the vehicle.

Wheel Sensor - for flotation tyres

Wheel Sensor - for (larger) row crop wheels

Radar Sensor / RDS ‘Satspeed’ Interface

UK57201.PCX

DGPS input (this option only appears when top port is
configured for GPS input)

1.

Spreader Setup

1.

Working Width

UK572-02.PCX

1.

Spreader Setup

2.

Speed Sensor Factor

Summary of Contents for Apollo FYM

Page 1: ...1 Apollo FYM Spreader Controller Calibration RDS Part No Document Issue Software Issue S DC 500 10 746 1 1 20 2 14 PS605 001rev09...

Page 2: ...sion Farming System the System are limited as set out in the specification of the System details of which are contained in the Help files and product literature and which must be read before using the...

Page 3: ...e Smoothing 8 2 1 4 Off Target Alarm 8 2 1 5 Info Weight 8 2 2 Loadcell Correction 9 Correction Span 9 Min Stat Weight 9 Dynamic Time 9 Dynamic Weight 9 Start Delay 9 Steady Weight 9 H Land Delay 9 T...

Page 4: ...dth 14 5 1 1 Set current Working Width 14 5 2 Forward Speed Sensor 14 5 2 1 Select Sensor Option 14 5 2 2 Wheel sensor calibration Autocal 14 5 2 3 Wheel sensor calibration manually calculating the Fo...

Page 5: ...y Alpha numeric values are entered via the right hand keypad You must press the key from 2 to 5 times to select the required letter Some keys have additional special characters not shown on the key le...

Page 6: ...he contrast setting is adjusted so that the screen graphics can no longer be viewed i e completely light or dark don t panic you can navigate directly to the DISPLAY screen by pressing and holding the...

Page 7: ...press 1 5 Select Control Software There are two lines displayed If the head unit does not have a secondary software module fitted both lines will be the same and switching between them has no effect I...

Page 8: ...it is acceptable for the instrument to display a steady readout of 10 tonnes ha between those limits i e 3 In this case the rate lock on figure should be set to 3 0 Adjustable from 0 to 50 Default 2...

Page 9: ...tem will resume DYNAMIC corrections This is to give the floor time to get to speed T Factor Delay This is the pause time after each new DYNAMIC correction has been made before the new correction start...

Page 10: ...nu function immediately sends the data to the serial port The message Printing Data is displayed while data transfer is occurring If the bar on the screen stops filling up part way the instrument cann...

Page 11: ...speed If necessary measure this speed using a hand held tachometer Note the speed displayed on the INFO screen The correct Cal factor Initial Factor x Displayed Speed Actual Speed Default 1 pulse per...

Page 12: ...get rate then the response setting may be too high Default 100 Range 0 9999 3 4 3 Deadband The Deadband function sets the range over which the flow rate will vary about the target rate before the cont...

Page 13: ...Rate This is the target application rate that is programmed on the MAIN screen Default 20 Range 0 9999 4 1 3 T Factor The T factor is the calibration factor that is altered while the spreader is disp...

Page 14: ...the forward speed sensor This could be calculated based on the nominal tyre diameter or rolling distance and then entered manually ref section 1 1 3 however this does not take into account wheel slip...

Page 15: ...for exactly 10 revolutions of the sensed wheel Measure this distance in inches or metres and divide by 20 to find the Speed Sensor Factor iii If 4 wheel magnets are installed the distance is 1 4 the...

Page 16: ...e ALARMS SETUP button at the base of the screen 6 1 1 Low High RPM Alarm From the RPM SETUP screen you can also set a minimum and maximum RPM at which an alarm is triggered Set as necessary Default 0...

Page 17: ...APOLLO FYM SPREADER CONTROLLER 17 Issue 1 12 12 13 Original Issue Issue 1 1 20 2 14 Ref CRQ5468...

Reviews: