background image

LB METRO

3


Table of contents


General information

......................................................................................................................................

11


Calling for the after sales service

.................................................................................................................

11


Performance and technical data

...................................................................................................................

14


General safety regulations

............................................................................................................................

21


Handling the machine in its packing

...........................................................................................................

21


Unpacking the machine

.................................................................................................................................

21


Handling the machine after unpacking

.......................................................................................................

21


Control and indicator panel

.........................................................................................................................

23


Description of the symbols on the control panel

.........................................................................................

24


Using the floor washer

..................................................................................................................................

28


Instructions for starting up the floor wahser

..............................................................................................

28


Regulations to be complied with during operation

....................................................................................

29


Maintenance instructions

..............................................................................................................................

29


Washing

..........................................................................................................................................................

31

·


Adding and draining water

................................................................................................................................

32

·


Choosing the detergent

.....................................................................................................................................

32

·


Solution filter cleaning ...............................................................................................................................................................

33


Maintenance

...................................................................................................................................................

34


Replacing the brushes

...........................................................................................................................................

34


Adjusting the squeegee

..................................................................................................................................

36


Drive system

...................................................................................................................................................

37


Steering

...........................................................................................................................................................

38


Brakes

.............................................................................................................................................................

40


Suction motors

...............................................................................................................................................

42


Squeegee blades

.............................................................................................................................................

44

·


Replacing the blades

........................................................................................................................................

44


Batteries

..........................................................................................................................................................

46

·


Installing the batteries

......................................................................................................................................

47

·


Installing the batteries charger

...........................................................................................................................

47


Electronic control units

.................................................................................................................................

48


Electric installation diagram

........................................................................................................................

50


Periodic maintenance and safety checks

.....................................................................................................

54


Troubleshooting

.............................................................................................................................................

59


Safety information

.........................................................................................................................................

61


Summary of Contents for 33.LB.Metro

Page 1: ...ANUTENZIONE USE AND MAINTENANCE MANUAL HANDLEIDING VOOR GEBRUIK EN ONDERHOUD MANUEL D UTILISATION ET ENTRETIEN A19 0486 12 99 R C M S p A 41041 Casinalbo MO Via Tiraboschi 4 Tel 059 51 53 11 Telefax 059 51 07 83 Internet http www rcm it E mail inforcm rcm it ...

Page 2: ......

Page 3: ...LB METRO 1 MANUALE USO E MANUTENZIONE USE AND MAINTENANCE MANUAL HANDLEIDING VOOR GEBRUIK EN ONDERHOUD MANUEL D UTILISATION ET ENTRETIEN ...

Page 4: ...lla lavapavimenti 27 Norme da seguire durante il funzionamento 29 Norme per la manutenzione 29 Lavaggio 30 Carico e scarico acqua 32 Scelta detergente 32 Pulizia filtro soluzione 32 Piani di manutenzione 34 Sostituzione spazzole 34 Regolazione tergipavimento 35 Sistema avanzamento 37 Sterzo 38 Freni 39 Motori aspirazione 41 Lame tergipavimento 43 Sostituzione lame 43 Batteria 45 Installazione batt...

Page 5: ...rting up the floor wahser 28 Regulations to be complied with during operation 29 Maintenance instructions 29 Washing 31 Adding and draining water 32 Choosing the detergent 32 Solution filter cleaning 33 Maintenance 34 Replacing the brushes 34 Adjusting the squeegee 36 Drive system 37 Steering 38 Brakes 40 Suction motors 42 Squeegee blades 44 Replacing the blades 44 Batteries 46 Installing the batt...

Page 6: ...an de schrobzuigmachine 28 Normen die tijdens de werking opgevolgd moeten worden 29 Normen voor het onderhoud 29 Schoonmaken 31 Water aan en afvoer 32 Keuze reinigingsmiddel 32 Filter in de schoonwatertank 33 Onderhoudstabellen 34 Borstels vervangen 34 Afstelling van der vloerwisser 36 Aandrijfsysteem 37 Besturing 38 Remmen 40 Aanzuigmotoren 42 Rubbers vloerwisser 44 Vervangen van de rubbers 44 Ac...

Page 7: ...laveuse 27 Recommandations à respecter durant le fonctionnement 29 Recommandations pour l entretien 29 Lavage 30 Remplissage et vidange d eau 32 Choix du détergent 32 Nettoyage filtre solution 32 Programmes d entretien 34 Changement des brosses 34 Réglage de la raclette 36 Système de déplacement 37 Direction 38 Freins 40 Moteurs d aspiration 42 Lames de la raclette 44 Changement des lames 44 Batte...

Page 8: ...i rivestimento escluso moquette o su piani o salite con pendenza inferiore al 10 3 La R C M S p A non si ritiene responsabile di inconvenienti rotture incidenti ecc dovuti alla non conoscenza o alla non applicazione delle prescrizioni contenute nel presente manuale Lo stesso dicasi per l esecuzione di modifiche varianti e o l installazione di accessori non autorizzati preventivamente In particolar...

Page 9: ...cept for carpet on flat areas or rises with gradient lower than 10 3 R C M S p A will not accept liability for problems breakages accidents etc due to ignorance of or failure to apply the instructions in this manual The same applies to modifications variants and or the installation of accessories without prior authorization In particular R C M S p A also declines all liabilities for work done on t...

Page 10: ...n met een stijging van minder dan 10 3 R C M S p A acht zich niet verantwoordelijk voor ongemakken breuken ongevallen enz die te wijten zijn aan het niet kennen of toepassen van de voorschriften uit deze handleiding Hetzelfde geldt voor het uitvoeren van wijzigingen veranderingen en of aanbrengen van extra s die niet tevoren goedgekeurd zijn R C M S p A wijst in het bijzonder elke verantwoordelijk...

Page 11: ...moquettes Elle ne doit pas être utilisée pour le lavage de sols ou de rampes dont la déclivité serait supérieure à 10 3 R C M S p A décline toute responsabilité en cas de problème technique de rupture ou d accident provoqué par l ignorance ou le non respect des instructions et recommandations figurant dans le présent manuel de même qu en cas de modification et ou d installation d accessoires sans ...

Page 12: ...mero di matricola Il dettaglio dei difetti riscontrati I controlli eseguiti Le regolazioni effettuate e i loro effetti Ogni altra informazione utile Indirizzare le richieste alla rete assistenza autorizzata Ricambi Nella sostituzione dei ricambi usare esclusivamente RICAMBI ORIGINALI collaudati e autorizzati dal costruttore Non attendere che i componenti siano logorati dall uso sostituire un compo...

Page 13: ...De uitgevoerde afstellingen en het resultaat hiervan Elke andere nuttige informatie De aanvragen indienen bij een bevoegd servicecentum Onderdelen Bij het vervangen van onderdelen alleen gebruik maken van ORIGINELE ONDERDELEN getest en goedgekeurd door de fabrikant Niet wachten tot de componenten geheel versleten zijn een onderdeel op het juiste moment vervangen betekent een betere werking van de ...

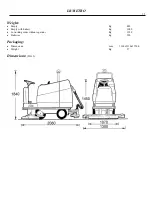
Page 14: ...a recupero Lt 280 Tergipavimento flottante Sollevamento e abbassamento elettrico automatico Batteria Capacità massima batteria V Ah 36 480 Dimensioni vano lung larg alt mm 630 420 815 Dimensioni batteria con cassone mm 610 410 765 Autonomia h 4 5 Motori elettrici Motore trazione N V W 2 36 500 Motore rotazione spazzole N V W 3 36 500 Motore aspirazione N V W 2 36 800 Potenza totale W 4100 Sterzo m...

Page 15: ...LB METRO 13 Peso A vuoto Kg 480 A vuoto con batteria Kg 1000 In assetto di lavoro escluso operatore Kg 1250 Batteria Kg 520 Imballo completo Dimensioni mm 1100x2110x1550 h Peso Kg 57 Dimensioni FIG 2 ...

Page 16: ...ting type Lifting and lowering system electric automatic Batteries Maximum battery capacity V Ah 36 480 Compartment dimensions L W H mm 630 420 815 Battery with case dimensions mm 610 410 765 Working autonomy h 4 5 Electric motors Drive motor q ty V W 2 36 500 Brush rotation motor q ty V W 3 36 500 Suction motor q ty V W 2 36 800 Power total W 4100 Steering mechanical system acting on the front wh...

Page 17: ...LB METRO 15 Weight Empty Kg 480 Empty with battery Kg 1000 In working order without operator Kg 1250 Batteries Kg 520 Packaging Dimensions mm 1100x2110x1550 h Weight Kg 57 Dimensions FIG 2 ...

Page 18: ...Lt 280 Vloerwisser pendelend Opheffen en dalen elektrisch automatisch Accu Max accucapaciteit V Ah 36 480 Afmetingen accuruimte l b h mm 630 420 815 Accuafmetingen met bak mm 610 410 765 Autonomie h 4 5 Elektrische motoren Aandrijfmotor N V W 2 36 500 Motor borstelrotatie N V W 3 36 500 Aanzuigmotor N V W 2 36 800 Totaal vermogen W 4100 Besturing mechanisch op het voorwiel Aandrijving Vooruit en a...

Page 19: ...LB METRO 17 Gewicht Leeg Kg 480 Leeg met accu Kg 1000 Werkklaar zonder bediener Kg 1250 Accu Kg 520 Volledige verpakking Afmetingen mm 1100x2110x1550 h Gewicht Kg 57 Afmetingen TEK 2 ...

Page 20: ...récupération litre 280 Raclette flottante Soulèvement et abaissement électrique automatique Batterie Capacité maximum V Ah 36 480 Dimensions logement long larg haut mm 630 420 815 Dimensions batterie avec caisson mm 610 410 765 Autonomie h 4 5 Moteurs électriques Moteur traction nb V W 2 36 500 Moteur rotation brosses nb V W 3 36 500 Moteur aspiration nb V W 2 36 800 Puissance totale W 4100 Direct...

Page 21: ... METRO 19 Poids A vide kg 480 A vide avec batterie kg 1000 En configuration de travail opérateur exclu kg 1250 Batterie kg 520 Emballage complet Dimensions mm 1100x2110x1550 h Poids kg 57 Dimensions FIG 2 ...

Page 22: ...truzioni d uso e manutenzione nonché delle condizioni d ispezione e manutenzione É assolutamente vietato aspirare sostanze infiammabili e o tossiche É assolutamente vietato toccare le parti in movimento della macchina nel caso fosse assolutamente necessario prima fermare il funzionamento della macchina Movimentazione macchina imballata La macchina giunge imballata su pallet Il peso e le dimensioni...

Page 23: ...n de verpakte machine De machine wordt op een pallet ingepakt aangeleverd Gewicht en afmetingen vindt u in de TECHNISCHE KENMERKEN De vork van de heftruck moet zo geplaatst worden dat het midden van de verpakking ongeveer in het midden van de vork komt te rusten Het geheel moet zeer voorzichtig verplaatst worden waarbij vermeden moet worden de machine te stoten en tot grote hoogten op te heffen He...

Page 24: ...e 7 Avvisatore acustico 8 Interruttore generale a chiave 9 Comando pedale freno 10 Leva bloccaggio sbloccaggio freno di stazionamento 11 Pedale avanzamento retromarcia 12 Manopola apertura chiusura e regolazione soluzione 13 Interruttore gruppo spazzante optional 14 Interruttore luci optional 15 Coperchio serbatoio soluzione 16 Pedale soll gruppo spazzante optional 17 Leva bloccaggio sbloccaggio s...

Page 25: ...al 10 Hendel voor ver ontgrendeling parkeerrem 11 Voetpedaal voor en achteruit 12 Draaiknop wateraanvoer open dicht 13 Schakelaar borstelgroep optional 14 Verklikker verlichting 15 Deksel vloeistoftank 16 Veegsysteem bedieningspedaal optional Panneau de contrôle et de commande Fig 3 1 Interrupteur d arrêt d urgence 2 Tableau de bord digital 3 Pommeau du potentiomètre de pression brosses 4 Interrup...

Page 26: ...op de displayverschijnt het woord level de aanzuigmotoren stoppen en devloerwisser gaat automatisch omhoog réservoir plein l écran fait apparaître l indication level dans ce cas les moteurs d aspiration s arrêtent et la raclette se soulève automatiquement indica il freno inserito compare sul display la scritta brake indicates that the brake is engaged the word brake appears on the display geeft aa...

Page 27: ...d 1 motoren in werking 5 Interrupteur moteurs d aspiration Commande la mise en marche des moteurs d aspiration Position 0 moteurs à l arrêt Position 1 moteurs en marche 6 Interruttore lampada rotante Comanda l inserimento della lampada rotante Posizione 0 lampada spenta Posizione 1 lampada in funzione 6 Revolving flashing light switch Switches on the revolving flashing light 0 light off 1 light on...

Page 28: ...e et la fermeture et règle le débit de solution distribuée sur les brosses 13 Interruttore gruppo spazzante OPTIONAL Comanda l inserimento del gruppo spazzante 13 Brushing unit switch OPTIONAL Operates the brushing unit 13 Verklikker schakelaar borstelgroup OPTIONAL Voor het inschakelen van de schakelaar borstelgroup 13 Interrupteur groupe de balayage OPTION Commande la mise en marche du groupe de...

Page 29: ... serbatoio 2 vedi fig sotto dell acqua di recupero sia vuoto 2 Riempire il serbatoio d acqua pulita 1 vedi fig sotto 3 Verificare che le spazzole siano sollevate da terra potenziometro 3 fig 3 4 Verificare che il pedale freno 9 fig 3 sia sbloccato 5 Inserire la chiave 8 fig 3 nel quadro generale e ruotarla in senso orario con questa operazione si darà corrente alla apparecchiatura di comando gener...

Page 30: ...aken regelmeter 3 tek 3 4 Controleer of het rempedaal 9 ontgrendeld is tek 3 5 Steek de sleutel in het contact 8 tek 3 en draai deze tegen de klok in zo krijgt de hoofdbediening van de apparatuur stroom 6 Met behulp van schakelaar 5 tek 3 de aanzuiging inschakelen 7 De borstelrotatie aanzetten met schakelaar 4 tek 3 8 De vloeistofkraan met behulp van draaiknop 12 openzetten tek 3 9 De borstels met...

Page 31: ...aten De machine mag alleen gebruikt worden door bedieners die bevoegd zijn door degene die voor de machine verantwoordelijk is en die kennisgenomen hebben van de inhoud van deze handleiding Deze bedieners moeten lichamelijk en psychisch voor dit werk geschikt zijn en mogen niet onder invloed verkeren van alcohol drugs of medicijnen Wees er zeker van dat er geen vreemde voorwerpen op de machine lig...

Page 32: ...o fino ad ottenere il carico voluto La pressione così impostata verrà mantenuta automaticamente Per il dosaggio dell acqua detergente agire sempre sul manopola 12 portandola su una posizione intermedia in modo che tutta la superficie subito dopo le spazzole sia ben bagnata peró senza che un eccesso generi schizzi rivoli o trabboccamenti del tergipavimento Inserire l aspirazione mediante l interrut...

Page 33: ...voorwaartsgaan zakt de vloerwisser automatisch om het water op te zuigen voetpedaal 11 tek 3 naar de buitenkant van de machine drukken zodat deze met de gewenste snelheid begint te rijden en de schoonmaken begint als u achteruit wilt rijden het pedaal naar de binnenkant van de machine drukken de vloerwisser wordt automatisch opgeheven en de machine kan achteruit rijden Na het schrobben en drogen a...

Page 34: ...sente che un detersivo troppo aggressivo puó risultare dannoso per una lunga durata della macchina É necessario utilizzare detersivo a schiuma frenata o additivo antischiuma onde evitare danni al motore d aspirazione Se non fosse possibile procurarsi tali prodotti per evitare la schiuma si puó utilizzare del comune aceto di vino versandone 50 cc nel serbatoio di recupero prima del lavaggio Pulizia...

Page 35: ...l of een antischuim additief om schade aan de aanzuigmotor te voorkomen Als u dergelijke producten niet kunt kopen kunt u om overvloedig schuim te vermijden voor het starten met werken 50 cc azijn in de vuilwatertank gieten Filter in de schoonwatertank zie foto zijkant Om een goed werkend filtersysteem te waarborgen is het aan te bevelen dit filter eens per maand te reinigen Het reinigen geschiedt...

Page 36: ... the new brush 5 to the support 4 using the screws 3 replace the brush assembly 2 3 4 5 on the hub 1 by simply fitting it into place Onderhoudstabellen Borstels vervangen Voordat u de borstels gaat vervangen haalt u de sleutel uit het contact om onopzettelijke inschakeling van motoren te voorkomen en vervolgt u op deze manier veer 2 naar buiten uittrekken zoals de pijlen in de tekening zodat de bo...

Page 37: ...ando lo spigolo della lama posteriore del tergipavimento tocca il pavimento con un inclinazione compresa tra 45 e 50 rispetto al suolo Naturalmente la giusta angolazione viene individuata solo dal risultato pratico dell asciugatura quindi si riuscirà ad ottenere un risultato tanto migliore quanto più esperto sarà l operatore Fare attenzione al fatto che spesso l asciugatura viene influenzata negat...

Page 38: ...de vloerwisser de vloer raakt met een hoek van 45 tot 50 ten opzichte van het terrein De juiste instelling maakt u slechts op uit het resultaat van het drogen en is dus afhankelijk van de ervaring van de bediener Denk erom dat het drogen vaak negatief wordt beïnvloed door het slecht functioneren van de aanzuiging In dit geval de aanzuigslangen de openingen de filters en de vloerwisser zelf zorgvul...

Page 39: ... or towards the inside for REVERSE The same pedal can be used to regulate the travel speed from 0 to 6 km h Aandrijfsysteem De machine wordt voortbewogen door een elektrisch systeem bestaand uit twee reductiemotoren 1 tek 6 op de achterwielen 2 tek 6 en door twee controle units 3 tek 6 die elk een van de reductiemotoren bedienen voor het VOORUIT of ACHTERUIT rijden Door het voetpedaal 4 tek 6 naar...

Page 40: ...t 2 fig 7 to the ring gear 3 fig 7 on the front wheel The transmission sprocket 2 is driven by the sprocket 5 fig 7 keyed to the steering wheel by means of the double chain 4 fig 7 To adjust any backlash which may occur on the steering wheel move the supports of the sprockets 2 and 5 using the screws 6 fig 7 Besturing De besturing wordt geregeld door ketting 1 tek 7 die de beweging van transmissie...

Page 41: ...tipo meccanico 3 Per bloccare in posizione di stazionamento premere a fondo il pedale freno 3 fig 8 e inserire verso il basso la levetta d arresto 4 fig 8 4 Quando le ganasce tendono a non bloccare la lavapavimenti registrare il freno mediante i registri 5 fig 8 Attenzione Controllare e registrare il freno almeno una volta ogni tre mesi Fig 8 1 Comando freno 2 Ganascia 3 Pedale freno 4 Levetta d a...

Page 42: ... indrukken en vervolgens hefboom 4 tek 8 naar beneden drukken 4 Wanneer de klemmen de machine niet voldoende blokkeren de rem regelen met behulp van de registerschroeven 5 tek 8 Attentie De rem tenminste een keer in de drie maanden controleren en registreren Tek 8 1 Rembediening 2 Klen 3 Rempedaal 4 Hefboom parkeerrem 5 Rem registerschroeven Freins Les freins permettent d arrêter l auto laveuse al...

Page 43: ...uscotto aprire il coperchio 3 fig 9 dei motori aspirazione Staccare la spina allentare i dadi a farfalla 4 fig 10 e ruotare in senso antiorario il motore sganciarlo dalla sede e sfilarlo vedi frecce di FIG 10 per riassemblare operare nel modo inverso NB Ogni sei mesi controllare i carboncini 5 fig 10 e se usurati sostituirli Per il controllo dei carboncini operare nel seguente modo togliere la cal...

Page 44: ... de motor tegen de klok in draaien van zijn plaats loshaken en eruit tillen let op de pijlen in tek 10 in omgekeerde volgorde te werk gaan om het geheel weer te monteren NB Elke 6 maanden de koolborstels 5 tek 10 controleren en vervangen als ze versleten zijn Voor de controle van de koolborstels als volgt te werk gaan de plastic kap 6 tek 10 verwijderen de schroeven losdraaien de plastic steunen v...

Page 45: ... tubo di aspirazione 3 fig 5 Togliere la coppiglia A dal perno B sul tergipavimento fig 12 sfilandolo verso il basso Svitare i dieci pomelli 6 sulla bandella posteriore 4 e le dieci viti 7 sulla bandella anteriore 5 fig 12 Ruotare le lame in gomma 2 3 fig 12 utilizzando uno spigolo nuovo Le lame in gomma sono del tipo reversibile su quattro spigoli per quella posteriore nera e su due per quella an...

Page 46: ...p de achterzijde en de bouten 7 op de voorzijde 5 fig 12 Draai de rubbers vervolgens zodanig om dat een nieuwe en scherpe zijkant de vloer raakt Het zwarte rubber aan de achterzijde 4zijkanten bruikbaar het rode rubber aan de voorzijde op 2 zijkanten Als alle zijkanten versleten zijn dient het rubber te worden vervangen om de nieuwe rubbers te monteren in omgekeerde volgorde te werk gaan de afstel...

Page 47: ... L abuso piú comune riscontrato nell impiego della batteria per trazione é la sovraccarica Questo solo fattore se applicato continuamente puó abbreviare drasticamente la durata La massima temperatura raccomandata é di 45 C Se la temperatura dell elettrolito aumenta di oltre 10 12 C rispetto alla temperatura ambientale si puó avere la sovraccarica indipendentemente dal valore della temperatura ragg...

Page 48: ...terijindicator nog slechts een restcapaciteit aangeeft van ca 5 10 schakelt de borstelaandrijving en watertoevoer automatisch uit Wèl blijft het mogelijk om de machine te verrijden en een natte vloer droog te zuigen Ruimtes voor het opladen van de accu De gassen die zich tijdens het opladen ontwikkelen zijn explosief zorg er dus voor dat de accu tijdens het opladen goed geventileerd staat en dat d...

Page 49: ... the battery socket Accu plaatsen De accu in de daarvoor bedoelde ruimte plaatsen Voor de installatie de accu met aandacht nakijken en hierbij vooral controleren of er geen beschadigde elementen zijn Nooit elektrolyt bijvullen als de accu s een week of langer niet gebruikt zijn De accuverbindingen moeten schoon zijn en er moet een dun laagje vet of vaseline op de klemmen of verbindingen liggen De ...

Page 50: ...a dovuta ad un assorbimento eccessivo 8 La frenatura è durata più del tempo massimo impostato discese molto lunghe 9 Errore di programmazione della centralina 10 Errore sulla potenza comandi di potenza danneggiati ELECTRONIC CONTROL UNITS The LB Metro floor washer is equipped with two high frequency electronic control units with energy recovery to control drive This type of device also has diagnos...

Page 51: ... 10 Fout vermogen vermogenbesturing beschadigd CENTRALES ÉLECTRONIQUES L auto laveuse modèle LB metro est dotée de deux centrales électroniques haute fréquence à récupération d énergie pour le contrôle du déplacement Ce type d appareillage est également doté d une fonction de diagnostic détectant les éventuels dysfonctionnements de la traction Le nombre de clignotements du voyant présent sur les c...

Page 52: ...LB METRO 50 Fig 13 Schema impianto elettrico Fig 13 Electric installation diagram Fig 13 Schema elektrische installatie Fig 13 Schéma circuit électrique ...

Page 53: ...LB METRO 51 Fig 13 Schema impianto elettrico Fig 13 Electric installation diagram Fig 13 Schema elektrische installatie Fig 13 Schéma circuit électrique ...

Page 54: ...cuito sulle centraline o sui motori trazione Sostituire fusibile 6 Fusibile 80A lamellare motori aspirazione Il fusibile brucia quando si verifica un corto circuito sui motori aspirazione Sostituire fusibile 7 Fusibile 40A lamellare spazzole Il fusibile brucia quando si verifica un corto circuito sui motori delle spazzole Sostituire fusibile 8 Fusibile pressione spazzole Il fusibile brucia quando ...

Page 55: ...ering borstelmotoren 40A Kortsluiting in de borstelmotoren vervang de zekering 8 Borsteldruk motorzekering Kortsluiting in borsteldruk actuator motor vervang de zekering THERMO ZEKERING 9 Dweilrubber hefinrichting actuator 10 Borsteldruk instelling actuator De thermische zekeringen werken als beveiliging voor het electrisch systeem actuator van het dweilrubber en de borstels Een foute werking van ...

Page 56: ...lche goccia di olio sulle catene di trasmissione 8 Ingrassare lo snodo della forcella della ruota sterzante 9 Controllare lo stato della valvola di erogazione della soluzione di lavaggio 10 Ogni sei mesi controllare lo stato dei carboncini di ogni motore Periodic maintenance and safety checks 1 The floor washer must be inspected by a specialist technician who checks its safety or for any damage or...

Page 57: ...ontroleren 10 Elk half jaar de staat van de koolborstels van elke motor controleren Opérations régulières de contrôle et d entretien contrôles de sécurité 1 L auto laveuse doit être contrôlée par un technicien spécialisé lequel doit s assurer que la machine remplit les conditions de sécurité et s assurer qu elle ne présente aucun dommage ni aucune anomalie avant sa mise en service à l issue de mod...

Page 58: ...uire l attuatore Pulire filtro fig 11 La soluzione detergente non esce omogeneamente sulle spazzole Tubazioni alimentazione acqua sulle Spazzole intasate Filtro soluzione intasato Pulire il tubo intasato Pulire filtro La soluzione detergente non esce o ne esce poca sulle spazzole Tubazioni alimentazione acqua sulle Spazzole intasate Il rubinetto apertura soluzione non apre Filtro soluzione intasat...

Page 59: ...zione della lavapavimenti La macchina non parte o si arresta improvvisamente Motori sotto sforzo tanto da inserire la protezione magneto termica Batterie scariche Led della diagnostica posti sulle centraline elettroniche lampeggiano Attendere circa un minuto e poi ripetere la procedura d avviamento vedi norme per la messa in funzione della lavapavimenti Ricaricare le batterie Vedi centraline elett...

Page 60: ...avaggio della macchina i detergenti aggressivi acidi ecc devono essere usati con cautela Attenersi alle istruzioni del produttore dei detergenti e nel caso usare indumenti protettivi tute guanti occhiali ecc Vedi direttive CEE sull argomento Atmosfera esplosiva La macchina non é stata costruita per lavorare in ambienti dove sussiste la possibilitá che vi siano gas polveri o vapori esplosivi pertan...

Page 61: ...ergent solution is not flowing out evenly onto the brushes Pipelines which supply water to the brushes are fouled Solution filter clogged Clean the fouled pipe Clean the solution filter The detergent solution does not reach the brushes or only a little is reaching them Pipelines which supply water to the brushes are fouled Solution outlet tap not opening Solution filter clogged Closing electromagn...

Page 62: ...he machine The machine does not start or it stops suddenly Motors labouring so hard they have triggered the overload cutout Batteries flat Diagnostics LEDs on electronic control units flashing Wait about a minute and then repeat the starting procedure see instructions for starting up the machine Recharge the batteries See electronic control unit section The machine does not travel forward or back ...

Page 63: ...hine aggressive detergents acids etc must be used with care Follow the instructions provided by the detergent manufacturer and if necessary wear protective clothing overalls gloves goggles etc See EEC Directives on this subject Explosive atmosphere The machine is not constructed to operate in environments with a risk of explosive gases powders or vapours its use in an exposive atmosphere is theref...

Page 64: ...vervangen Filter reinigen tek 11 De reinigingsvloeistof komt niet gelijkmatig op de borstels Wateraanvoerleidingen op de borstels verstopt Filter in schoonwatertank verstopt De verstopte leiding schoonmaken Reinig het filter Geen of onvoldoende reinigingsvloeistof naar de borstels Leidingen wateraanvoer borstels verstopt De kraan voor vloeistofverdeling gaat niet open Filter in schoonwatertank ver...

Page 65: ... herhalen zie normen voor starten schrobzuigmachine De machine start niet of stopt onverwachts Sterk belaste motoren magneto thermische beveiliging wordt ingeschakeld Lege accu s Leds diagnose op de elektronische controle units knipperen Ongeveer een minuut wachten en de startprocedure herhalen zie normen voor starten schrobzuigmachine Accu s opladen Zie elektronische controle units De machine gaa...

Page 66: ...schoonmaakwerkzaamheden van de machine voorzichtig gebruikt worden Houdt u aan de instructies van de fabrikant en gebruik zonodig beschermende kledingstukken overall handschoenen bril enz Zie ook de EEG richtlijnen wat betreft dit onderwerp Omgeving met explosie gevaar De machine is niet gebouwd voor het werken in een omgeving waar explosieve gassen stof of stoom aanwezig zijn het gebruik van de m...

Page 67: ...r Nettoyer le filtre fig 11 La solution détergente ne s écoule pas de manière régulière sur les brosses Tuyaux d alimentation eau sur les brosses bouchés Filtre solution bouché Déboucher les tuyaux Nettoyer le filtre La solution détergente ne s écoule pas sur les brosses ou en faible quantité Tuyaux d alimentation eau sur les brosses bouchés Le robinet de solution détergente ne s ouvre pas Filtre ...

Page 68: ...e mise en marche de l auto laveuse La machine démarre ou s arrête subitement Sollicitation excessive des moteurs provoquant le déclenchement de la protection magnétothermique Batteries déchargées Les voyant de diagnostic sur centrales électroniques clignotent Laisser s écouler environ une minute avant de répéter la procédure de démarrage voir instructions de mise en marche de l auto laveuse Charge...

Page 69: ...u besoin se munir des protections nécessaires bleu de travail gants lunettes de protection etc Se reporter aux recommandations des directives CEE en la matière Atmosphère explosive La machine n est pas conçue pour être utilisée en milieu où sont présents des poussières vapeurs ou gaz explosifs Aussi son utilisation dans une atmosphère de ce type est elle rigoureusement INTERDITE Élimination des su...

Page 70: ...LB METRO 68 ...

Reviews: