6 Series Installation Instructions
(Continued)
©2008 RUTHERFORD CONTROLS INT’L CORP. WWW.RUTHERFORDCONTROLS.COM
USA: 2697 INTERNATIONAL PARKWAY, PKWY 5, VIRGINIA BEACH, VA 23452 • CANADA: 210 SHEARSON CRESCENT, CAMBRIDGE, ON N1T 1J6
PHONE • 1.800.265.6630 • 519.621.7651 • FAX: 1.800.482.9795 • 519.621.7939 • E-MAIL: [email protected]
4
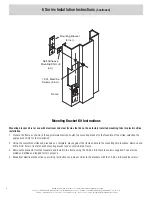
Frame
Self-Adhesive
Mounting Shim (8
incl.)
Mounting Bracket
(2 incl.)
12-24 Machine
Screws (6 incl.)
Mounting Bracket Kit Instructions
Mounting bracket kit is for use with aluminum and steel frames that do not have factory installed mounting tabs for electric strike
installation.
1. Prepare the frame as shown in the approximate drawing. Fasten the mounting bracket to the faceplate of the strike, selecting the
appropriate shims for the installation.
2. Using the assembled strike and brackets as a template, place against the frame and mark the mounting hole locations. Remove and
drill a 3/16" hole in frame for each mounting bracket and countersink the frame.
3. Remove the brackets from the faceplate and install in the frame using the 12-24 x 3/8" machine screws supplied. Tabs are zinc
plated and drilled and tapped for this purpose.
4. Make final electrical connections per wiring instructions and mount strike to the brackets with the 12-24 x 3/8" machine screws.


