3
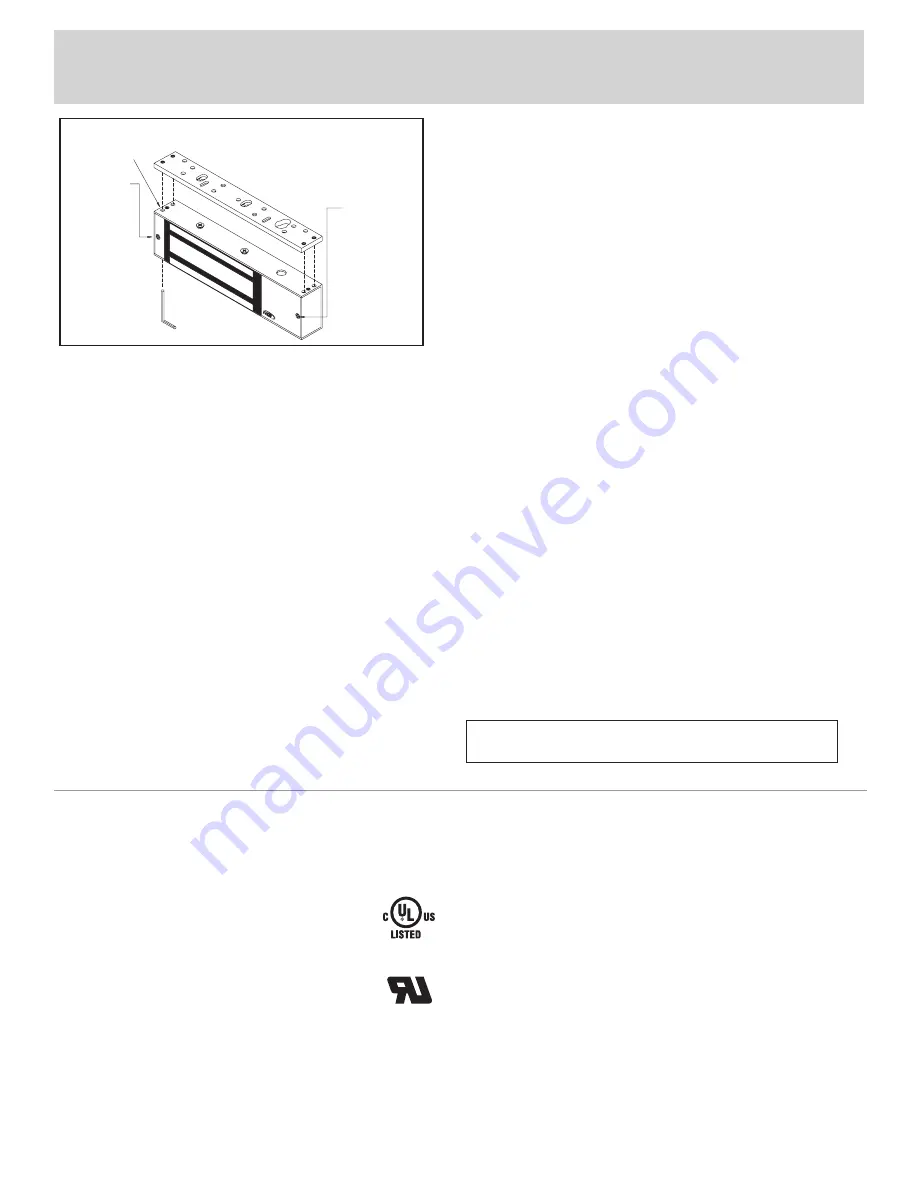
Anti-Tamper Feature - Two screws prevent insertion of an Allen
wrench into the captive mounting screw opening on the bottom of
the lock. Fig. 3 shows their location. one screw also secures the
wiring cavity cover. The mounting plate cannot be separated from
the lock without removing these two screws.
Lock Options
Both of the 8310 and 8320 locks can be equipped with the DSS or SCS
options or both.
SCS (Security Condition Sensor) - This feature can detect the quality of
the locking bond between the surface of the magnet and the armature
plate. Indication is with a local leD as well as remote monitoring
through a SPDT relay output. The sensitivity of this feature is such that
a foreign object with a thickness of .007” (.18mm) is sufficient to allow
the sensor to detect a problem.
Due to the sensitivity of this feature and the necessity to maintain a
reliable locking bond, these surfaces must be kept free of contaminating
materials. Both the lock surface and the armature plate must be cleaned
periodically with a non-abrasive cleanser. Alignment of armature plate
and magnet is required to ensure proper function of sensor.
Low Voltage Detection - each SCS circuit board also includes a low
voltage detection circuit when shipped from the factory. This
feature will cause the alarm relay and status leD to activate
should the lock input voltage drop below 9vDC. That signals a
monitored system or guard station that the holding force of the
lock may have been compromised.
DSS (Door Status Sensor) - The DSS option monitors the position
of the door upon which the lock is installed. A SPDT reed switch
mounted within the lock cavity eliminates the need for extra sensors
to be installed on the door for notification of security or access control
systems. The DSS option comes with a magnet pre-installed into the
lock armature plate for signaling the reed switch in the housing when
the door is closed independent of power to the lock. Care should be
taken during the final testing of the lock to ensure that the DSS option
is operating in the desired manner.
Inspection and Maintenance
This product and all related accessories or parts must be inspected
and maintained on a quarterly basis. Contacting surfaces of the
electromagnetic lock and armature plate must be kept free of
contaminating materials. Surfaces must be cleaned periodically with a
non-abrasive cleaner.
All mounting fasteners must be inspected on a quarterly basis.
When properly installed, the ends of the armature plate allow a slight
movement but the plate will feel secure when grasped at the bolt. There
should be no movement to the mounting bracket or housing of the
electromagnetic lock.
For added safety, thread locking compound has been provided for the
armature plate bolt and the four captive electromagnetic lock mounting
screws.
WARNING: Improper installation, maintenance, inspection or usage
of the product or any related accessories or parts may cause the
electromagnetic lock, armature plate and associated hardware to
disengage and fall, causing serious bodily injury and property damage.
PleASe DelIveR All INSTAllATIoN INSTRuCTIoNS To
tHe eND-user upoN completIoN of tHe INstallatIoN.
8310 & 8320 Electromagnetic Lock
Installation Instructions
(Continued)
Listings
These products have been successfully tested and evaluated by ul
in two separate categories for use in both the united States and
Canada.
auxiliary lock. the GWXt fire listing qualifies these for
use with ul Classified fire doors maximum 4’ in width
and 8’ in height. The 8310 and 8320 are rated up to and
including 1-1/2 hours (90 minutes).
Special locking Arrangement Component. Additionally,
these products are qualified components for the purpose
of locking outward-swinging exit doors against unauthorized egress.
They are designed to release automatically in case of a power failure
or upon activation of an automatic fire alarm system wired to the
power supply fire panel relay.
The Following Conditions of Acceptability Apply:
1) This product is intended for use with Special locking
Arrangements which are installed in accordance with the
manufacturer’s installation and operation instructions, the life Safety
Code, NFPA 101 of the National Fire Protection Association and the
local authority having jurisdiction.
2) The power for this unit is to be provided by a listed (AlvY,
fula, or apHV) class 2 power supply when designated as a special
locking arrangement (fWaX).
3) The suitability of the lead wires is to be evaluated per the
requirements for the end-use product.
4) If the product is installed in conjunction with a fire alarm control
panel, the wiring from the control unit to this product device shall be
for fail-safe operation.
ul testing was conducted on standard models without accessories.
These locks are not intended or tested for use as a ul listed Burglar
Alarm System unit.
CAMERA-READY LOGOTYPE FOR TYPE L AND TYPE R LISTING MARKS FOR CANADA AND THE U.S.
These Marks are registered by Underwriters Laboratories Inc.
The minimum height of the registered trademark symbol ® shall be 3/64 of an inch. When the overall diameter of the
UL Mark is less than 3/8 of an inch, the trademark symbol may be omitted if it is not legible to the naked eye.
The font for all letter forms is Helvetica Condensed Black, except for the trademark symbol ®, which is
Helvetica Condensed Medium. No other fonts are acceptable.
Please Note:
The word "MARINE" should only be used for UL Classified marine products.
200-195F 20M/11/97
Fig. 3 – Lock Mounting
Anti-tamper
feature screw
Anti-tamper
feature and
wiring cavity
screw
Captive
mounting
screw


