background image

Connections & Setup

10 

Chapter 1

Explanation of Jacks

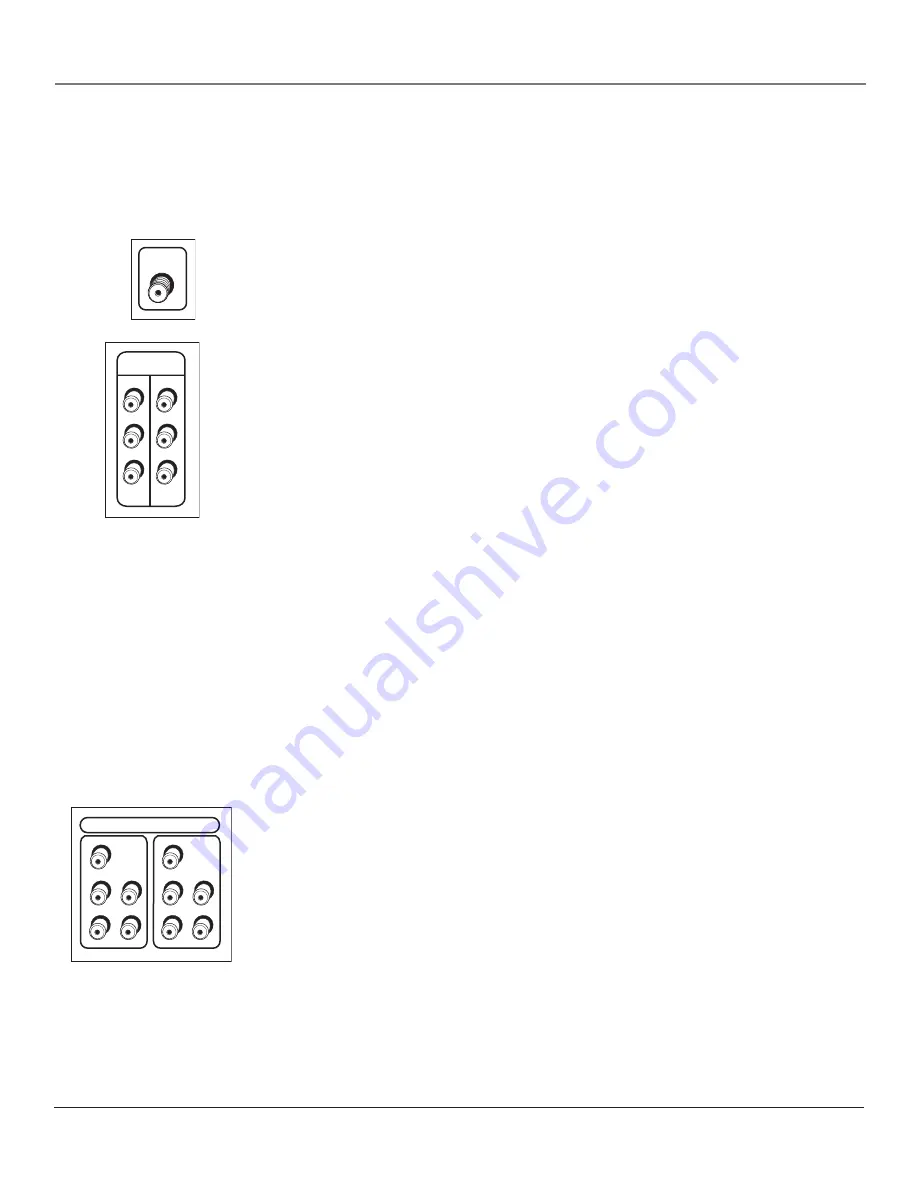
This section describes the jacks you can use for connections. There are several ways to connect components to your TV. 

Back Panel Jacks (in alphabetical order)

ANTENNA/CABLE  

Lets you connect a coaxial cable to receive the signal from the 

antenna, cable, cable box, or if using the examples on pages 12-17, a VCR. 

AUDIO/VIDEO OUTPUT

  Connect a VCR or DVD-recorder to record programs from the 

Cable or Antenna Input (excluding component video formats) while the TV is turned on. 
You must leave the TV on the same channel you are recording. You can also connect an 
amplifier or audio receiver for improved sound quality or an external video monitor.

•  

V

 (Video) Provides composite video connection. The connector is usually yellow.

• 

FIXED AUDIO L/R

  Provides fixed-level audio output from the TV. This audio output 

is in sync with the video signal coming from the monitor's Video output. 

Note: 

When recording from this output, remember to tune to the channel you want 

to record. 

Important:

 If you're watching a program on the HDTV Monitor's screen and listening 

to the audio from the FIXED AUDIO output jacks, you might notice that the video 
and audio are slightly out of sync. The HDTV Monitor processes incoming video to 
optimize it for display, which results in a small delay before displaying the video on 
screen. The Video output jack does not process video for display, so it does not have 
the same delay. The FIXED AUDIO output jacks are in sync with the video signal from 
the Video output. 
If you're using an external audio receiver to accompany video on the HDTV Monitor's 
screen, use the VARIABLE AUDIO output jacks, described below.

• 

VARIABLE AUDIO

  Provides variable-level audio output. Volume levels are controlled 

by the volume controls on the TV and remote control. This audio output is in sync 
with the video displayed on the HDTV Monitor's screen.

• 

SUBWOOFER

  Provides lower bass audio frequencies from the TV to a subwoofer.

Note: 

If you’ve connected a subwoofer, make sure you set the External Subwoofer 

option in the Sound menu. Go to page 44 for instructions.

COMPONENT INPUTS

  Lets you connect a component video source, such as a DVD 

player.

• 

CMP1 Y PB PR (Component Video)

  Provides optimum picture quality because the 

video is separated into three signals. Use three video-grade cables for the connection. 
When using CMP1 Y PB PR, make sure to connect left and right audio cables to the 
CMP1 L and R Audio Input jacks.

• 

CMP1 L/R (Audio)

  Provides left and right audio connections. The left audio 

connector is usually white, and the right audio connector is usually red.

• 

CMP2 Y PB PR, and L and R


Audio 

Allows you to connect a second component 

video source. Their description is the same as CMP1 above. When using CMP2 Y PB 
PR, make sure you connect the left and right audio cables to the CMP2 Audio jacks.

P

R

CMP2

CMP1

COMPONENT INPUTS

Y

L

R

P

B

P

R

Y

L

R

P

B

RIGHT

FIXED 

AUDIO

VARIABLE 

AUDIO

A U DIO/VIDEO  

OUTPUT

SUB

V

LEFT

LEFT

RIGHT

ANTENNA/

CABLE

Summary of Contents for Scenium D44LPW134

Page 1: ...HDTV Monitor with DLP technology HDTV Monitor User s Guide DLP LOGO 1 1 8 inche at minimum ...

Page 2: ..._______________________________________________________________________________ Important Information This symbol indicates that the lamp in the HDTV contains mercury Disposal of these materials may be regulated due to environmental considerations For disposal or recycling information please contact your local authorities or the Electronic Industries Alliance www eiae org Refer to the identificatio...

Page 3: ...torms or when unused for long periods of time Even if the power indicator is off the apparatus is still not fully disconnected from the power source To disconnect the apparatus completely from the power source take its power plug out of the wall outlet or power strip The power plug must be easily accessible 14 Refer all servicing to qualified service personnel Servicing is required when the apparat...

Page 4: ...thode Ray Tubes CRTs which means you don t have to worry about screen burn fixed video images burning onto the screen permanently or convergence realigning the CRTs The diagram on the left illustrates the complex system Thin and Light The efficiency of DLP technology enabled our design team to create a high performance HDTV that is about 16 inches thin and weighs less than 100 pounds Lamp Replacemen...

Page 5: ...ore detail In summary HDTV is capable of resolution that is up to 10 times the resolution of the picture on a regular analog TV Aspect Ratio Aspect ratio is simply the width and height of the picture Regular TVs use a 4 3 aspect ratio which means the picture is a little wider than it is tall a screen that is 20 inches wide is about 15 inches tall When the standards were being developed for televis...

Page 6: ...at to bring out the detail a process commonly referred to as reverse 3 2 pulldown DVI HDTV Input Lets you connect a component with a DVI Digital Visual Interface output DVI provides an uncompressed digital video interface developed for high bandwidth digital connection It supports the overlay of high resolution graphics needed by some electronic program guide navigation and other interactive servi...

Page 7: ...tteries in the remote 19 How to Use the Remote Control to Complete the Initial Setup 19 Turn on the TV 19 Complete the Initial Setup 19 Set the Menu Language 19 Welcome Screen and Connection Confirmation 20 Complete Auto Channel Search 20 Changing Lists and Labels 20 Chapter 2 Using the Remote Control 21 The Buttons on the Remote Control 22 Programming the Remote 24 Find Out If You Need to Program ...

Page 8: ...lish V Chip Rating System 39 Canadian French V Chip Rating System 40 Blocking Canadian V Chip Ratings 40 V Chip Movie Rating Limit 41 Blocking Movie Ratings 41 Blocking Unrated Exempt Programs 41 Lock Unlock Parental Controls 41 Front Panel Block 41 PIP Picture in Picture and POP Picture outside Picture Operation 42 PIP and POP Buttons 42 Chapter 4 Using the TV s Menu System 43 Sound Menu 44 Pictu...

Page 9: ...s Setup Chapter Overview Things to Consider Before You Connect Choose Your Connection Explanation of Jacks Connection Instructions Front Panel Buttons Plug in the TV Put Batteries in the Remote How to Use the Remote Control to Complete the Initial Setup Turn on the TV Complete the Initial Setup ...

Page 10: ...eated air from it won t flow around other components Position Cables Properly to Avoid Audio Interference Insert each cable firmly into the designated jack If you place components above the TV route all cables down the side of the back of the TV instead of straight down the middle of the TV If your antenna uses 300 ohm twin lead cables do not coil the cables Also keep the twin lead cables away from ...

Page 11: ...ive who will visit your home for a fee to install your electronic entertainment system and to instruct you in its operation For details about this service call 1 888 206 3359 For additional assistance while using your RCA Scenium product please visit www rcascenium com customersupport HDTV Tuner DVD Satellite VCR Coaxial Audio video S Video DVD For general information on connecting an A V receiver...

Page 12: ... video for display so it does not have the same delay The FIXED AUDIO output jacks are in sync with the video signal from the Video output If you re using an external audio receiver to accompany video on the HDTV Monitor s screen use the VARIABLE AUDIO output jacks described below VARIABLE AUDIO Provides variable level audio output Volume levels are controlled by the volume controls on the TV and ...

Page 13: ...t a bandwidth of up to 1 78 Gigabits per second L Audio R Audio Provides left and right audio connections when using the DVI jack The left audio connector is usually white and the right connector is usually red Note Remember to connect the left and right audio cables because the DVI cable carries only the picture signal not the sound Wired IR This jack is for connecting a wired remote control syst...

Page 14: ... FIXED AUDIO VARIABLE AUDIO AUD IO VIDEO OUTPUT SUB V LEFT LEFT RIGHT TV Wired IR VIDEO DVI HDTV AUDIO L R AUDIO AUDIO L R L R Y PB PR HDTV TUNER ANT IN ANT OUT SAT IN IN OUT VCR ANTENNA IN ANTENNA OUT AUDIO L R VIDEO AUDIO L R VIDEO CABLE R O SATELLITE RECEIVER OFF AIR ANTENNA Y PB PR S VIDEO DVD PLAYER L R AUDIO OUT HDTV Tuner 1A 3A 3B 4A 5A 5B 1B 4B 5C 4C 6A 6B VCR TV DVD 2A 2B ...

Page 15: ...ct your HDTV Tuner to your VCR A Connect a coaxial cable to the HDTV Tuner s antenna output and to the VCR s antenna input B Connect the audio white and red cables to the Audio Output jacks on the HDTV Tuner and to the Audio Input jacks on the VCR C Connect the video cable to the Video Output jack on the HDTV Tuner and to the Video Input jack on the VCR 5 Connect your VCR to your TV A Connect a co...

Page 16: ...BLE S VIDEO V R L R Y L R L PB FOR FACTORY USE ONLY PR Y L R PB V R L RIGHT FIXED AUDIO VARIABLE AUDIO AUD IO VIDEO OUTPUT SUB V LEFT LEFT RIGHT TV Wired IR IN OUT VCR ANTENNA IN ANTENNA OUT AUDIO L R VIDEO AUDIO L R VIDEO CABLE OFF AIR ANTENN R A O VIDEO AUDIO L R S VIDEO SATELLITE RECEIVER 1A 1B 2 3B VCR TV 1C 3A 3C ...

Page 17: ...or antenna is connected to your VCR Connect the coaxial cable from your cable outlet or antenna to the Antenna Input on the VCR 3 Connect your Satellite Receiver to your TV A Connect the audio white and red cables to the VID1 L MONO and R Audio jacks on the back of the TV and to the Audio Output jacks on the satellite receiver B Connect the video cable to the VID1 V Video jack on the back of the T...

Page 18: ... VIDEO V R L R Y L R L PB FOR FACTORY USE ONLY PR Y L R PB V R L RIGHT FIXED AUDIO VARIABLE AUDIO AUD IO VIDEO OUTPUT SUB V LEFT LEFT RIGHT TV Wired IR IN OUT VCR ANTENNA IN ANTENNA OUT AUDIO L R VIDEO AUDIO L R VIDEO CABLE OFF AIR ANTENN R A O Y PB PR S VIDEO DVD PLAYER L R AUDIO OUT 1A 2A 2B 3 DVD 1B 2C VCR TV ...

Page 19: ... to the VID1 V Video jack on the back of the TV using a video cable Important If you use the VID1 S VIDEO or V Video jack to connect your TV to the DVD player you must connect the audio cables to the VID1 L MONO and R jacks on the TV 2 Connect your VCR to your TV A Connect a coaxial cable to the VCR s Antenna Output and to the ANTENNA CABLE Input jack on the TV B Connect the audio white and red ca...

Page 20: ...e TV and turn back on The lamp should turn on Lamp is dead You can replace the lamp yourself follow ing the instructions on page 55 Go to page 60 for ordering information Power supply within TV may need service Go to page 58 for warranty information MENU OK Brings up the Main menu When the menu system is displayed pressing MENU OK selects highlighted items CH Scans down through the channel list In...

Page 21: ... or down arrow button to move up or down Use the right or left arrow button to move right or left To select the item that you ve highlighted press OK Note Highlighted means that the menu item stands out from other menu items on the list appears darker brighter or a different color Turn on the TV Press TV on the remote or press the Power button on the TV s front panel Note Pressing the TV button tu...

Page 22: ... a personal six character label for each channel Note Changing List and Labels can be time consuming You can change these at a later time by accessing the Setup menu 1 Press the left or right arrow button to scroll through the channels and choose the one you want to edit 2 Press the down arrow to highlight the In channel list option Press the left or right arrow button to add the box is checked or...

Page 23: ... this publication are for representation only 21 Chapter 2 Using the Remote Control Chapter Overview The Buttons on the Remote Control Programming the Remote to Operate Other Components The Learning Feature Remote Control Codes ...

Page 24: ...eature for this button works only with HDTV tuners see page 34 for more information on Autotuning CH or CH Scans up or down through the current channel list Press once to change the channel up or down press and hold to continue changing channels In DVD mode while a disc is playing CH advances to the next chapter CH goes to the preceding chapter CLEAR Removes any menu or display from the screen and...

Page 25: ... remote is in the right mode to control that device REV PLAY FWD STOP PAUSE If programmed these buttons provide transport control for some remote controllable VCRs DVD players tape decks and CD players SAT CAB Puts the remote in SAT CAB mode and if Autotuning is enabled turns on the TV and tunes to the correct input channel SKIP In TV mode press once before changing channels and the TV will wait 3...

Page 26: ...entry automatic code search Using Direct Entry 1 Turn on the component you want to operate VCR DVD player satellite receiver etc 2 Look up the brand and code number s for the component on the code list in this section 3 Press and hold the component button you want to program on the remote 4 Enter the 4 digit code from the remote control code list starting on page 31 If the component button flashes ...

Page 27: ...ave been searched the component button turns off and remote exits Automatic Code Search If the component you want to control does turn off 1 Press and release REV then wait 2 seconds Repeat this step until the component turns back on 2 To finish press and hold STOP until the component button on the remote turns off How to Use the Remote After You ve Programmed It Because this universal remote can c...

Page 28: ... specific button from the original remote control to one of the TV s remote control buttons Note All learned functions for a mode can be erased if you program a different component to that mode Up to 2 inches apart Adding a Learned Function There are several things to consider before you begin the learning process You can t record a learned function to the following buttons on the TV s remote contr...

Page 29: ...emote control press and release the button where you want to store the new function the component button turns off and then back on Note If you press an invalid button on the HDTV Monitor remote one of the component button flashes 4 times to alert you You ll have to repeat step 4 5 With the remote controls facing each other and no more than 2 inches apart press and hold the button of the component ...

Page 30: ...een cleared Note If an invalid button is pressed the component mode button s flashes 4 times and the selected component button stays on and remote remains in Clear Learned Function mode Repeat step 3 5 Press the CLEAR button and your HDTV Monitor remote returns to its original operation mode Deleting ALL Learned Functions This procedure erases all learned functions in every component mode of the re...

Page 31: ...er the HDTV Monitor remote is in AUX HD mode press the AUX HD button and you want to adjust the volume you only have to press the VOL or VOL buttons Follow the instructions below to set up Volume Punchthrough IMPORTANT First you must program the AUDIO button on the TV s remote control to operate your audio receiver or amplifier Go to page 24 for instructions If you can t program this remote to oper...

Page 32: ... LEDs turn on for 2 seconds and then turn off The remote returns to the factory settings Note If an invalid button is pressed all component LEDs blink 4 times and turn off At this point you must start over Using the INPUT Button Use the INPUT button to scroll through the available input channels and view components you have connected to the TV 1 Press TV to place the remote in TV mode Make sure th...

Page 33: ...ns DVD Aiwa 3010 3021 Apex 3023 3024 Broksonic 3027 3075 Daewoo 3028 Denon 3029 3030 3031 Emerson 3032 3033 3076 Funai 3033 GE 3000 3034 3035 Go Video 3077 Hitachi 3009 3067 3068 3069 3070 JVC 3003 3011 3078 Kenwood 3071 Konka 3012 3013 Koss 3085 Lasonic 3087 Magnavox 3004 3036 Memorex 3037 Mintek 3038 Mitsubishi 3005 NAD 3032 Norcent 3039 3040 Onkyo 3041 Oritron 3047 Panasonic 3014 3042 Philips 3...

Page 34: ...d 2068 Motorola 2017 2068 MTC 2009 Multitech 2009 2012 2022 2031 2036 NEC 2005 2006 2007 2012 2014 2057 2064 Nikko 2010 Noblex 2009 Olympus 2017 Optimus 2010 2068 Optonica 2047 Panasonic 2017 2018 2055 2066 Pentax 2012 2033 2034 2053 2063 Pentex Research 2014 Philco 2017 2018 2037 2038 Philips 2017 2037 2047 2065 Pioneer 2006 2033 2042 2064 Portland 2012 2013 2015 2056 Proscan 2000 2001 2072 Quasa...

Page 35: ...thin this publication are for representation only 33 Chapter 3 Using the TV s Features Chapter Overview Channel Banner Autotuning Parental Controls and V Chip PIP Picture in Picture and POP Picture outside Picture Operation ...

Page 36: ...o remember to change your TV to the VID1 input for example when you want to watch a DVD on your DVD player 4 3 format Current screen format Mono Mono appears when the current channel is broadcasting in or Stereo mono Stereo appears when the current channel is broadcasting in stereo SAP The current channel is broadcasting SAP Second Audio Program information Parental Controls are locked CC Closed C...

Page 37: ... Choose this if you don t have this particular component connected to the TV or if you don t want the TV to automatically tune to the correct channel input when you re using this component Channel 3 or 4 Component is connected to the CABLE ANTENNA jack on the back of the TV and you want the TV to tune to channel 3 when you press the corresponding button on the remote Reminder make sure the compone...

Page 38: ...f you block their age based rating You can also block out programs that have been given an Exempt rating and programs that are considered unrated The next several pages have tables showing the TV age based ratings and content themes for the US and Canada US V Chip TV Rating Limit The V Chip TV Rating Limit lets you decide which TV programs can and cannot be viewed To set TV programming limits 1 Ch...

Page 39: ...is program suitable for all ages It contains little or no sexual dialogue D or situations S no strong language L and little or no violence V TV Y7 Directed to Children 7 years and older Designed for children ages 7 and above It may be more appropriate for children who have acquired the developmental skills needed to distinguish between make believe and reality Themes and elements in this program m...

Page 40: ...ngs TV MA Mature Audience Only TV 14 Parents Strongly Cautioned TV PG Parental Guidance Suggested TV G General Audience TV Y7 Directed to Children 7 years and older TV Y All Children Content Themes D Sexually explicit dialogue L Adult language S Sexual situations V Violence FV Fantasy Violence Blocking Specific Content Themes You can block programs based on their content Content is represented by t...

Page 41: ... frequent use of profanity PG Parental Guidance Programming intended for a general audience but which may not be suitable for younger children under the age of 8 Parents may consider some content inappropriate for unsupervised viewing by children aged 8 13 Violence Guidelines Depictions of conflict and or aggression will be limited and moderate may include physical fantasy or supernatural violence ...

Page 42: ...tch on their own Violence Guidelines Violence will not be portrayed as the preferred acceptable or only way to resolve conflict or encourage children to imitate dangerous acts which they may see on television Any realistic depictions of violence will be infrequent discreet of low intensity and will show the consequences of the acts Other Content Guidelines There will be no profanity nudity or sexua...

Page 43: ... activate V Chip for rating limits to take effect Press the down arrow to highlight Unrated Exempt Prog Then press the right arrow to toggle between View and Block Lock Unlock Parental Controls Selecting this option lets you lock and unlock parental controls settings using a password If you do not lock parental controls none of the settings for V Chip Channel Block or Front Panel Block will take e...

Page 44: ...the way the PIP window works PIP Brings up the PIP window Press again to bring up POP Press again to remove the window Up and down arrow buttons Let you move the PIP window to different corners of the screen Up arrow moves PIP counterclockwise down arrow moves PIP clockwise Left and right arrow buttons Switches the main POP window where the sound is coming from with the other window SWAP Switches ...

Page 45: ...ontained within this publication are for representation only 43 Chapter 4 Using the TV s Menu System Chapter Overview Sound Menu Picture Menu Channel Guide Menu Time Menu Parental Control Menu PIP Menu Setup Menu ...

Page 46: ...ono available for regular TV viewing only Plays the sound in mono only Use this setting when receiving broadcasts with weak stereo signals Stereo Splits the incoming stereo audio signal into left and right channels Most TV programs and recorded materials have stereo audio The word Stereo appears in the channel banner when you tune to a program that is broadcast in stereo Automatic available for re...

Page 47: ...deo for the visually impaired Sound logic Reduces the annoying blasts in volume during commercial breaks and also amplifies softer sounds in program material Eliminates the need to constantly adjust the volume Headphone settings Displays a choice list of available settings you can adjust Volume Bass and Treble The Headphone sound option allows you to choose stereo mono or automatic These descriptio...

Page 48: ... detail Medium for a slightly softer picture than the Minimum setting Maximum for an even softer smoother picture than the other settings the picture detail is somewhat decreased Optimized still picture When enabled box checked enhances the picture specifically for still frames for example if you re watching a slideshow on your HDTV monitor or if you ve paused a frame of a DVD Auto Skin Tone When e...

Page 49: ...al Use the left or right arrow button to make adjustments To return to the Picture menu press the up or down arrow button Display options settings Lamp brightness You can adjust the brightness of your picture by adjusting the brightness of your display lamp The Boosted setting gives you a brighter picture while the Normal default setting gives you a longer lamp life Horizontal position You can adj...

Page 50: ... time If it is eight o clock for example you must first enter the number zero then number eight Use the OK button to choose between AM and PM Wake up timer Lets you set the TV to turn itself on When you turn on Wake up timer the following options appear Wake up time Lets you set the time you want the TV to turn itself on Wake up duration Lets you set how long you want the TV to stay on when it turn...

Page 51: ...figure the TV to fit its surroundings and your preferences To access the Setup menu press MENU on the remote and then select Setup from the main menu Channel setup Signal Type The TV chooses the signal type during the initial setup If you change how you receive broadcasts through the antenna input you must change the Signal type setting Choose Cable if you are using cable or a cable box for TV signa...

Page 52: ...coded with closed captioning information which lets you display the audio portion of a program as text on the TV screen Closed captioning is not available on all channels at all times Only specific programs encoded with closed captioning information When a program is closed captioned CC is displayed in the channel banner See Chapter 3 for more information about the channel banner The closed caption...

Page 53: ... within this publication are for representation only 51 Chapter 5 Other Information Chapter Overview Troubleshooting Lamp Replacement Instructions Limited Warranty Care and Cleaning FCC Information Accessory Information ...

Page 54: ...l Press the POWER button on the front of the TV If the TV turns on check the remote control solutions on the next page The front panel controls may be locked disabled Use the remote control to unlock the front panel controls by selecting the Front Panel Block in the Parental Control menu and press OK to uncheck the box The TV might be performing a periodic diagnostic check Wait for a few minutes f...

Page 55: ...ted to the jacks Try adjusting sharpness function to improve weak signals Go to page 47 for more instructions Sound from external audio receiver amplifier not in sync with the HDTV Monitor s screen If you re watching a program on the HDTV Monitor s screen and listening to the audio from the FIXED AUDIO output jacks you might notice that the video and audio are slightly out of sync The HDTV Monitor ...

Page 56: ...the remote Note if you remove the batteries you may have to reprogram the remote to operate other components You might need to drain the remote s microprocessor remove batteries and press the number 1 button for at least 60 seconds Release the 1 button replace the batteries and if necessary program the remote again Make sure there s nothing plugged into the WIRED IR jack on the TV s back panel The...

Page 57: ... you read and understand all of the instructions If you need any clarification call 1 866 723 6486 for help You must follow all the instructions step by step TTE Technology Inc cannot be held responsible for failure to adhere to the safety measures described herein the safety measures on the back panel of the TV and any other reasonable safety practices and precautions Note Lamp contains a small am...

Page 58: ... precaution will ensure that no one plugs in the TV if you walk away from it or when you re waiting for the lamp unit to cool or when you re installing the new lamp 5 Wait 30 minutes so the lamp can thoroughly cool If you don t wait at least 30 minutes you risk getting injured 6 After 30 minutes go to the back of the TV set and find the lamp unit access door located in the lower right side of the T...

Page 59: ...t turn on unless this door is in place and properly attached a Insert the catch tabs also called latches into the slots on the left side of the lamp access compartment first Then put the rest of the door in place by rotating the door until it is fully closed and the latches are engaged b Tighten the screw 16 Plug the power cord into the back of the TV first and then back into the wall outlet strip 1...

Page 60: ...ou must take your unit to the Service Center location at your own expense or pay for the cost the Service Center may charge to transport your unit to and from your home Proof of purchase in the form of a bill of sale or receipted invoice which is evidence that the product is within the warranty period must be presented to obtain warranty service For rental firms proof of first rental is also require...

Page 61: ...ilation slots in the cabinet to help assure adequate ventilation The TV s screen may be cleaned with a soft lint free cloth as well Take care not to scratch or mar the screen If necessary you may use a cloth dampened with warm water Never use strong cleaning agents such as ammonia based cleaners or abrasive powder These types of cleaners will damage the TV While cleaning do not spray liquid direct...

Page 62: ...Triple cable used to connect a video source with Y PR PB jacks to the TV Gold Tipped cable DT6DC 6 ft price 24 95 DT12DC 12 ft price 34 95 2 way Signal Splitter helps you connect to a second TV or VCR Amplified VHF UHF FM Antenna allows you to easily switch from the antenna signal to cable or satellite easily without disconnecting antenna Surge Protector provides eight outlets with 3 adapter spacin...

Page 63: ...E 35 47 Audio 11 Component video 10 35 DVI 4 11 35 Front 35 Front panel 11 S Video 11 35 Video 11 35 L Lamp 2 Lamp replacement 55 57 Language 19 50 Learning feature 26 28 Lists and labels 20 49 M Maximum TV volume 50 Menu Button 19 22 Channel guide 48 Language 19 50 Parental control 48 Picture 46 PIP 49 Setup 19 49 Sound 45 Time 48 MENU OK Button 18 Mute 23 34 O ON OFF button 23 Optimized still pi...

Page 64: ...ks are trademarks of THOMSON S A used under license to TCL Thomson Electronics TTE Printed in USA TOCOM 1642954A Please do not send any products to the Indianapolis address listed in this manual or on the carton This will only add delays in service for your product Visit the RCA Scenium website at www rcascenium com ...

Reviews: