3
EN
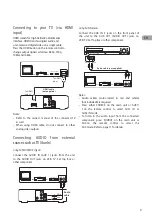
Connecting AUDIO from external
sources such as TV (Aux-In)
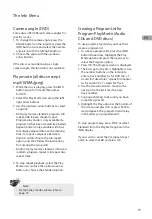
Connecting to your TV (via HDMI
input)
HDMI stands for High Definition Multimedia
Interface. HDMI transfers digital audio and
uncompressed digital video on a single cable.
Press the HDMI button on the remote control to
change output signals as follows: 480p, 720p,
1080i and 1080p.
Notes:
• Refer to the owner's manual of the connected TV
as well.
• When using HDMI cable, do not connect to other
analog video outputs.
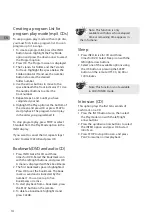
Using AUDIO IN (AUX 1) jacks
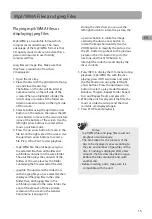
Using AUX IN 2 jacks
Notes:
• Audio cables (color-coded in red and white)
(not included) are required.
• Press either SOURCE on the main unit or AUX1/
2 on the remote control to select AUX1 IN or
AUX2 IN mode.
• To listen to the audio input from the connected
component, press SOURCE on the main unit or
AUX on the remote control to select the
AUX mode. Refer to page 17 for details.
Connect the AUDIO IN (AUX 1) jacks from the unit
to the AUDIO OUT jacks on VCR, TV, Set Top Box or
other component.
Connect the AUX IN 2 jacks on the front panel of
the unit to the AUX OUT (AUDIO OUT) jacks on
VCR, TV, Set Top Box or other component.
OR
OR
VCR
TV
Set Top Box
VIDEO OUT
1
HDMI
HDMI
To HDMI
output
To HDMI
input
HDMI cable
(not supplied)
OR
OR
VC R
TV
Set To p B ox
AUDIO OU T
White
Red
VIDEO OUT
1
Audio
cable
OR
OR
VC R
TV
Set To p B ox
AUDIO OU T
Red
AUX IN
2
AUX IN
2
White
Audio cable (not supplied)
Summary of Contents for RTD317
Page 35: ......


