background image

To Reduce Image Dist


Distance Between The Projector And Screen 

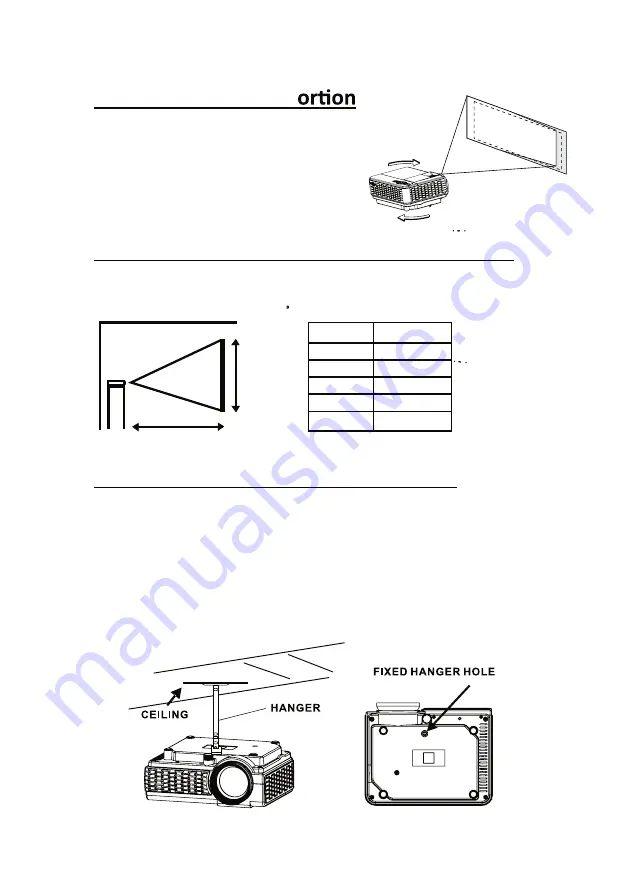
Measure the distance between the projector and where you want to position 

the screen. This is the projection distance.

Installing your Projector in the Ceiling

6

S

C

R

E

E

N

S

IZ

E

DISTANCE

Distance
1.16m
1.35m
1.51m
1.81m
2.15m 

Screen Size
37 inch
45 inch
50 inch
60 inch
72 inch

•  Move the projector as close to the center of 

the screen as possible.

•  The light beam from the projector should be 

perpendicular to the screen for a rectangular 
or square image.

When installing the projector in the ceiling, please purchase a projector mount 
recommended by an installation professional and follow the instructions that 
come with the mount.
Before installing the projector in the ceiling, please check to make sure the 
ceiling structure can support the weight of the projector and the mount. If in 
doubt, please ask the advice from an installation professorial.

NOTE:

 Projector mount and screw(s) not included

Summary of Contents for RPJ106

Page 1: ...ks of RCA Trademark Management and are used under license by Curtis International Ltd Any other product service company trade or product name and logo referenced herein are neither endorsed nor sponsored by RCA Trademark Management or its affiliates Ideal for dark viewing environments for optimal performance Please note Projector brightness is measured in ANSI lumens Your viewing environment is th...

Page 2: ...xit from the apparatus 10 Only use a chments accessories specified by the manufacturer 11 Unplug this apparatus during lightning storms or when unused for long periods 12 Refer all servicing to qualified service personnel Servicing is required when the apparatus has been damaged in any way such as power supply cord or plug is damaged liquid has been spilled or objects have fallen into the apparatus ...

Page 3: ... Changes or modified to this unit not expressly approved by the party responsible for compliance could void the user s authority to operate the equipment 6 WARNING Use of this unit near fluorescent lighting may cause interference regarding use of the remote If the unit is displaying erratic behavior move away from any fluorescent lighting as it may be the cause 7 WARNING Shock hazard Do Not Open 8...

Page 4: ...to try to correct the interference by one or more of the following measures Reorient or relocate the receiving antenna Increase the separation between the equipment and receiver Connect the equipment into an outlet on a circuit different from that to which the receiver is connected Consult the dealer or an experienced radio TV technician for help In The Box 3 Remote Main unit Lens Cover User Manua...

Page 5: ...ntrols of Remote P8 Install Remove Battery Of Remote P8 Controls of Projector P9 Install Power Adapter P10 Main Button Operation P10 Connect HDMI Show the Image On Projector Screen Connect AV Show The Image On Projector Screen P11 Connect VGA Show The Image On Projector Screen P12 Connect Audio Output Aux Out Line Out Earphones P13 Install USB Device And Micro Sd Card TF P13 Using TF Card and USB ...

Page 6: ...setup and portability Rear Table Select this location with the projector placed near the floor behind the screen NOTE That a special rear projection screen is required Front Ceiling Select this location with the projector suspended upside down from the ceiling in front of the screen NOTE A projector mount is required to install the projector in a ceiling Rear Ceiling Select this location with the ...

Page 7: ...ter of the screen as possible The light beam from the projector should be perpendicular to the screen for a rectangular or square image When installing the projector in the ceiling please purchase a projector mount recommended by an installation professional and follow the instructions that come with the mount Before installing the projector in the ceiling please check to make sure the ceiling str...

Page 8: ...harpen the image by rotating focus knob Follow below picture to adjust the focus and trapezoidal screen Adjust the focus by turning the knob while observing the image pixels near the center of the screen Optimal focus is obtained when the pixels are clearly visible Depending on the projected screen size the focus near the screen edges may be less sharp than the screen center Keystone image is crea...

Page 9: ...gs Finally replace the cover Batteries shall not be exposed to excessive heat such as placing under the sunlight or near a fire Please make sure the batteries are installed with their correct polarities Do not mix old and new batteries Use only the same type of batteries Do not dispose of the batteries in fire battery may explode or leak Do not recharge a non rechargeable battery OK 2ABC 1 3DEF 4G...

Page 10: ... TRAPEZOIDAL ADJ Knob 7 s 8 9 POWER Indicator 10 Controls Of Projector 11 R 12 s 13 M 14 S 15 EAR PHONE Jack 16 AV IN Jack 17 TF Card Slot 18 HDMI 1 2 Ports 19 USB Port 20 DC IN Jack 9 1 2 VGA IR 3 4 HDMI 2 HDMI 1 USB AV 15 16 17 18 19 20 OK 5 6 7 8 9 10 11 12 13 14 OK ...

Page 11: ...tatus or exit the menu Press the buttons to fast search forward and rewind on USB TF Press the buttons to search next or previous file on USB TF VOL VOL Press the buttons to select the sound level Press the button to play pause the playback of file on USB TF card FLIP Press the button to rotate mirror projector screen ZOOM Press the button to select image scale Press to mute the audio Press again ...

Page 12: ... press the button to turn on unit and power indicator will light GREEN 4 Press the button to select AV mode and the video of AV device will show on projector screen 5 Press the button to turn off unit power Important Note If there is no sound from the internal speakers when playing media contents from a set top box BD DVD or streaming players connecting to the HDMI input please check the set top b...

Page 13: ...7 9 60 46 6 70 48 1 72 46 9 75 XGA 1024x768 40 3 50 48 4 60 56 5 70 12 Follow below picture to connect VGA cable and device 1 Turn off the unit before connect VGA cable 2 Press the button to turn off power of your projector before connection 3 After connect press the button to turn on unit and power indicator will light GREEN 4 Press the button to select VGA mode and the video of VGA device will s...

Page 14: ...rom the stereo audio output when playing media contents from a set top box BD DVD or streaming players connecting to the HDMI input please check the set top box or the player s digital audio settings and make sure it is set to PCM Stereo mode Connect Audio Output Aux Out Line Out Earphones Install USB Device And Micro Sd Card TF Follow below picture to install USB and TF card Turn off the unit bef...

Page 15: ... Figure 3 14 Sub Menu on Text screen Figure 4 OK OK OK OK OK OK OK OK OK OK 1 When music playback press the show on lower figure 2 2 U OK OK 1 When movie playback press the show on lower figure 3 2 U OK OK 1 When text playback press the show on lower figure 4 2 U OK OK OK NOTE Pause F B F F P r ev N ext Stop R_ All R_ O FF Set A Play I nfo Slow Step G oto Pause FB FF Prev N e x t Stop R _ A l l Set A...

Page 16: ... the button to select Bluetooth speaker column 5 Press the button to select Bluetooth Speaker On 6 Turn on your External Bluetooth Speaker and select to Bluetooth pairing mode 7 A few seconds near the BT logo will show the connected External Bluetooth Speaker name in the main function page 8 After connection completed the unit sound to External Bluetooth speaker Disconnect the Bluetooth 1 Press th...

Page 17: ...ast Brightness Color Sharpness digit If chose User item Follow below figure Use buttons to select different color temperature to Cool Medium Warm User Use or to select Red Green Blue digit If chose User item Follow below figure Use buttons to select screen ratio AUTO 4 3 16 9 Follow below figure Use buttons to select Off Low Middle High Default Use buttons to select 75 100 USE TO SELECT USE TO SEL...

Page 18: ...utton to enter projector menu press buttons to select SOUND menu Using Projector Menu 2 0 17 Sound Mode User Parameter 0 0 1 0 e l b e r T 0 0 1 0 s s a B This SOUND menu showed on right upper of view screen Sound Mode Standard Balance 0 Auto Volume Off f f O r e k a e p S h t o o t e u l B USE TO SELECT PRESS OK PRESS OK USE TO SELECT PRESS OK PRESS OK Balance 0 Auto Volume Off Bluetooth Speaker ...

Page 19: ...eek Italian Norwegian Romanian Finnish Press button to enter projector menu press buttons to select OPTION menu This OPTION menu showed on right upper of view screen OSD Languag h s a i l g n E e Restore Factory Default Rotate 0 OSD Duration 30 S Software Update USB Restore Factory Default OSD Language English USE TO SELECT USE TO SELECT PRESS OK PRESS OK USE TO SELECT PRESS OK Rotate 0 USE TO SEL...

Page 20: ...ite light output ANSI IDMS V1 03 SECTION 15 3 33 LMS White brightness output ANSI IEC ISO 21118 33 1LMS 800 x 480 RGB 1080p 1080i 720p 576i 480p and 480i Operating 30W Standby 1 1W DC 12V 2 5A Input AC100 240V 50 60Hz Output DC12V 2 5A 16 7M 37 100 inch AV VGA HDMI X 2 Support USB device up to 32GB Support format Mpeg1 Mpeg2 Mpeg4 mp3 Jpeg Support TF card up to 32GB Support format Mpeg1 Mpeg2 Mpeg...

Page 21: ...nal consumer purchaser or gift recipient Keep the original sales receipt as proof of purchase is required to make a warranty claim This warranty is void if the product is used for other than single family household use or subjected to any voltage and waveform other than as on the specified rating on the label e g 120V 60Hz We exclude all claims for special incidental and consequential damages caus...

Reviews: