background image

14

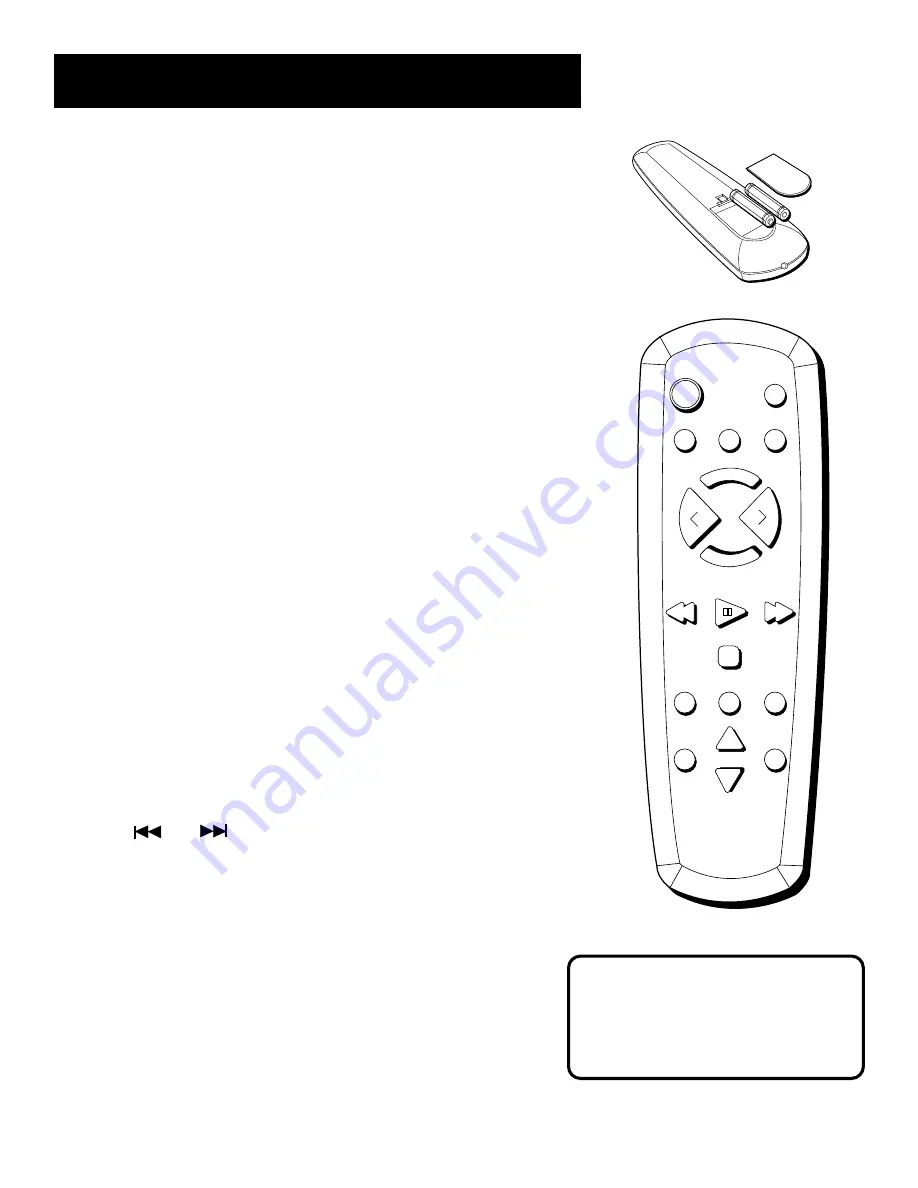
using the remote control

POWER

VIDEO

TAPE

CD

STOP

TUNING

SEEK

PRESET

TUNER

SHUFFLE

DISC SKIP

REPEAT

MUTE

TRACK

PLAY

SEARCH

TRACK

SEARCH

EQ P

RESET

V

O

L

V

O

L

In Your Sights

The remote control works by line-of-
sight, which means that for best
results, you should aim the remote
directly at the front of the unit.

Battery Installation

1.

Open the battery compartment door.

2.

Insert 2 AAA-size batteries as indicated on the back of
the remote control.

3.

Close the battery compartment door.

General Controls

The following buttons control the power and the volume:

POWER

 — Press to turn on and turn off power to the unit.

VOL

 (up & down) — Use to control the volume for all functions.

MUTE

 — Press once to mute sound; press again to turn off mute.

EQ PRESET

 –– Press to scroll through the PRESET EQ functions.

Function Controls

Press one of the FUNCTION control buttons to choose that function:

TUNER

TAPE

CD

, or 

VIDEO 

or turn the unit on from Standby mode.

Note: The 

TUNER

 button also controls the radio band

(AM or FM).

Tuner Controls

Use the TUNER buttons to control radio functions.

PRESET — Press to choose preset radio stations.

TUNING 

(up & down) –– Press to tune up and down.

SEEK — Press to tune manually. To automatically seek stations, hold
down the tuning up or down buttons for one second.

CD Controls

The remaining buttons control the CD player.

DISC SKIP — Press to change discs.

PLAY/PAUSE — Press to play discs, and to pause disc play.

STOP — Press to stop disc play.

TRACK 


and


 — Press to move to the beginning of a track

or search within a track.

SHUFFLE

 –– Press to random play your CD tracks.

REPEAT 

–– Press to repeat play of your CDs.

Summary of Contents for RP-9340

Page 1: ...USER S GUIDE AUDIO SYSTEM RP 9340 ...

Page 2: ...estions Also the Federal Communications Commission has prepared a helpful booklet How To Identify and Resolve Radio TV Interference Problems This booklet is available from the U S Government Printing Office Washington DC 20402 Please specify stock number 004 000 00345 4 when ordering copies Precautions Never open the cabinet under any circumstances Any repairs or internal adjustments should be mad...

Page 3: ...Buttons 7 Loadings Discs 7 Playing Discs 7 Shuffling Play Order 8 Repeating Play Order 8 Choosing Discs For Play 8 Programming Play Order 9 Understanding The Music Calendar 10 Using ATS Auto Track Skip 10 Front Panel Display Messages 11 using the cassette deck 12 Knowing The Cassette Deck Buttons 12 Playing Cassette Tapes 12 Recording On Cassette Tapes 13 using the remote control 14 Battery Instal...

Page 4: ...n setting up your system Choose a level solid surface Don t place it on a soft surface such as carpeting or foam rubber Choose a location away from direct sunlight radiators air ducts and other sources of heat Avoid locations that are subject to moisture mechanical vibration shock or excessive dust Make sure that the location has adequate air circulation Good ventilation is essential to protect th...

Page 5: ...t s back panel Connect the FM antenna wire the same way you connect the speakers After connecting the FM antenna extend it to its full length then you can adjust its position for better reception when you are listening to the radio VIDEO AUXILIARY Components Use the AUX input jacks on the back of the unit to add an additional source of sound into your system To hook up an auxiliary component match...

Page 6: ...OWER button is the Infrared Remote Control sensor The remote control will not work if the sensor is blocked or covered Standby indicator light Lights when the system power is off and unit is in standby mode variable bass boost Enhances bass frequencies at low volume levels The amount of boost is decreased as the volume is increased Press the VARIABLE BASS BOOST button to scroll through the variabl...

Page 7: ...be skipped when you use the ATS Auto Track Skip feature Number Indicator Depending on the current mode shows the volume level the preset number for radio stations or the track number of a CD Radio Band Indicator Shows which radio band you are using When listening to FM stereo the STEREO indicator also is displayed when the station is broadcasting in stereo Variable Bass Boost Indicator Shows the c...

Page 8: ...lay Note that the FM radio station must be transmitting in stereo for you to receive it in stereo If the STEREO indicator is fading in and out change from FM Stereo to FM Mono to improve reception Storing radio Stations in Memory Preset as many as 32 stations for easy access 1 Choose the radio band and station 2 Press the MEMORY button The PRESET indicator and the station frequency blink in the Fr...

Page 9: ...d to pause play Loading Discs 1 Press the OPEN CLOSE button to open the CD compartment drawer 2 Place the CD s into the tray 3 Press the DISC SKIP button to rotate the drawer in order to load a third CD Playing Discs After you get the discs loaded press the DISC SKIP button to choose the CD you want to play and then press Play Pause to begin play Press Stop to stop disc play CD Playing Time The el...

Page 10: ...e point in the track you want begin repeating A B flashes in the display 2 Press A B again at the point you want the repeating to stop or press A B again to cancel the function A B stops flashing and remains in the display The section of the track you marked repeats until you press Stop or until you press or to move to another track Repeating a Program When you program tracks into memory you can r...

Page 11: ... Program You must be in Stop mode in order to recall and edit the program 1 Press the PROGRAM button to enter Program mode The Front Panel Display shows first programmed track 04 in the example to the right 2 Press PROGRAM to move to the next program number until you get to the programmed track you want to change Pr 02 in the example to the right 3 Press DISC SKIP to choose the disc and then press...

Page 12: ...ndar lists 15 tracks and if there are more than 15 on a disc the 16 symbol appears While a track is playing the corresponding number in the Calendar blinks After the track is played the Calendar no longer displays its number Using ATS Auto Track Skip ATS Auto Track Skip is the opposite of programmed play instead of programming the tracks you want to hear you indicate which tracks you don t want to...

Page 13: ... of the program Front Panel Display Messages When using the CD function you may encounter the following messages TRACK AUTO TRACK SKIP 1 2 3 4 5 7 9 10 11 12 14 15 16 6 13 8 TRACK AUTO TRACK SKIP 1 2 3 4 5 7 9 10 11 12 14 15 16 6 13 8 The first ATS program number PR 01 contains track 08 Notice that when play begins track 6 does not appear in the Music Calendar and will be skipped TRACK AUTO TRACK ...

Page 14: ... function button to activate the cassette deck 2 Press STOP EJECT to open the cassette compartment door 3 Insert a tape into the compartment door and then close the door securely 4 Press REWIND or FAST FORWARD to move tape to the desired starting point 5 Press PLAY to begin playing the tape playing two tapes in sequence 1 Insert a tape into each of the tape compartments and close the tape doors 2 ...

Page 15: ...on 3 Press the RECORD button to begin recording 4 Press STOP EJECT to end recording From a CD 1 Insert a cassette tape into the tape deck preferably a blank cassette 2 Choose the CD function 3 Insert the disc s to be recorded then choose the track or create a program that you want to record 4 Press Play Pause on the CD player twice to begin and pause disc play 5 Press the RECORD button on the cass...

Page 16: ...ound press again to turn off mute EQ PRESET Press to scroll through the PRESET EQ functions Function Controls Press one of the FUNCTION control buttons to choose that function TUNER TAPE CD or VIDEO or turn the unit on from Standby mode Note The TUNER button also controls the radio band AM or FM Tuner Controls Use the TUNER buttons to control radio functions PRESET Press to choose preset radio sta...

Page 17: ...ing sprays or antistatic agents on discs Also never clean the discs with benzene thinner or other volatile solvents which may cause damage to the disc surface Tape Care Don t expose tapes to sunlight or store in hot places High temperatures may warp the shell or damage the tape itself Keep cassettes in their boxes when not in use Cassette tapes can be erased by magnetic fields produced by permanen...

Page 18: ...ray contains a disc Make sure that discs labels are facing up Make sure that Pause mode is not activated Make sure CD function is selected CD sound skips Clean the disc as explained in Care and Maintenance Check disc for warping scratches or other damage Check for vibration or shock that may affect the CD player Move system if necessary Distorted or noisy recordings Inspect the recording head and ...

Page 19: ... 3 ATS Auto Track Skip 10 AUX input jacks 3 C Cassette Deck Buttons FAST FORWARD 12 PAUSE 12 PLAY 12 RECORD 12 REWIND 12 STOP 12 STOP EJECT 12 cassette player features automatic level control 13 CD Button 7 CD Playing Time 7 REMAIN TIME 7 CD Remain Time Indicator 5 Choosing Discs for Play 8 Cleaning the Tape Heads 15 Clearing All Tracks 9 Clearing the Program 9 compact discs 3 and 5 7 Compact disc...

Page 20: ...er Electronics Inc Product Exchange Center 32 Spur Drive El Paso Texas 79906 Pay any charges billed to you by the Exchange Center for service not covered by the warranty A new or refurbished unit will be shipped to you prepaid freight What your warranty does not cover Customer instruction Your Owner s Manual provides information regarding operating instructions and user controls For additional inf...

Reviews: