background image

3

2. Attach the TV stand or wall mount bracket (not included)

Attach the TV Stand 

(For steps to attach the wall mount see page 4)

CAUTION:

Be sure to disconnect the A/C power cord before installing a stand or Wall-Mount brackets.
The LED display is very fragile and must be protected at all times when installing the legs that form the stand. Be sure to protect the 

TV screen from getting scratched or damaged by any hard objects. In addition, DO NOT exert pressure on the front of the TV at any 

time because it could crack.

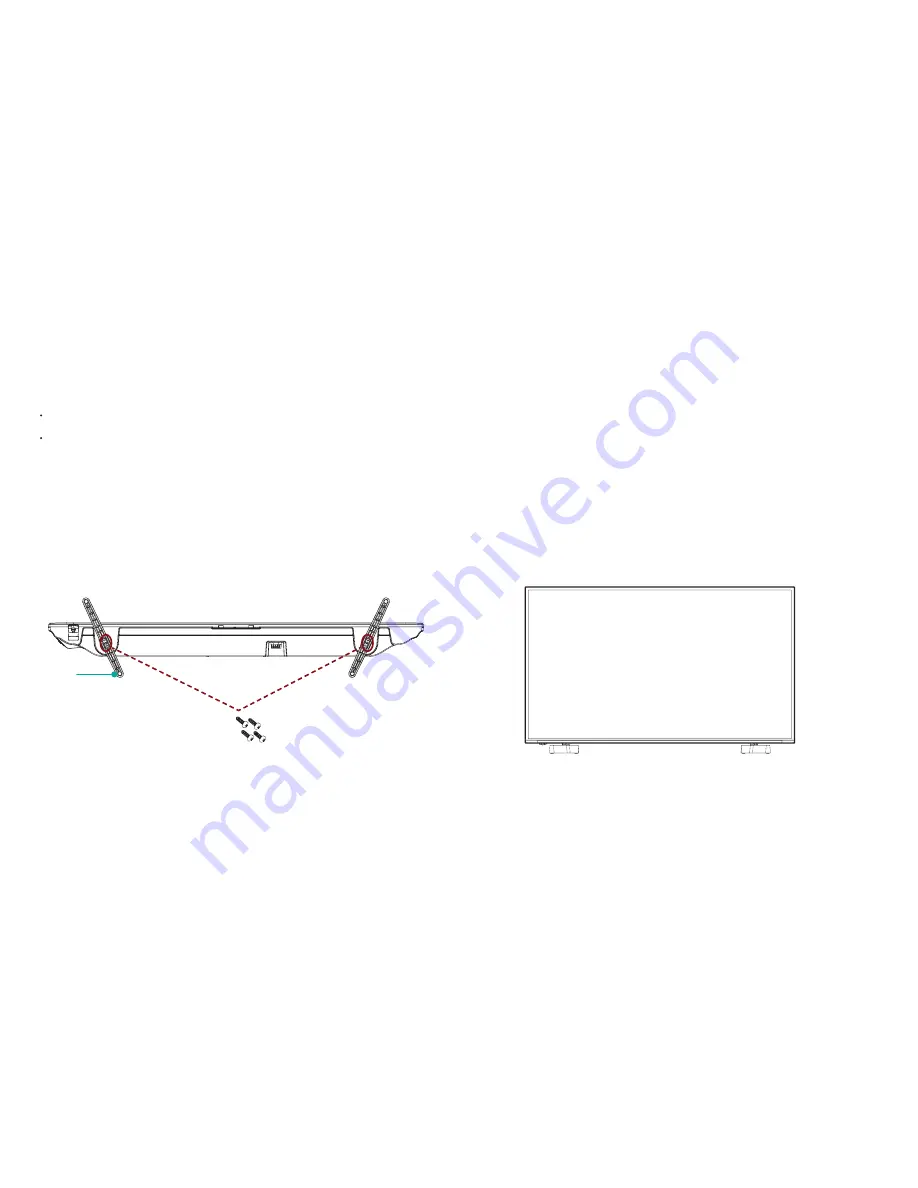
To attach the left and right leg that forms the stand:

1. Carefully place your TV face down on a soft, flat surface to prevent damage to the TV or scratching to the screen.

2. Place the legs into the bottom slots of the TV, insert and 

tighten the screws (found in the accessories bag) in the circled 

area with the screwdriver (not provided). 

leg

 Screws: ST4×16

3. Then the TV is ready for use now.

Summary of Contents for RLDED4350-UHD-B-SM

Page 1: ...RSAG2 025 SS 1...

Page 2: ...Quick Start Guide Before using the TV please read this guide thoroughly and retain it for future reference For more detailed instructions please see the Instruction Manual Model RLDED4350 UHD B SM...

Page 3: ...ed contents 2 Attach the TV stand or wall mount bracket 3 Buttons and Ports 5 Using your TV remote control 11 Power on the TV 13 Product specifications 16 Quick problem solving tips 17 Certification a...

Page 4: ...e foam in the carton box Required tools and devices Wireless router not included for Internet connectivity Phillips screwdriver not included to secure the TV stand HDMI and other types of cables not i...

Page 5: ...tect the TV screen from getting scratched or damaged by any hard objects In addition DO NOT exert pressure on the front of the TV at any time because it could crack To attach the left and right leg th...

Page 6: ...e fixing screws not provided that are 9 5 11 5 mm in length when measured from the attaching surface of the mounting hook Rear cover of the TV Spacer Screw Wall mount bracket 9 5 11 5 mm Wall mount ho...

Page 7: ...iew TV Bottom View Power Input SERVICE ANT CABLE 0 5A MAX 0 5A MAX HDMI2 4K 30Hz HDMI1 4K 30Hz ARC USB3 USB2 USB1 MHL DC 5V 900mA VOL Power MENU CH CH INPUT VOL DIGITAL AUDIO OUT HDMI 3 4K 60Hz HDMI 4...

Page 8: ...Connect an antenna cable set top box or satellite receiver Using your remote press the INPUT button and select TV as the input source HDMI DVD Player Recorder Set top Box Satellite Receiver Satellite...

Page 9: ...ble PB Blue PR Red L White R Red AV IN VIDEO Yellow Connect a composite video cable not provided and left right audio cables not provided from an external AV device Using your remote press the INPUT b...

Page 10: ...as a cell phone and view the screen of your device on the TV Recommend to use MHL Cable with 2 core as shown in the figure USB Connect a USB 3 0 device to transfer photos mu sic and movies to your TV...

Page 11: ...ing Your TV to a Wired or Wireless Network Connecting to a Wired Ethernet Network Connect your TV to your network by connecting the LAN port on the back of your TV to an external modem or router using...

Page 12: ...etwork adapter If the wireless router supports DHCP your TV can connect more easily to the wireless network If you apply a security system other than the systems listed below it will not work with the...

Page 13: ...previous place in the menu or app Live TV Change TV input source All Apps Channel up down Mute and restore sound Exit the application Turn Closed Caption On Off Special function buttons Confirmation b...

Page 14: ...to the battery compartment If you do not intend to use the remote control for a long time then remove the batteries Battery chemicals can cause a rash If the batteries leak clean the battery compartme...

Page 15: ...wer cord into a power outlet Press the Power button on the remote to turn on the TV A splash screen that shows the RCA logo appears Next the First Time Setup Menu begins by prompting you to choose you...

Page 16: ...t connection then select Wi Fi When you re done select your network from the list that displays and move to the next screen Complete the first time setup menu After the splash screen that shows the RC...

Page 17: ...payments may be required to access content through some applications Some or all of the included or downloaded application services in this manufacturer device may not function depending on the Inter...

Page 18: ...ut 60 Hz 640 480 800 600 1024 768 60 Hz 480 I 480 P 720 P 1080 I 1080 P 50 Hz 576 I 576 P 720 P 1080 I 1080 P 24Hz 30Hz 3840x2160 for HDMI 1 HDMI 2 24Hz 30Hz 50Hz 60Hz 3840x2160 for HDMI 3 HDMI 4 Rece...

Page 19: ...e mode is set to On Sound but no picture or black and white picture If the picture is black and white unplug the TV from the AC outlet and replug it after 60 seconds Check that the Color is set to 50...

Page 20: ...Reorient or relocate the receiving antenna Increase the separation between the device and receiver Connect the device into an outlet on a circuit different from that to which the receiver is connected...

Reviews: