RCA RDR4330 Instruction Manual Download Page 3

3

Copyright © 2020 RCA Communications Systems   

www.RCACommunicationsSystems.com

Communications Systems

RDR43x0-IS Series Professional
Digital Two-Way Radios

INSTRUCTION MANUAL

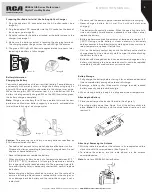
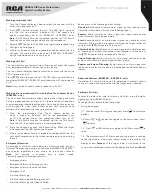
Preparing Your Radio for Initial Use Setting Up Your Charger

1.  Plug the adapter’s AC connector into the AC outlet socket. (see 

image A) 

2. Plug the adapter’s DC connector into the DC socket on the back of 

the charger. (see image B) 

3. Place the radio with the battery attached, or the battery alone, in the 

charger. (see image C) 

4. Make sure the battery contact is touching the charging terminals. 

The charging process begins when the red LED light illuminates. 

5. The green LED light will illuminate approximately two hours later, 

indicating the battery is fully charged.

Battery Storage

1.  Fully charge the battery before storing it for an extended period of 

time to avoid battery damage due to over-discharge. 

2. Recharge a battery after three months storage to avoid reduced 

battery capacity due to over-discharge. 

3. When storing a battery, keep it in a dry place at room temperature.

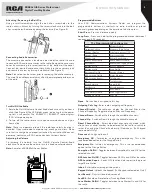
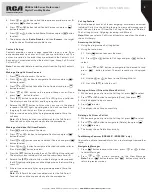
Attaching the Battery

1.  Place the battery on the back of the radio. (See Figure 1) 

2. Press the battery down (See Figure 2) until the battery clicks into 

place. 

Note:

 If the battery is not securely locked, remove it and 

reattach it.

Attaching / Removing the Antenna

1.  With the radio turned off, set the antenna in its receptacle and turn 

clockwise until it is screwed down. (See Figure 3) 

2. To remove the antenna, turn the radio off and turn the antenna 

counterclockwise.

Note:

 Same for all RDR43x0 Series Radios.

Battery Information

Charging the Battery

Your radio is powered by a Lithium-Ion (Lilon) battery. To avoid damage 
and comply with warranty terms, charge the battery using only an 
original RCA charger, exactly as described in the charger user guide. 
When the charger’s LED illuminates red, it is an indication that the 
battery is being correctly charged. When the LED illuminates green, 
the battery charge is complete. 

Note:

 Charge a new battery 12 to 14 hours before initial use for best 

performance. Maximum battery capacity is normally achieved after 
two or three full charge / discharge cycles.

Caution:

 To reduce the risk of injury, use only batteries specified by 

RCA Communications Systems. 


– To avoid risk of personal injury, do not dispose of batteries in a fire. - 

Dispose of batteries according to local recycling regulations. Do not 
dispose as household waste. 


– Never attempt to disassemble the battery. 


– When charging a battery, keep it at a temperature between 41°F ~ 

104°F (5°C ~ 40°C) to ensure a full charge. Temperatures outside 
this range significantly reduce battery life. The operating time (talk-
time and standby time) is noticeably shorter than normal, replace 
the battery. 


– Before charging a battery attached to a radio, turn the radio off to 

ensure a full charge. Never leave a radio on while in the charger, as 
it can damage both the battery and the radio; the charger is not a 
radio stand. 

Image A

Image B

Image C


– Do not cut off the power supply or remove battery while charging.


– Never charge a battery that is wet. Dry it with soft cloth prior 

charging. 


– The battery will eventually weaken. When the operating time (talk-

time and standby time) becomes noticeably shorter than normal, 
replace the battery. 


– Battery performance greatly decreases at temperatures below -4°F 

(-20°C). Having a spare battery is always necessary in extremely 
cold environments. A cold battery may work again when it returns to 
room temperature, so keep it for later use. 


– Dust on the battery contact may cause the battery not to work or 

charge properly. Use a clean dry cloth to wipe it before attaching 
the battery to the radio. 


– Batteries with damaged contacts can be extremely dangerous. Any 

battery with damage to one or more contacts should be replaced 
immediately and not used under any circumstances.

2

1

3

Summary of Contents for RDR4330

Page 1: ...lls Selecting a Zone 6 Selecting a Channel Subscriber ID or Group ID 6 Receiving and Responding to a Group Call 6 Receiving and responding to an Individual Call 6 Receiving and All Call 6 Making a Radio Call 6 Making Call with Channel Selector Knob Making a Group Call 6 Making an Individual Call 7 Making an All Call 7 Making Group Individual Call with One Touch Access Button 7 Emergency Operation ...

Page 2: ...lip Antenna ANH4300U W UHF models ANH4300V W VHF models RDR4330TM Handheld Radio RDR4390TM Handheld Radio RDR4360TM Handheld Radio RCA RDR43x0 ISTM Series Overview 1 Side Button 1 Programmable 7 Channel Knob 13 Speaker 19 Belt Clip 2 Push To Talk Button PTT 8 On Off Volume Knob 14 Numeric Keypad RDR4360 RDR4390 20 Battery 3 Side Button 2 Programmable 9 Earpiece RDR4360 RDR4390 15 Duplex Microphone...

Page 3: ...ger s LED illuminates red it is an indication that the battery is being correctly charged When the LED illuminates green the battery charge is complete Note Charge a new battery 12 to 14 hours before initial use for best performance Maximum battery capacity is normally achieved after two or three full charge discharge cycles Caution To reduce the risk of injury use only batteries specified by RCA ...

Page 4: ...Terminates an outgoing emergency This is the recommended option for the Orange Button Emergency On Initiates an emergency This is the recommended option for the Orange Button Encryption On Off Toggles between Encryption On and Off for the selected channel GPS Location On Off Toggles between GPS On and Off for the radio GPS Location Report Sends GPS location data report to the preset target Base St...

Page 5: ...s the menu press the button Press the Up or Down button to access the menu functions 2 To select a function or enter a sub menu press the button 3 To go back one menu level or to return to the previous screen press the button Press the button to return to the Home Screen Radio Keypad RDR4390 only You can use the alphanumeric keypad to access the radio features You can also use the keypad to enter ...

Page 6: ...he subscriber alias or ID RDR4360 RDR4390 only 3 Press the PTT button to respond to the call and the LED indicator lights up red Note If Talk Permit Function is enabled wait for the Talk Permit Tone to finish and then speak clearly into the microphone 4 Release the PTT button to listen again 5 If there is no voice activity for a set period of time the call ends Receiving and responding to an Indiv...

Page 7: ...riod of time the calls end Radio returns to the screen you were on prior to initiating the call Emergency Operation An Emergency Alarm is used to indicate a critical situation You can initiate an Emergency at any time on any screen RDR4360 RDR4390 only display regardless of any activity on the current channel Note This function is available only in digital mode Your radio supports 7 Emergency Alar...

Page 8: ... and the display briefly shows Target Radio Available If the target radio is not active in the system the radio beeps twice and the display briefly shows Target Radio Unavailable Remote Monitor Allows the radio to send Remote Monitor command to another radio This command activates the receiving radio s microphone and transmitter for the duration specified for the receiving radio in the Remote Moni...

Page 9: ... Log lists are Outgoing Incoming and Missed Note When you select a Call List and it contains no entries the display shows List Empty Accessing the Call Log 1 Using the programmed Call Log button 2 Using the radio menu 2 1 Press button to access the menu 2 2 Press or button to Call Logs and press button to select 2 3 Press or button to navigate to the desired list and press button to select The mos...

Page 10: ... to select Status Messages press button to enter the Status Messages menu 4 Press or button to select the preset Status Message and press button to enter 5 Press or button to select the target radio you wish to send the Status Message to 6 If the message is sent the radio beeps twice and the display shows Sent If the message is not sent the radio beeps once and display shows Failed Managing Sent T...

Page 11: ...eeps twice and the display shows Sent If the message is not sent the radio beeps once and the display shows Failed Deleting a Text Message from the Inbox RDR4360 RDR4390 only 1 Press button to access the menu 2 Press or button navigate to the Message and press to select 3 Press or button to navigate to Inbox and press to select 4 Press or button to select the message and press to access the sub me...

Page 12: ...mmed Scan button Keypad Locked and Keypad Unlocked You can lock your radio s keypad to avoid an inadvertent key press You have two options to lock your keypad Shortcut key press the programmed keypad lock button to lock or unlock the keypad Use keypad to activate the setting 1 Press to access the menu 2 Press or to navigate to Settings and press to select 3 Press or to navigate to Keypad Lock and ...

Page 13: ...tting Setting Channel Display Defines if the radio displays the caller ID or the Alias during a call 1 Press to access the menu 2 Press or to navigate to Settings and press to select 3 Press or to navigate to Channel Display and press to select 4 Press or to select Alias or Frequency Setting the Power Level Sets the radio s transmission power level for this channel This feature can be toggled betw...

Page 14: ...ey Value and Key ID for ARC4 Encryption as the transmitting radio in order to decode the encrypted transmission Channels may have their encryption enabled or disabled usingaprogrammableshortcutkey EncryptionOn Off ortheEncryption Menu Display Radios Only A radio must have the Encryption enabled on the channel to transmit with encrypted transmission A visual indicationappearsonalldisplayradiosifthe...

Page 15: ... or spirits Symptom Solution Radio will not power on a The battery needs charging Recharge the battery or replace it with a fresh one b The battery is not properly installed Remove the battery and reattach it The operating time is notice ably shorter than normal even though the battery is properly charged a The battery has worn out it is time to buy a new battery b The battery is not fully charged...

Reviews: