background image

2

S

S

S

SA

A

A

AF

FF

FE

E

E

ET

T

T

TY 

Y IIIIN

N

N

NS

S

S

ST

T

T

TR

R

R

RU

U

U

UC

C

C

CT

T

T

TIIIIO

O

O

ON

N

N

NS

S

S

S

• Never open the cabinet or remove the 

metal control panel, as this might 
result in electrical shock or damage to 
the unit.

• If your PRO-SW60P needs servicing, 

contact your local RadioShack store.

• To prevent electrical shock, do not use 

this polarized plug with an extension 
cord receptacle or other outlet unless 
the blades can be fully inserted to 
prevent blade exposure.

• Unplug the PRO-SW60P’s power cord 

from the electrical outlet if it will be 
left unused for a long time.

• Only connect this unit to a power 

supply of the type described in the 
operating instructions or marked on 
the unit.

• Route the power-supply cord so it is 

not likely to be walked on or pinched 
by items placed upon or against it, 
especially at plugs, convenience 
receptacles, and the point where it 
exits from the unit.

• Placing the subwoofer on the same 

stand or shelf as your turntable can 
result in low frequency rumble or 
acoustic feedback.

Cautions:

• To prevent fire or shock, do not 

expose this subwoofer to rain or 
moisture.

• Do not place the subwoofer with its 

metal plate against the floor.

• Place the subwoofer away from heat 

sources such as radiators, stoves, or 
other appliances that produce heat.

WARNING:

 To reduce the risk of fire or

shock hazard, do not expose this product to
rain or moisture.

CAUTION

RISK OF ELECTRIC 

SHOCK. DO NOT OPEN.

CAUTION:

 TO REDUCE THE RISK

OF ELECTRIC SHOCK, DO NOT
REMOVE COVER OR BACK. NO USER-
SERVICEABLE PARTS INSIDE. REFER
SERVICING TO QUALIFIED PERSON-
NEL.

This symbol is intended to alert
you to the presence of uninsu-
lated dangerous voltage within
the product’s enclosure that
might be of sufficient magnitude
to constitute a risk of electric
shock. Do not open the prod-
uct’s case.

This symbol is intended to
inform you that important oper-
ating and maintenance instruc-
tions are included in the
literature accompanying this
product.

!

!

40-5023.fm  Page 2  Thursday, November 4, 1999  1:44 PM

Summary of Contents for PRO-SW60P

Page 1: ...llite combination It also has these features Auto On Off automatically switches the PRO SW60P s amplifier to standby if the subwoofer does not receive a signal for about 11 minutes Standby Indicator lights when the subwoofer is connected to power but not receiving a signal High Level Input lets you connect the subwoofer to an amplifier s or receiver s speaker outputs Note You need speaker wire not...

Page 2: ...point where it exits from the unit Placing the subwoofer on the same stand or shelf as your turntable can result in low frequency rumble or acoustic feedback Cautions To prevent fire or shock do not expose this subwoofer to rain or moisture Do not place the subwoofer with its metal plate against the floor Place the subwoofer away from heat sources such as radiators stoves or other appliances that ...

Page 3: ...d back walls Even slightly moving the subwoofer can have a major effect on bass response We recommend that you test the subwoofer in different locations to determine where the best balance is between your satellite speakers if used and subwoofer We also recommend that you place the PRO SW60P at least 4 inches away from the wall and at least 2 3 feet away from your television or computer s disk dri...

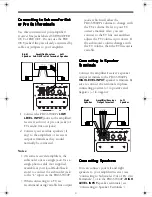
Page 4: ...t to o o o S S S Sp p p pe e e ea a a ak k k ke e e er r r r T T T Te e e er r r rm m m mi i i in n n na a a al l l ls s s s Connect the amplifier receiver s speaker output terminals to the PRO SW60P s HIGH LEVEL INPUT speaker terminals Be sure to connect the terminals in phase connecting positive to positive and negative to negative C C C Co o o on n n nn n n ne e e ec c c ct t t ti i i in n n ng...

Page 5: ...y mode A A A AD D D DJ J J JU U U US S S ST T T TI I I ING NG NG NG T T T TH H H HE E E E V V V VO O O OL L L LU U U UM M M ME E E E Once you have made all connections follow these steps to adjust the PRO SW60P s volume 1 Rotate VOLUME CONTROL to MIN 2 Turn on your amplifier receiver and another component such as a radio cassette player CD player or turntable 3 Begin play of an audio source such a...

Page 6: ...lockwise a little then rotate VOLUME CONTROL clockwise by about the same amount This increases low bass output without affecting the mid bass output To reduce low bass output without affecting the mid bass output equally rotate FREQUENCY HZ clockwise and VOLUME CONTROL counterclockwise C C C CA A A AR R R RE E E E To enjoy your RCA PRO SW60P 60 Watt Powered Subwoofer for a long time Keep the subwo...

Page 7: ...10 THD 50W RMS 4 Ohms 1 THD Crossover 50 Hz 200 Hz Adjustable Frequency Response 50 200 Hz Power Voltage AC 120 V 60 Hz Power Consumption 60W Dimensions HWD 103 4 101 2 12 in 263 267 305 mm Weight 17 4 lbs 7 9 kg Specifications are typical individual units might vary Specifications are subject to change and improvement without notice ...

Page 8: ...nt of a product defect during the warranty period take the product and the RadioShack sales receipt as proof of purchase date to any RadioShack store RadioShack will at its option un less otherwise provided by law a correct the defect by product repair without charge for parts and labor b replace the product with one of the same or similar design or c refund the purchase price All replaced parts a...

Reviews: