54
Playback
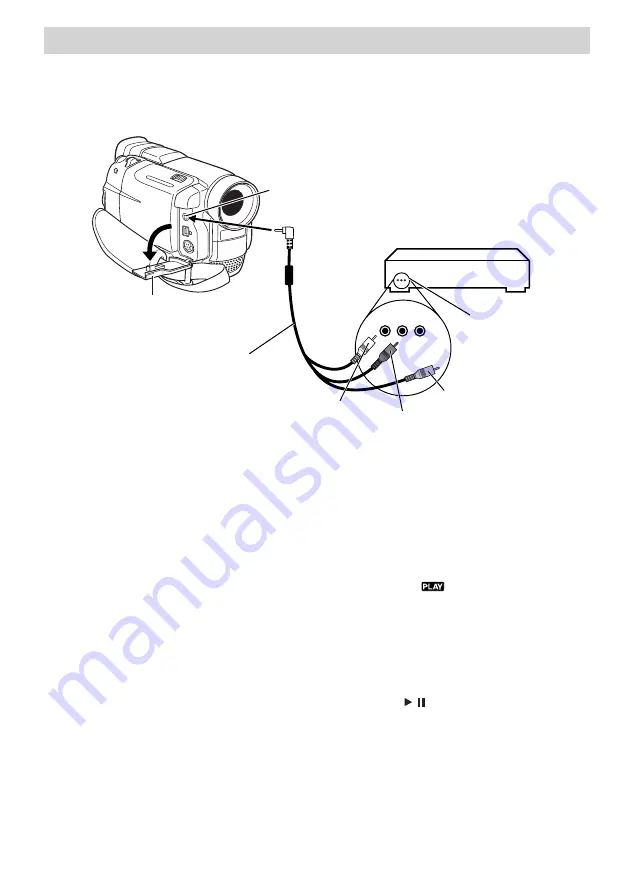
Dubbing Sound to a VCR Using
A/V Input Jacks:
1. Locate the A/V cable that came
with the camcorder.
2. Make sure all units are turned off.
3. Connect the white plug of the A/V
cables to the VCR’s Left AUDIO
IN jack (L AUDIO IN).
4. Connect the red plug of the
A/V cables to the VCR’s Right
AUDIO IN jack (R AUDIO IN).
Note
: Some VCRs do not offer both left
and right audio jacks. If your TV only has
one audio jack, use the A/V cable’s white
plug for audio.
6. Open the camcorder’s Connector
Cover.
L AUDIO IN
R AUDIO IN
VIDEO IN
L AUDIO IN
R AUDIO IN
VIDEO IN
Connector cover
(Open when connecting cables)
Yellow Plug
(NOT Connected)
Red Plug
(R AUDIO IN)
White Plug
(L AUDIO IN)
A/V Connection Cable
(Included with Camcorder)
A/V Jack
A/V Jacks
(Note: Can be on
front or rear of VCR)
VCR
7. Connect the A/V Connection
Cable’s single plug into the
camcorder’s A/V Jack.
8. Press in the Thumb Lock and
rotate the Power Switch to
playback (
) mode.
9. Turn on the VCR.
10. Tune the VCR to its video input
channel to hear the recording.
11. Start the VCR’s record mode.
12. Press the camcorder’s Play/Pause
Button (
/
) to begin playback.
Connecting the Camcorder to a VCR to Capture Sound Only


