background image

24

Chapter 3

Graphics contained within this publication are for representation only.

Using the TV’s Features

V-Chip TV Rating Limit

The V-Chip TV Rating Limit lets you decide which TV programs can and cannot be
viewed. To set TV programming limits:

1.   Choose Parental Controls from the Main menu. If Parental Controls are locked,

you must enter your password. If they are not locked, you will get a message
reminding you that your limits will not be effective until you lock Parental
Controls.

2. Press MENU to continue.

3. Highlight and select V-Chip TV Rating Limit.

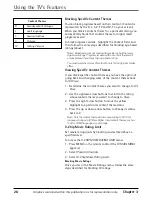
4.   Use the arrow buttons and the OK button on your remote to change the status

of a TV program rating or content theme from View to Block.

Changing the status of TV program limits is described in more detail later in the
chapter.

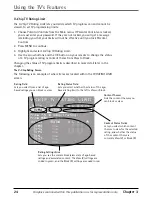
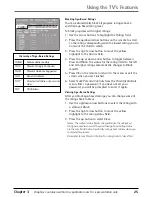
The V-Chip Rating Screen

The following is an example of where items are located within the TV RATING LIMIT
screen.

- - Content - -

V-CHIP TV RATING LIMIT

Rating Status
 

TV-MA 

VIEW


^


D L S V FV


V V V

RATING STATUS
 TV-MA 

View

 TV-14 

View

 TV-PG 

View

 TV-G 

View

 TV-Y7 

View

 TV-Y 

View


D L S V FV


V V V

 V V V V 
 V V V V 

         V

Press ^/v to select rating.
Press MENU to exit.

Rating Settings Area

Lets you see the current block/view state of age-based
ratings and associated content. The View (V) settings are
coded in green, and the Block (B) settings are coded in red.

Rating Field

Lets you select from a list of age-
based ratings you can block or view.

Rating Status Field

Lets you select whether the status of the age-
based rating limit to the left is View or Block.

Content Themes

Lists the content themes you
can block or view.

Content Status Fields

Lets you select which content
themes to view for the selected
rating, and whether the status
of the content theme is
currently View (V) or Block (B).

Summary of Contents for 36F530T - 36" TruFlat TV

Page 1: ...Television User s Guide Changing Entertainment Again ...

Page 2: ... au fond Refer to the identification rating label located on the back panel of your product for its proper operating voltage FCC Regulations state that unauthorized changes or modifications to this equipment may void the user s authority to operate it Caution Using video games or any external accessory with fixed images for extended periods of time can cause them to be permanently imprinted on the...

Page 3: ... This G LINK Cable 7 How to Find the Remote Sensor 7 Placing the G LINK Wands 7 Plug in the TV 8 Put batteries in the remote 8 How to Use the Remote Control to Complete the Initial Setup 8 Turn on the TV 8 Set the Menu Language 8 Complete Auto Channel Search 9 The GUIDE Plus System Setup 9 Downloading Data 10 What to Expect 11 Chapter 2 Using the Remote Control Button Descriptions for TV Mode 12 B...

Page 4: ... Feature 21 Parental Controls and V Chip 23 How V Chip Works 23 V Chip TV Rating Limit 24 Blocking Specific Content Themes 26 Viewing Specific Content Themes 26 V Chip Movie Rating Limit 26 V Chip Unrated Program Block 27 Channel Block 27 Front Panel Block 27 Lock Unlock Parental Controls 27 Chapter 4 Using the TV s Menu System Audio Menu 28 Picture Quality Menu 29 Screen Menu 30 Using Closed Capt...

Page 5: ...wn the middle of the TV If your antenna uses 300 ohm twin lead cables do not coil the cables Also keep the twin lead cables away from audio video cables Important Stand and Base Safety Information Choose the location for your TV carefully Place the TV on a stand or base that is of adequate size and strength to prevent the TV from being accidentally tipped over pushed off or pulled off This could c...

Page 6: ...and to the INPUT2 VIDEO jack on the back of the TV 2 Connect your TV to your VCR Connect a coaxial cable to the CABLE ANTENNA jack on your TV and to the Output Jack on your VCR sometimes labeled OUT TO TV Note If your VCR has A V input jacks you can connect your TV to your VCR using audio video cables for better quality 3 Connect cable or antenna to your VCR Connect the coaxial cable from your cab...

Page 7: ...ction The left audio connector is usually white VIDEO Provides composite video connection The video connector is usually yellow S VIDEO Provides better picture quality than the video jacks because the color part of the signal is separated from the black and white part of the picture When using S VIDEO make sure to connect left and right audio cables to the INPUT1 AUDIO Input jacks INPUT2 VIDEO AUD...

Page 8: ...onsole VIDEO Receives video from another component such as a VCR camcorder or video game console Front Panel Buttons If you cannot locate your remote you can use the front panel buttons of your TV to operate many of the TV s features MENU Brings up the Main menu Also returns you to the previous menu Press and hold for two seconds to access the GUIDE Plus system CH v Scans down through the current ...

Page 9: ...s G LINK cable How to Find the Remote Sensor You have to place the G LINK wands in front of the remote sensor on the VCR and or cable box Some cable boxes and VCRs have the remote sensor labeled on the unit If the remote sensor isn t labeled on your VCR and or cable box you need to use the remote control that came with the VCR and or cable box to locate the sensor 1 Turn off the VCR and or cable b...

Page 10: ...s the arrow buttons on the remote to highlight one of the items listed on the screen Use the up or down arrow button to move up or down Use the right or left arrow button to move right or left To select the item that you ve highlighted press OK Note Highlighted means that the menu item stands out from other menu items on the list appears darker brighter or a different color Turn on the TV Press TV...

Page 11: ...tup The GUIDE Plus system is an on screen interactive program guide that lists what shows are on TV in your area In order to receive program listings you need to complete the following steps The G LINK cable must be connected to the back of your TV and the wands must be placed in front of the remote sensor on your cable box and or VCR in order for the GUIDE Plus system to work go back to page 7 fo...

Page 12: ...l settings are complete highlight Yes end setup and press OK If your cable box and or VCR code testing failed you should see INCOMPLETE where the cable box and VCR codes are listed Once setup is complete additional screens appear If any settings are incomplete or incorrect highlight No repeat setup process and press OK Follow the instructions on the screen You can choose to view a demo of the GUID...

Page 13: ...he GUIDE Plus system appears with all of your TV program listings If the program information hasn t been sent to your TV yet an outline of the GUIDE without TV program listings will appear on the screen Program information is usually sent to your TV at night If the TV detected that you have multiple cable companies in your area you will need to select a channel lineup Features of the GUIDE Plus sy...

Page 14: ...IDE again to remove it from the screen INFO Brings up the channel banner INPUT Toggles through the available input sources VID1 SVID1 VID2 CVID2 FRNT and current channel MENU Brings up the Main menu You can also press and hold for 2 seconds to display the GUIDE Plus system MUTE Reduces the TV s volume to its minimum level Press again to restore the volume OK When in the menu system selects highlig...

Page 15: ...st brands of remote controllable components The remote is already programmed to operate most RCA GE and Proscan components Notes The TV button can t be programmed on this remote The remote may not be compatible with all brands and models of components It also may not operate all functions of the remote that came with your component Find Out If You Need to Program the Remote To determine whether th...

Page 16: ...rn off then the remote can t be programmed to operate that component Note Each time you press PLAY the remote sends about 10 sets of codes Therefore you might have to press the PLAY button up to 20 times If the component you want to operate does turn off 1 Press and release REVERSE then wait 2 seconds Repeat this step until the device turns back ON 2 To finish press and hold STOP until the indicat...

Page 17: ...ou want the remote to operate the TV you would press the TV button to put the remote into TV mode before you could operate the TV 1 Press the appropriate component button DVD TV VCR to set the remote to operate the component 2 Press ON OFF to turn the component ON or OFF 3 Use the remote buttons that apply to that component Note If you keep pressing buttons and nothing happens the remote is probab...

Page 18: ...005 2013 2015 2033 2053 2112 Sanky 2104 2132 Sansui 2010 2092 2111 2123 Sanyo 2011 2013 2023 Scott 2012 2015 2025 2032 2038 2065 2093 2116 Sears 2011 2014 2021 2023 2048 2049 2050 2051 2055 2056 2107 2118 Sharp 2017 2029 2094 2095 2096 2097 2132 Shintom 2004 2056 2061 2098 Shogun 2013 Signature 2132 Singer 2021 2061 2128 Sony 2004 2098 2099 2119 STS 2021 2107 Sylvania 2021 2022 2026 2062 2063 2065...

Page 19: ...tem and tune to the channel displayed in the video window Press CLEAR to exit the GUIDE Plus system and return to the original channel The GUIDE Plus System Menu Bar The GUIDE Plus system offers eight different options on the Menu bar Grid Sort News Schedule Messages Promotions Channels and Setup To access the Menu bar 1 Press GUIDE to access the GUIDE Plus system 2 Press MENU or use the up and do...

Page 20: ...ere you are in the GUIDE Plus system Be sure to look at the action bar before pressing the command numbers When highlighting the program the following Action buttons appear Watch Press 1 on the remote to place a timer in the Schedule for the TV to turn on and tune to the program highlighted in the channel listing Go To Press 2 on the remote to bring up the direct dial box and enter the number of t...

Page 21: ...to browse through the list one page at a time 2 Press the right arrow button or INFO button to see full text Schedule menu selection Schedule menu action buttons Schedule The Schedule menu allows you to alter timers for either viewing or recording programs Schedule Menu Action Buttons When viewing the Schedule menu these Action buttons appear Remove Highlight the Watch or Record timer you wish to ...

Page 22: ...mation You can do the following in the Setup Menu Change system settings Confirms the settings you completed in the GUIDE Plus system setup are correct Review options Displays the GUIDE Plus auto display options On Automatically displays the GUIDE Plus system when you press the ON OFF button on the remote Off Disables the GUIDE Plus system from being displayed when you press the ON OFF button on t...

Page 23: ...P Second Audio Program information Displayed when the Sleep Timer has been set 00 00 Displayed to count down time left on the commercial skip SKIP timer 12 01 ESPN 60 SAP 00 00 Why You Should Use the Auto Tuning Feature The auto tuning feature tunes the TV to the correct channel for different components you have connected to your TV like a VCR or DVD Player When you set up auto tuning in the menu ...

Page 24: ...nt is connected to the CABLE ANTENNA jack on the back of the TV and you want the TV to tune to channel 3 when you press the corresponding button on the remote Reminder make sure the component s Channel 3 4 switch is set to channel 3 Channel 4 Component is connected to the CABLE ANTENNA jack on the back of the TV and you want the TV to tune to channel 4 when you press the corresponding button on th...

Page 25: ...dults and may be unsuitable for children under 17 It contains one or more of the following content themes crude indecent language L explicit sexual activity S or graphic violence V TV 14 Parents Strongly Cautioned Contains some material that many parents would find unsuitable for children under 14 Parents are strongly urged to exercise greater care in monitoring this program and are cautioned agai...

Page 26: ...n the chapter The V Chip Rating Screen The following is an example of where items are located within the TV RATING LIMIT screen Content V CHIP TV RATING LIMIT Rating Status TV MA VIEW D L S V FV V V V RATING STATUS TV MA View TV 14 View TV PG View TV G View TV Y7 View TV Y View D L S V FV V V V V V V V V V V V V Press v to select rating Press MENU to exit Rating Settings Area Lets you see the curr...

Page 27: ... watch 3 Press the right arrow button to move the yellow highlight to the Status field 4 Press the up or down arrow button to toggle between View and Block The status for the rating listed to the left and all higher ratings automatically changes to Block and B 5 Press OK on the remote to return to the menu or exit the screen when you are finished 6 Select Lock Parental Controls from the Parental C...

Page 28: ...ption of going back and changing some of the content themes back to V View 1 Determine the content themes you want to change to V View 2 Use the up down arrow buttons to scroll to the rating whose content theme you want to change to View 3 Press the right arrow button to move the yellow highlight to a particular content theme status 4 Press the up or down arrow button to change its status back to ...

Page 29: ...lock If you don t the channel block will not take effect Note If you have a digital cable box channels 126 999 can be blocked but will not be removable from your scan list Front Panel Block Selecting this option lets you block disable or unblock enable the TV s front panel The remote still tunes to any channel When using this as a Parental Control method remove access to any remote that is capable...

Page 30: ...ntly adjust volume control Second Audio Program SAP Plays the program s audio in a second language if one is available The word SAP appears on the TV when you tune to a program that is broadcast with SAP information SAP audio is broadcast in mono SAP is also used to broadcast a program s audio with descriptions of the video for the visually impaired Audio Output Speakers Displays a choice list tha...

Page 31: ...ck of your TV The next time you tune to the component the picture changes according to the settings you created previously Picture Presets Displays a choice list that lets you select one of three preset picture settings Bright Lighting Normal Lighting Soft Lighting or Personal Picture Preset Choose the setting that is best for your viewing environment Auto Color Displays a choice list that lets yo...

Page 32: ... to adjust the picture tilt Using Closed Captioning Many programs are encoded with closed captioning information which lets you display the audio portion of a program as text on the TV screen Closed captioning is not available on all channels at all times Only specific programs encoded with closed captioning information are applicable When a program is closed captioned the CC icon is displayed in ...

Page 33: ...plays a control panel that lets you edit your Normal channel list and choose a six character label for each channel Follow the on screen directions to enter your channels and other information Channel Use the up and down arrows to scroll up and down through the channels available via your antenna You can enter the channel number directly using the number buttons Normal List Only the channels inclu...

Page 34: ...utomatically Reminder you must turn the schedule On The on screen directions guide you through the steps needed to set the schedule Set Time Displays a control panel that lets you enter the current time The on screen directions guide you through the steps needed to set the time If your GUIDE Plus system is set up it will automatically update your time and this option will not appear MAIN MENU 1 Au...

Page 35: ... front panel controls by selecting the Front Panel Block in the Parental Controls menu and choosing Unblock Controls don t work If you re using the remote control press the TV button first to make sure the remote is in TV mode The front panel controls may be locked disabled Use the remote control to unlock the front panel controls by selecting the Front Panel Block in the Parental Controls menu an...

Page 36: ...able to the CABLE ANTENNA jack tune the TV to channel 3 or 4 whichever channel is selected on the 3 4 switch on the back of your VCR Also check to make sure the TV VCR button on the VCR is in the correct mode press the TV VCR button on your VCR If you re trying to watch content from a component that s connected to the TV like a DVD player or VCR press the INPUT button on the remote control until t...

Page 37: ...doesn t occur Check Schedule for timer conflicts Go to page 19 for instructions Make sure the wands of the G LINK cable are placed in front of the remote sensor s on the component s Make sure your VCR is turned off during the time you ve scheduled to record a program because the system turns the VCR on when it starts recording if it s already on when recording starts the system will turn it off Ma...

Page 38: ...ing Care and Cleaning CAUTION Turn OFF your TV before cleaning You can clean the TV as required using a soft lint free cloth Be sure to occasionally dust the ventilation slots in the cabinet to help assure adequate ventilation The TV s screen may be cleaned with a soft lint free cloth as well Take care not to scratch or mar the screen If necessary you may use a cloth dampened with warm water Never...

Page 39: ...thin the geographic territory covered by an Authorized RCA Television Service Center If not you must take your television to the Service Center location at your own expense or pay for the cost the Service Center may charge to transport your television to and from your home To identify your nearest Authorized RCA Service Center ask your dealer visit www rca com look in the Yellow Pages or call 1 80...

Page 40: ...DENTAL OR CONSEQUENTIAL DAMAGES RESULTING FROM THE USE OF THIS PRODUCT OR ARISING OUT OF ANY BREACH OF ANY EXPRESS OR IMPLIED WARRANTY ON THIS PRODUCT THIS DISCLAIMER OF WARRANTIES AND LIMITED WARRANTY ARE GOVERNED BY THE LAWS OF THE STATE OF INDIANA EXCEPT TO THE EXTENT PROHIBITED BY APPLICABLE LAW ANY IMPLIED WARRANTY OF MERCHANTABILITY OR FITNESS FOR A PARTICULAR PURPOSE ON THIS PRODUCT IS LIMI...

Page 41: ... ft ANT200 Part No VH913 Price SCTV4000C Remote Control This is the remote control that came packed with your TV Replacements or spares can be ordered as needed 2 way Signal Splitter helps you connect to a second TV or VCR Amplified VHF UHF FM Antenna allows you to easily switch from the antenna signal to cable or satellite easily without disconnecting antenna Component Video Cables Triple cable u...

Page 42: ......

Page 43: ......

Page 44: ......

Page 45: ......

Page 46: ......

Page 47: ......

Page 48: ...if not installed and used in accordance with the instructions may cause harmful interference to radio communications However there is no guarantee that interference will not occur in a particular installation If this equipment does cause harmful interference to radio or television reception which can be determined by turning the equipment off and on the user is encouraged to try to correct the int...

Page 49: ...Téléviseur Guide de l utilisateur Transforme encore le divertissement ...

Page 50: ...ution ou de blessure AVERTISSEMENT Afin de réduire le risque d incendie et de choc électrique ne pas exposer ce produit à la pluie ou l humidité Attention Afin de réduire le risque de choc électrique ne pas enlever le couvercle ou l arrière Ne contient aucune pièce réparable par l utilisateur Confiez l entretien à du personnel qualifié Ce symbole indique des instructions importantes accompagnant l...

Page 51: ...câble G LINK 7 Comment trouver le capteur de la télécommande 7 Placer les sondes du câble G LINK 7 Branchement du téléviseur 8 Insertion des piles dans la télécommande 8 Utilisation de la télécommande pour effectuer le réglage initial 8 Mise en marche du téléviseur 8 Réglage de la langue d affichage 8 Recherche automatique complète de canaux 9 Réglage du système GUIDE Plus 9 Téléchargement de donn...

Page 52: ...trôle parental et puce V 23 Comment fonctionne la puce V 23 L écran de limite des catégories TV 24 Blocage de thèmes particuliers 26 Pour visualiser les thèmes particuliers 26 Classification limite films puce V 26 Blocage des émissions sans code 27 Blocage des canaux 27 Blocage du panneau avant 27 Verrouillage déverrouillage des Contrôles des parents 27 Chapitre 4 Utilisation du systéme de menus d...

Page 53: ...enne utilise des câbles à deux fils 300 ohms évitez de les enrouler De plus maintenez les câbles à deux fils à l écart des câbles audio vidéo Informations de sécurité importantes concernant le support et la base Choisissez minutieusement l emplacement de votre téléviseur Placez le téléviseur sur une base ou un meuble suffisamment grand et solide pour que le téléviseur ne soit pas renversé poussé o...

Page 54: ...léviseur à votre magnétoscope Connectez un câble coaxial dans la prise CABLE ANTENNA de votre téléviseur et dans la prise de sortie de votre magnétoscope parfois marquée OUT TO TV Nota Si votre magnétoscope comporte des prises A V vous pouvez connecter votre téléviseur à votre magnétoscope en utilisant des câbles audio vidéo pour obtenir une meilleure qualité 3 Connectez le câble ou l antenne à vo...

Page 55: ... AUDIO Permet une connexion audio gauche Le connecteur audio droit est généralement blanc VIDEO Permet une connexion vidéo composite Le connecteur vidéo est normalement jaune S VIDEO Offre une meilleure qualité d image qu avec les prises vidéo parce que la portion couleur du signal est séparée de la portion noir et blanc de l image Si vous utilisez le S vidéo assurez vous de connecter les câbles a...

Page 56: ...d un autre composant comme un magnétoscope un caméscope ou une console de jeux vidéo Boutons du panneau avant Si vous ne trouvez pas votre télécommande vous pouvez utiliser les boutons du panneau avant de votre téléviseur pour activer de nombreuses fonctions de votre téléviseur MENU Affiche le menu principal du téléviseur Il vous ramène également au menu précédent Maintenez la enfoncée pendant deu...

Page 57: ...cteur Le capteur de télécommande de certains câblosélecteurs et magnétoscopes est identifié Si le capteur de télécommande n est pas identifié sur votre câblosélecteur et ou magnétoscope vous devez utiliser la télécommande fournie avec le magnétoscope et ou le câblosélecteur pour localiser le capteur 1 Éteignez le magnétoscope et ou le câblosélecteur 2 Tenez la télécommande pas celle fournie avec v...

Page 58: ...de Utilisez les touches à flèche vers le haut ou vers le bas pour vous déplacer vers le haut ou vers le bas Utilisez les touches à flèche vers la droite ou vers la gauche pour vous déplacer vers la droite ou vers la gauche Pour sélectionner l élément que vous avez mis en surbrillance appuyez sur OK Nota Lorsque l élément du menu est mis en surbrillance il se distingue des autres éléments de la lis...

Page 59: ... le guide de programmation interactif qui répertorie les émissions diffusées dans votre région Pour obtenir les horaires des émissions vous devez compléter les étapes suivantes Le câble G LINK doit être connecté à l arrière de votre téléviseur et les sondes doivent être placées devant le capteur de télécommande du magnétoscope et ou du câblosélecteur pour que le système GUIDE Plus puisse fonctionn...

Page 60: ... Yes end setup Oui terminer le réglage en surbrillance et appuyez sur OK Si le test de vérification de votre câblosélecteur et ou magnétoscope a échoué vous devriez vérifier la rubrique INCOMPLETE Incomplet dans laquelle sont répertoriés les codes du câblosélecteur et du magnétoscope Une fois le réglage terminé d autres écrans apparaissent Si des réglages sont incomplets ou incorrects mettez No re...

Page 61: ...e GUIDE Plus apparaît avec tous les horaires d émissions Si les informations concernant la programmation n ont pas encore été envoyées au téléviseur un sommaire du GUIDE sans les informations de programmation s affiche à l écran Les informations sont généralement envoyées au téléviseur pendant la nuit Si le téléviseur a détecté plusieurs câblodistributeurs dans votre localité vous devrez choisir u...

Page 62: ...al précédent GUIDE Affiche le système GUIDE Plus appuyez sur GUIDE pour l effacer de l écran INFO Affiche la bannière de canal INPUT Entrée Effectue un va et vient entre les sources d entrée disponibles VID1 SVID1 VID2 CVID2 FRNT et le canal en cours MENU Affiche le sommaire du téléviseur Vous pouvez également appuyer sur cette touche et la maintenir enfoncée pendant 2 secondes pour afficher le sy...

Page 63: ...on à commander la plupart des marques de composants télécommandables Elle est déjà programmée pour commander la plupart des téléviseurs et des récepteurs numériques satellites RCA GE et Proscan Nota La touche TV de cette télécommande ne peut être programmée Il se peut que cette télécommande ne soit pas compatible avec toutes les marques et tous les modèles de composants Il se peut également qu ell...

Page 64: ...posant Nota Chaque fois que vous appuyez sur PLAY la télécommande envoie approximativement 10 jeux de codes Vous pourriez donc avoir à appuyer jusqu à 20 fois sur la touche PLAY Si le composant que vous voulez commander s éteint 1 Appuyez sur la touche REVERSE puis relâchez la et attendez deux secondes Répétez cette étape jusqu à ce que le composant se RALLUME 2 Pour terminer appuyez sur la touche...

Page 65: ...seur appuyez sur la touche TV pour mettre la télécommande en mode TV avant de pouvoir commander le téléviseur 1 Appuyez sur la touche appropriée du composant DVD TV VCR pour régler la télécommande afin qu elle puisse commander le composant 2 Appuyez sur ON OFF pour ALLUMER ou ÉTEINDRE le composant 3 Utilisez les touches de la télécommande qui correspondent à ce composant Nota Si vous continuez d a...

Page 66: ...amsung 2005 2013 2015 2033 2053 2112 Sanky 2104 2132 Sansui 2010 2092 2111 2123 Sanyo 2011 2013 2023 Scott 2012 2015 2025 2032 2038 2065 2093 2116 Sears 2011 2014 2021 2023 2048 2049 2050 2051 2055 2056 2107 2118 Sharp 2017 2029 2094 2095 2096 2097 2132 Shintom 2004 2056 2061 2098 Shogun 2013 Signature 2132 Singer 2021 2061 2128 Sony 2004 2098 2099 2119 STS 2021 2107 Sylvania 2021 2022 2026 2062 2...

Page 67: ... et syntoniser le téléviseur au canal affiché dans la fenêtre de visualisation Appuyez sur CLEAR pour quitter le système GUIDE Plus et revenir au canal d origine Barre de menus du système GUIDE Plus Le système GUIDE Plus offre huit options différentes sur la barre des menus Grid Sort News Schedule Messages Promotions Channels et Setup Grille Tri Nouvelles Horaire Messages Promotions Canaux et Régl...

Page 68: ...ion avant d appuyer sur les numéros de commande Lorsque vous mettez l émission en surbrillance les boutons d exécution suivants sont disponibles Watch Regarder Appuyez sur le 1 de la télécommande pour placer un minuteur à l horaire afin que le téléviseur s allume et syntonise l émission mise en surbrillance dans l horaire des émissions Go To Aller à Appuyez sur la touche 2 de la télécommande pour ...

Page 69: ... la liste une page à la fois 2 Appuyez sur la touche à flèche vers la droite ou sur INFO pour voir l intégralité du texte Sélection du menu Schedule Boutons d exécution du menu Schedule Horaire Le menu Schedule vous permet de créer des minuteurs pour pouvoir regarder ou enregistrer des émissions Boutons d exécution du menu Schedule Lorsque vous visionnez le menu Schedule les boutons d exécution su...

Page 70: ...de réglage vous pouvez Change system settings Changer les réglages du système Confirme que les réglages que vous venez de terminer dans le système GUIDE Plus sont corrects Review options Affiche les options d affichage automatique de GUIDE Plus On Activé Affiche automatiquement le système GUIDE Plus lorsque vous appuyez sur la touche ON OFF de la télécommande Off Désactivé Désactive l affichage au...

Page 71: ...a fonction permettant de sauter SKIP les annonces publicitaires 12 01 ESPN 60 SAP 00 00 Pourquoi utiliser la fonction de syntonisation automatique La fonction de syntonisation automatique syntonise le téléviseur au bon canal pour les différents composants qui lui sont connectés comme un magnétoscope un lecteur DVD etc Lorsque vous réglez la Syntonisation automatique dans le système de menus vous n...

Page 72: ...mposant est connecté à la prise CABLE ANTENNA à l arrière du téléviseur et vous voulez que le téléviseur syntonise le canal 3 lorsque vous appuyez sur la touche correspondante de la télécommande Rappel vérifiez que le sélecteur Channel 3 4 est bien réglé au canal 3 Canal 4 Le composant est connecté à la prise CABLE ANTENNA à l arrière du téléviseur et vous voulez que le téléviseur syntonise le can...

Page 73: ...lement Cette émission est destinée spécifiquement aux adultes et risque de ne pas convenir à des enfants de moins de 17 ans Elle contient un ou plusieurs des thèmes suivants langage indécent et vulgaire L activité sexuelle explicite S ou violence graphique V TV 14 Parents sérieusement mis en garde Cette émission contient des scènes que de nombreux parents considéreraient inadéquates pour des enfan...

Page 74: ...thème de Voir à Bloquer Le fait de modifier l état des codes d émissions est décrit en détails plus bas dans le chapitre L écran de Classification limite TV Voici un exemple de l emplacement des éléments dans l écran de limites des catégories LIMITE CODES TV Contenu LIMITES CODES TV Code État TV MA VOIR D L S V FV V V V CODE État TV MA Voir TV 14 Voir TV PG Voir TV G Voir TV Y7 Voir TV Y Voir D L ...

Page 75: ...3 Appuyez sur la touche à flèche vers la droite pour mettre en surbrillance le champ État 4 Appuyez sur les touches à flèche vers le haut ou vers le bas pour alterner entre Voir et Bloquer L état des catégories à gauche et en haut de la liste passe automatiquement à Bloquer et B 5 Appuyez sur la touche OK de la télécommande pour revenir au menu ou quitter l écran lorsque vous avez terminé 6 Sélect...

Page 76: ...n arrière et remettre certains thèmes sur V Voir 1 Déterminez les thèmes que vous voulez changer à V Voir 2 Appuyez sur la touche vers le bas pour atteindre la classification dont vous voulez changer le thème à Voir 3 Appuyez sur la touche à flèche vers la droite pour mettre en surbrillance un état de thème de contenu particulier 4 Appuyez sur les touches à flèche vers le haut ou vers le bas pour ...

Page 77: ...canal n entrera pas en vigueur Nota Si vous avez un câblosélecteur numérique les canaux 126 à 999 peuvent être verrouillés mais ne peuvent peut être pas être retirés de votre liste de balayage Blocage du panneau avant Cette option vous permet de bloquer désactiver ou de débloquer activer le panneau avant du téléviseur La télécommande syntonise néanmoins le téléviseur sur n importe quel canal Si vo...

Page 78: ...audio SAP Lit la piste sonore de l émission dans une autre langue si elle est disponible Le téléviseur affiche le mot SAP lorsque l émission que vous regardez est diffusée dans une seconde langue Le signal audio SAP est transmis en monophonie Le système SAP sert également à diffuser un signal audio comportant des descriptions de l image vidéo destinées aux malvoyants Sortie d audio et haut parleur...

Page 79: ...viseur La prochaine fois que vous utilisez le composant l image change selon vos réglages précédents Préréglages de l image Affiche une liste pour sélectionner l un des trois préréglages de l image Intensité forte Intensité normale Intensité faible ou Préréglage personnalisé Choisissez le réglage qui convient le mieux à votre environnement Ajustement auto des couleurs Affiche une liste d options v...

Page 80: ...ge Utilisation du sous titrage De nombreuses émissions sont encodées avec des sous titres ce qui vous permet d afficher la portion audio de l émission à l écran sous forme de texte Le sous titrage n est pas disponible en tout temps sur tous les canaux Seules les émissions encodées spécialement sont disponibles avec sous titrage Si une émission est sous titrée les lettres ST s affichent dans la ban...

Page 81: ... votre Liste normale de canaux et de choisir un nom de six caractères pour chaque canal Suivez les instructions à l écran pour introduire vos canaux et d autres informations Numéro de canal Utilisez les flèches vers le haut ou vers le bas pour parcourir la liste des canaux disponibles via votre antenne Vous pouvez introduire le numéro du canal directement au moyen des touches numériques Liste norm...

Page 82: ...éviseur Rappel vous devez activer l horaire Les instructions à l écran vous guident tout au long de la procédure de réglage de l horaire programmé Réglage de l heure Affiche un tableau de commande vous permettant de mettre l horloge à l heure Les instructions à l écran vous guident tout au long de la procédure de réglage de l heure Si vous avez activé le système GUIDE Plus l heure se règle automat...

Page 83: ...e du panneau avant dans le menu Contrôles des parents et en choisissant Débloquer Les commandes ne fonctionnent pas Si vous utilisez la télécommande appuyez d abord sur la touche TV pour vous assurer que la télécommande est en mode TV Les commandes du panneau avant sont peut être verrouillées désactivées Utilisez la télécommande pour déverrouiller les commandes du panneau avant en sélectionnant Bl...

Page 84: ...se CABLE ANTENNA syntonisez le téléviseur au canal 3 ou 4 selon le canal sélectionné sur le sélecteur 3 4 à l arrière de votre magnétoscope Vérifiez également si le bouton TV VCR du magnétoscope est dans le bon mode appuyez sur le bouton TV VCR de votre magnétoscope Si vous essayez de visionner le contenu à partir d un composant connecté au téléviseur comme un lecteur DVD ou un magnétoscope appuye...

Page 85: ...grammez une émission pour la regarder ou l enregistrer rien ne se passe Vérifiez s il n y a pas un conflit horaire Voir les instructions à la page 19 Assurez vous que les sondes du câble G LINK sont en place à l avant du des capteur s de la télécommande sur le s composant s Assurez vous que votre magnétoscope est éteint lorsque vous programmez une émission pour l enregistrer car le système allume ...

Page 86: ... Entretien et nettoyage ATTENTION ÉTEIGNEZ le téléviseur avant le nettoyage Vous pouvez nettoyer le téléviseur au besoin en utilisant un chiffon doux non pelucheux N oubliez pas de dépoussiérer de temps à autre les fentes d aération du boîtier pour assurer une ventilation adéquate L écran du téléviseur peut également être nettoyé avec un chiffon doux non pelucheux Veillez à ne pas égratigner ni gâ...

Page 87: ... dans un territoire géographique couvert par le centre de service agréé pour les téléviseurs RCA Dans le cas contraire vous devez apporter votre téléviseur à vos frais au centre de service ou payer les frais facturés par le centre de service pour le transport de l appareil entre votre domicile et le centre Pour connaître le centre de service autorisé RCA le plus près de chez vous demandez à votre ...

Page 88: ... PRODUIT OU DE L INOBSERVATION DE QUELQUE GARANTIE QUE CE SOIT IMPLICITE OU EXPLICITE POUR CE PRODUIT CETTE EXONÉRATION DE GARANTIES ET LA PRÉSENTE GARANTIE LIMITÉE SONT RÉGIES PAR LES LOIS DE L ÉTAT D INDIANA SAUF POUR LES DISPOSITIONS PROHIBÉES PAR LES LOIS APPLICABLES TOUTE GARANTIE IMPLICITE DE QUALITÉ MARCHANDE OU D ADAPTATION À UN USAGE PARTICULIER RELATIVE À CE PRODUIT EST LIMITÉE À LA PÉRI...

Page 89: ...n la disponibilité Si nécessaire nous expédierons un modèle de remplacement DT6DC 1 82 m DT12DC 3 6 m ANT200 VH913 SCTV4000C Télécommande C est la télécommande qui est livrée avec votre téléviseur Vous pouvez commander des télécommandes de remplacement ou supplémentaires au besoin Répartiteur de signal bidirectionnel Il vous permet de connecter un second téléviseur ou magnétoscope Antenne VHF UHF ...

Page 90: ......

Page 91: ......

Page 92: ......

Page 93: ......

Page 94: ......

Page 95: ......

Page 96: ...ence et s il n est pas installé et utilisé conformément aux directives il peut causer une interférence nuisible dans les communications radio Cependant il est impossible de garantir qu aucune interférence ne se produira dans une installation particulière Si cet équipement cause un brouillage de la réception de radio ou de télévision que vous pouvez déterminer en éteignant puis en rallumant l appar...

Reviews: